


I’ve been thinking a lot about satin stitch lately. It’s probably the most question-provoking stitch out there. In concept, it isn’t a difficult stitch: really, when we satin stitch, all we’re doing is lining up straight stitches parallel to each other, to cover an area. Still, it’s not as easy as it sounds, is it?
The other day, I started browsing through articles on satin stitch here on Needle ‘n Thread, just to see if I’ve ever covered anything really meaningful and instructive about this glorious stitch – anything that people could really get their teeth into (or their fingers) and conquer once and for all the satin stitch. I came up with a lot of articles and a lot of thoughts on the stitch. It would take too long to recap too many points about satin stitch all in one place, so today, through pictures, I’m going to talk about materials that can be used to achieve a nice satin stitch. You can click on the photo to be taken to the blog post related to each photo.
This is the thing about satin stitch: it can look Really Good on an embroidered piece, or… it can look Really Bad. But this good or bad doesn’t necessarily have to do solely with the skill of the embroiderer. Often, the outcome of satin stitch (and with any embroidery, really!) depends upon the materials used. Are you using the right materials to achieve the look you want? That’s the question.
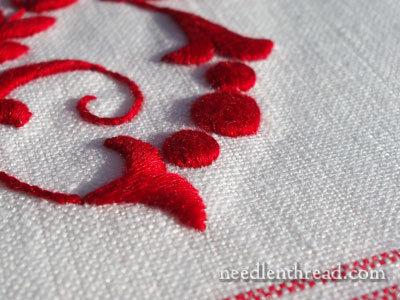
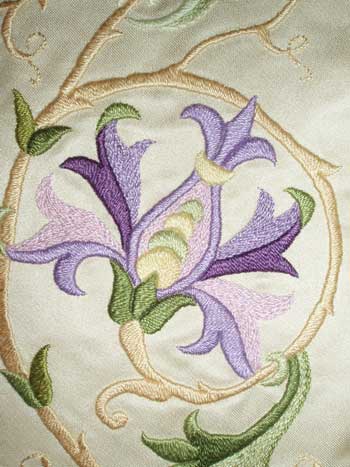
As far as threads are concerned, almost any thread can be used to make a beautiful satin stitch. Cottons such as coton a broder and floche (floche is used in the photo above) create particularly nice satin stitches when worked on a firmly woven fabric like a very high count linen, cotton, or cotton sateen.
Regular stranded cotton can be used to create a very nice satin stitch as well. But the key to achieving a smooth stitch is using one strand of cotton floss and covering small spaces. Trying to fill up a large area of satin stitch with multiple strands of stranded cotton generally turns out a satin stitch that looks ruffled, lumpy, and loose.
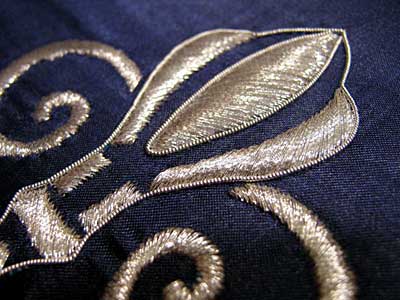
Wool makes a lovely satin stitch.
Crewel yarns require a tightly woven fabric to bite into – linen twill, high count linen, and medium count linen (30’s and higher) lined with muslin will work well with crewel yarns. But … there’s another key to achieving a nice satin stitch when working with crewel threads. The needle must be right! A large crewel needle or chenille needle (larger than you think – a size #22 chenille, for example, is a Big Needle, but it’s ideal for working with one strand of crewel yarn) will help the yarn pass through the fabric without the stress that can cause pilling and fuzziness which flaws the look of the stitch.
Silk, of course, makes a Gorgeous satin stitch, whether working with stranded spun silk (as in the photo above)…
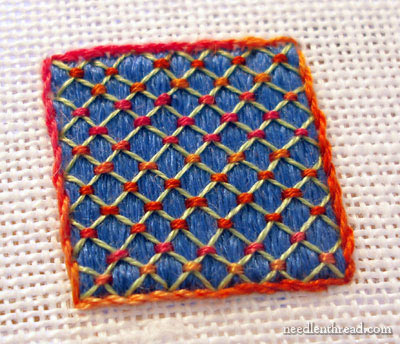
… or flat filament silk, behind the lattice work in the photo above…

… or twisted filament silk.
Whether using a fine silk, wool, cotton, or even metal threads, you always consider your fabric when working satin stitch in surface embroidery. The stitches must have something that holds them in place, and a loosely woven fabric just isn’t The Thing. If you think your fabric may be too lose to hold your satin stitches in place, then you need to back the fabric with a tightly woven muslin or linen.
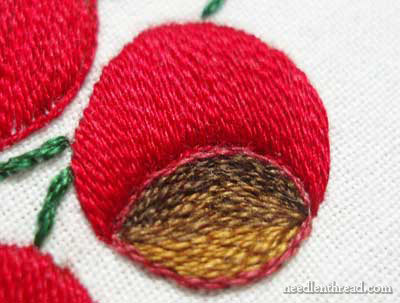
Specialty threads like Gilt Sylke Twist can achieve a gorgeous satin stitch effect. Gilt Sylke Twist is a “precious” thread – it’s somewhat expensive, and the original colors it came out in are not here forever, so once they’re gone, they’re gone. So to use it sparingly, instead of doing a proper satin stitch (where the thread crosses the length on the back as well), you can achieve a satin-stitched look by “laying” the stitches (coming up in your fabric right next to where you went down, to start the next stitch). This may not be “Satin Stitch Proper,” but it falls under the general umbrella of satin stitches.
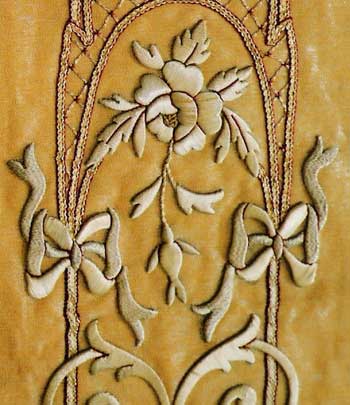
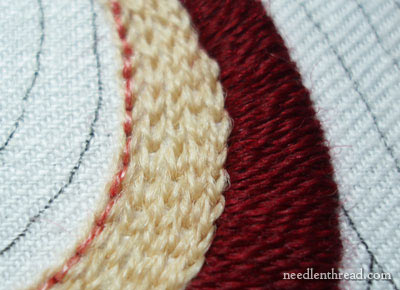
Metal threads can be used for a satin-stitched effect. Again, not “proper” satin stitch, and in fact, in the technique in the photo above, the metal thread itself never passes through the fabric at all. Instead, it is couched on each side of the card padding and then turned back to make another pass over the card padding, and then couched again on the other side. But the look is Satin Stitch, so we’ll put it under the umbrella, too.
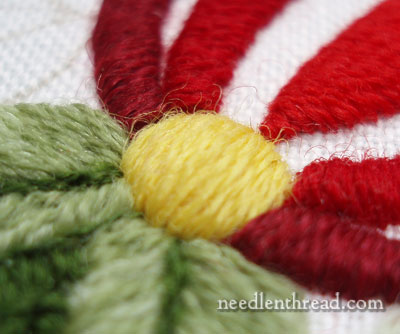
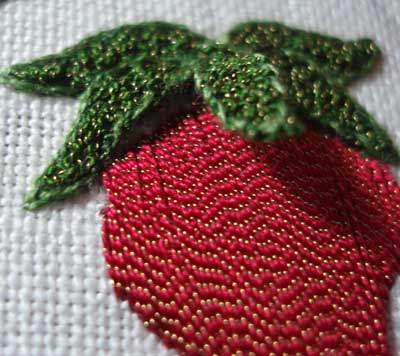
Some very fine metal threads can pass through the fabric, as they do in this project above. The design is stitched in a #1 silver Japanese thread, which is a very fine thread. It’s satin stitched over felt padding (on the thicker parts) and over tissue paper.
While this doesn’t cover ever type of thread on the market, you can see that just about any type of thread can take on the satin stitch.
It really is one of the most beautiful stitches, isn’t it?
What about you? Do you like satin stitch? Do you ever have any trouble with it? What are your biggest challenges when working satin stitch? If you could learn one thing about satin stitch, what would it be? I’d love your input! Leave a comment below if you’d like to add your two (or more) cents’ worth!
Enjoy your weekend! And don’t forget about the woad-dyed crewel wool give-away going on until Monday – if you haven’t signed up, do! The comments have been great fun to read!
An intresting fact that in all covents in South Africa the first stich that the Nuns taught the student was embrodiery satin stich. All respectable girls that came from convents can do satin stich
Regards
Leonie
satin stitch was the first stitch i mastered. it will always be one of my favorite stitches.
you showed some beautiful examples.
Dear Mary
Thanks by Satin Stitch Recaps, your stitches are perfect!
Yes, it’s not as easy as it sounds…
This is one of my favorite stitches, really a challenge on these last days, because I’m practicing a lot to do well, but with a strand of DMC cotton thread. The goal is to paint with the needle, over cotton muslin, etc
My problems are in the curves as always, when I must to change the direction of the stitch. So…I continue with the exercises!
Hugs
I do like the satin stitch. My biggest problem is keeping the edge nice and neat looking.
Stunning photos.
I love satin stitch as much as you do! I usually use DMC floche (n. 16) but it´s not easy to find in the market. One thread is really the secret.
Beside satin stitch and similar I like in french point de cordonet (http://www.jadsampler.fr/BB/LesPoints/Cordonnet.html) – used in monograms in the book recommended by you “Letters and Monograms from the House of Malbranche”.
Thank you very much for your always useful information.
nancy
HI, All! Thanks for your feedback on satin stitch!
Nancy – thanks for the link! I love overcast stitch, too. It’s a beeyooteeful technique for monogramming! It works best with non-strandable thread, like coton a broder or floche. MMmmmmmm…. puts me in mind to do some monogramming!!!
MC
I love a well-done satin stitch, but have hated (or at least been unhappy) with my results in the past. Satin stitch is what I’d call deceptively simple. I’ve had trouble with it due to instructions which left out the parts about outlining the area, and using some padding stitches inside the area if needed. To clarify – these instructions were in chain store kits. It wasn’t until I stopped by here and saw your instructions that I realized maybe it wasn’t *all* my doing, but lack of proper guidance. And I just learned when reading this post about using a bigger than expected needle for crewel wool.
I love the satin stitch!
I have learned a lot here, at Needle ‘n Thread.
Finally got it through my thick head about the padding. DMC cotton thread. Even a little layer of split stitches under satin stitches makes all the difference. (Split stitches in opposite direction of satin stitches.)
Single strand of thread…..
Biggest challenge, getting the angle of the thread right.
Now that I have played with the satin stitch some I can appreciate the effect of the fabric but still learning here too.
Yep, I love the satin stitch.
I absolutely adore the look of well-done satin stitches and use quite a bit of it in my work, but have horrible issues with it when trying to get circles or, more accurately, dots. They just never come out the way they do in the pictures – round, even, and perfectly puffy. I practice and practice, follow the directions to the letter, and still have yet to be successful. Is there a secret to getting them right? I am ready to tear my hair out (I’ve already torn my fabric!).
Breathtaking!!
I love satin stitch, too. Like you say, one of the “simpliest” — but requires practice, practice, and more practice. The “cordonnet” video was interesting — I think that is what is also referred to as “trailing”. I would be very interested to see a bit more information about the metal thread work on card (a couching technique?). I have only seen it as finished work, but never “in process”. Thanks for all the great photos!
Love the look of satin stitches, especially the strawberry in Gilt Sylk Twist. Can you explain more about “when it’s gone, it’s gone”?
It tough to get introduced to a gorgeous thread, only to find out it’s no longer available.
Thanks for a terrific summary!
–JoanneP
Hi, Joanne – Gilt Sylke Twist will (hopefully!) be around for a while, but the original colors were specially made from a supply of already-dyed silk that Au Ver a Soie had on hand. Once those colors are gone, they’re gone. But the thread itself is (again, hopefully!) here to stay, with new colors being introduced since the first batches were made. I think there are some new colors coming out in the near future. The thread industry is a rather precarious one – more precarious than we imagine. We walk into a shop and buy what we want, or order it online, but little do we realize how much work goes into creating one spool of specialty thread like Gilt Sylke Twist. The longevity of the thread depends on market demand as well as the resources to make the thread. So hopefully, GST will be around for a while – but the colors (especially the first run of colors when the thread was introduced) are limited. ~MC
Fantástico este artículo. Mi mayor problema con el punto de satén es que me queden los bordes bien perfilados. En estas fotografías se ven estupendos, en mis trabajos las redondas parecen tener pinchos y las rectas alguna que otra copa de vino. Un saludo.
Last week I was searching the net on satin stitch for a post that i had to make and here comes your post on satin stitch.Your website is an encyclopedia with everything available.
Oh, my, that couched gold thread (2nd photo from end) is soooo lovely!
My worst problem with satin stitch has always been getting the stitches exactly parallel. Using 1 strand of thread on very-high-count fabric helps a lot with this.
I’ve always loved satin stitch. It goes back to when I was growing up. My mother had a Lords Prayer sampler in the upstairs hallway that she had stitched when she was expecting me. It’s mainly outline and satin stitches and I would just stare and stare at it, fascinated by the smooth satin stitches. It also hung in their last house for 37 years. I guess that’s what started me to becoming a needle worker!
Thankyou so much – this is brilliant!
I’d love to hear more about unusual padding techniques and unusual ‘laying’ where satin stitch would normally be used as well. That was just fascinating. Tissue paper! Couching on the edges of the card!
If I could learn one thing about Satin Stitch, it would be to figure out what to look at when inserting the needle to help get a straighter line in my finished stitching.
Excellent recap on satin stitching. I just did a small project and use satin stitching. I though my final result looked a little clunky, so I will definitely give the single thread idea a try in the future.
It was very interesting to read about the various threads to try. I can find DMC cotton floss where I live, but not much else. I’m wondering if you can suggest various online vendors who can provide some of the various threads you discuss in your blog.
Thanks, Mona
This was a wonderful and interesting article! These are the tips and hints that are so basic but integral to successful stitching. However, these are the tips that our mothers and grandmothers and great-grandmothers have passed on, but somehow get lost through the years. Thank you for such a great reminder.
I, too, have a terrible time making the edges neat and even. No matter how slowly and carefully I go. They are still wobbly. Is there a secret? I swear I take my needle up and down right on the line but there it is-jaggedy sad edge. I know it takes practice but….. 🙂
Hmmm, I have trouble with: 1) keeping the stitch direction correct, especially around curves, 2) making the edges nice and even, 3) having consistent padding, and 4) stitching on the proper fabric. I think that just about covers every problem with satin stitch! I love stitching with silk and cotton, especially floche or coton a broder, but haven’t tried with wool, at least not yet.
I appreciate you mentioning the needle size. So many people always think that “smaller is better” when it comes to needles but it really isn’t, for the reasons you mention.
Your photos are beautiful! Thanks!
Thanks for this great information – to be honest I hadn’t thought a lot about the weave of the fabric! My satin stitch is much better since I started using only 1 thread of cotton with a small needle.
Great info! I’m working on one of the first Hungarian patterns you posted way back when: https://needlenthread.wpengine.com/2007/10/free-embroidery-pattern-hungarian-doily.html I’m wondering – when you have satin stitched areas that butt up against each other, how do you decide how to outline them? Like the yellow daisies in this pattern; I can’t figure out how best to go about outlining before satin stitching. Since the petals share a common line, do you do a double split-stitch outline on either side of the shared line? Love to have some comments about this aspect of satin stitching. Thanks!
Hi, Beth – I think the best way to go about it would be the same way you’d do what’s called “block shading” or block satin stitch. I would start on the outside of the design and outline only the uppermost line (the one farthest to the outside). Then do your satin stitching on that section, then work the next section in, outlining only the “outside” line – which is the line right next to the inside line of the previous section, that’s already been satin stitched) and then satin stitch that section. That way, each section sits up almost on top of the previous section, but not really noticeably – it just gives the finished slightly raised effect to the outside of the petals. The final section inside would have the outline around both the inner most and outer most line. You can reverse the order of stitching, too. Normally, the thing is not to outline all edges twice, but where two edges meet, decide which petal sits atop the other, and outline that petal. I hope that makes a little bit of sense. I’ll be doing a tutorial on block shading some time in October. I’m working a little project right now that demonstrates it. Hope that helps a little!
MC
Satin stitch was not a fav of mine — but now I think it was because of my impatience.
I have to always remember to Stop and Walk Away whenever doing something that seems to be not working at the time.
It works for all crafts and other parts of Life.
Hi,
I am embroidering on Silk organza with 3 strand YLI silk floss – I want to use silk – but it is lumpy with 3 strands. Any suggestions? What can I use to get flatter satin stitches? Thanks!
Hi, Kate – with satin stitch, one strand of floss generally works better, to get a smooth finish. However, if you’re going to use more than one strand at a time, a laying tool will help you keep the floss smooth. I have a video on using a laying tool under the how to videos. You don’t necessarily need an actual laying tool, though – you can get the same results using a large needle in place of the laying tool. – MC
Thank you!
I will try one strand and the laying tool. I loved this post – really made me think about my fabric and if it is stiff enough. I have been using tearaway stabilizer and tear it away after I have stitched my outlines – but I may try spraying my fabric with dissolved wash away stabilizer in water to stiffen it. I also use a milliner needle which may be too large – but I found the recommended John James needles way too tiny to hold well.
-Kate
Hi Mary! Do you have any information on point de cordonnet? I’m working on a monogram that references this technique. The link to the video in the comments (the jadsampler one) no longer works.
I am brand new to stitching and I wanted to try stitching a picture for a friend’s birthday.
I like the satin stitch a lot and was wondering what specific materials would I need for it? For example, what kind of background would I use or is there a specific thread?
Thank you!
Hi, Jessica – a fabric with a full weave and a high thread count works best, but it really depends on what you’re doing and what threads you’re using. In any case, if you’re venturing forth with regular DMC floss, something like a good cotton muslin will work fine. Use one strand of floss for the best results with satin stitch on this kind of fabric.
Fascinating! I think I am very late to this (2024) but this is great information.