


Over the past couple weeks, I’ve been testing a little embroidery piece that will be finished into something entirely useful. I’ve been using bullion knots. I love bullion knots!
Unfortunately, bullions get a bad rap as a difficult stitch. Yes, it’s true they can be a bit fiddly sometimes, but they’re not necessarily difficult. I think the biggest problem with bullions is the instructions that normally come with them.
Let’s chat a little bit bullion knots, shall we?
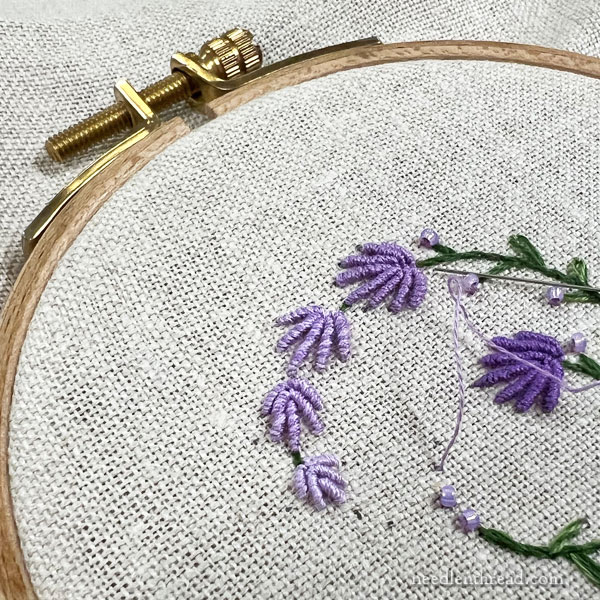
This little piece of embroidery is a sneak peek. It’s the next Stitch Snippet, before it was tweaked and altered a bit.
This part of the design (the top of the item we’ll be making) is simple and quick to stitch. It doesn’t look entirely like the photo above anymore, but the use of the bullions is pretty much the same. I’m working with two strands of DMC floss, and I’m using a milliner needle.
This needle – the milliner or straw needle – is so very helpful when it comes to making consistently good bullions. It’s not essential, but it helps! You can read about milliner needles and why they work well with bullions in this article. The same article also addresses other types of needles and what they’re used for in embroidery.
But besides the needle, the instructions you follow for bullions can really influence your relationship with them.
In most stitch dictionaries – especially anything written previous to about ten years ago – the typical diagram for a bullion knot shows the needle anchored into the fabric at two points – like I used in this article written back in 2011.
In that article, we were discussing the finished look of the bullion knot relative to the direction of wrapping the thread and the thread’s twist. (Nutshell: you’ll get a different look to the finished bullion depending on if you wrap clockwise of counter-clockwise, due to the twist in the the thread that you’re using.)
But that’s not how I typically make a bullion knot. I typically make bullion knots in the manner I used in this video – and as demonstrated in any instructions I’ve written for various projects (like Key to My Heart or Lavender Honey and similar project books where I used bullions).
If you use this approach to the bullion knot, you’ll find it is much easier, much less fiddly, and – I think – much more controllable than the typical “anchored needle” approach.
Practice!
If you have trouble with bullions, your best bet is to Practice!
Use a piece of scrap fabric in a hoop, and a needle (use a crewel needle if you don’t have a milliner on hand) and some thread. You can use stranded cotton (floss) – three strands works well – or you can use a non-stranded thread like perle cotton.
Practice bullions by following the video tutorial linked to above.
As you practice them, try this little tip: between each bullion that you make, hold your hoop up and let your needle drop towards the floor, so that your thread untwists itself. Often, the biggest obstacle to working a lot of a smoothly-executed bullions is over-twisted thread. Give your thread a chance to untwist itself after each bullion you make, and you’ll avoid the frustration that can develop when your thread is over-twisted.
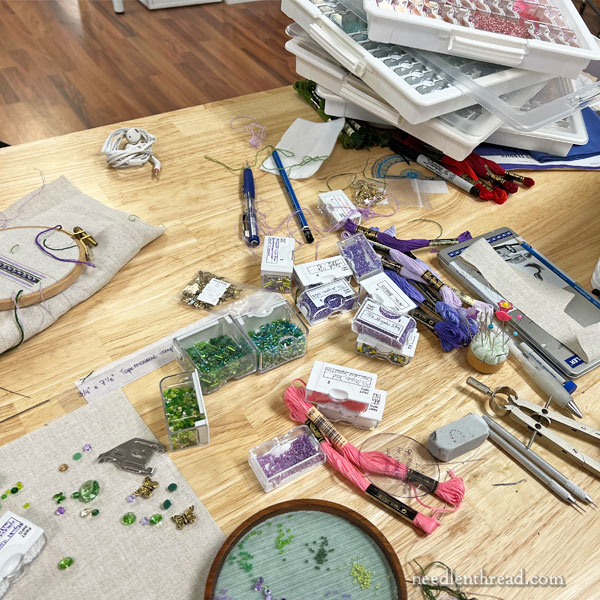
This is how you know things are back to normal in the studio: we’ve got the Working Mess building up!
We are finishing up a few samples for the first Stitch Snippet of 2024, and once they’re finished, we’ll be kitting the project. I don’t have a set launch date yet – much depends on the arrival of the various supplies for the kits. The kit will contain some specific specialty items which we’ve sourced from all around. It’s a great project! I can’t wait to show it all to you! So very many learning aspects associated with it…
Well, on that note, it’s time for me to get cracking and re-organize that mess. We’re gearing up for a wee bit of blizzard here in NE Kansas. We’ll see if it pans out as predicted. If it does, the studio will be exceptionally cozy over the next few days and we should be able to get a lot done!
Have a wonderful Monday!
This will be fun. My first attempt at bullions was in the “Wheat Five Ways” project, and because I used your technique, I found them very do-able. Looking forward to this next one! Jennifer
Dear Mary
Your tips on the bullion knot is so helpful I used to have problems with the stitch in the past, but as you so rightly say practice and more practice is the answer to getting the technique right. I’m intrigued by sneak peek of the new stitch snippet (that’s a mouthful, ha, ha). It looks delightful and it would be good practice to follow this project and get to know the bullion knot stitch. I love your desk it looks like mine. Thank you for sharing with us your new snippet and for the phosts and the useful technique for the bullion know stitch and the lovely photo of your work room.
Regards Anita Simmance