The topic of the back of embroidery projects can be a touchy one.
Many, many people in the stitching world have an opinion on the back of work. For lack of a better term off the top of my head, I’m going to use the phrase “Old School” in this discussion. When I think “Old School,” I think of my aunt. She was an Absolute Stickler about the back of her needlework. I was a kid during the Counted Cross Stitch Boom of the mid-80’s, and while Auntie dabbled in other types of needlework in her lifetime, she was an avid cross stitcher in the 80’s.
When she showed me how to do counted cross stitch back then, I remember her emphasizing the back of the stitching more than the front. It had to be perfect. Little parallel lines everywhere…
And yes, I might be older – I’ve passed the half century mark – but I don’t tend to be Old School when it comes to the back of embroidery. Embroidery isn’t done for the back of the work. Ever since I was a kid, I’ve always felt that people who flip your needlework over to inspect the back are looking for faults – and this has always annoyed me.
So I’m not here to nag you about the back of your embroidery.
BUT… (think of this as a mighty big but…)
…There are times when the back of the embroidery is more important than it would be otherwise, depending on the embroidery’s use.
Framed Embroidery is Different
If you’re embroidering something to frame, the back of the embroidery is not all that imperative, as long as nothing happens on the back that will be evident on the front. For example, if your ground fabric is white, it’s probably not a good idea to carry a thick black thread across the back of the work in a blank space where there’s no other embroidery on the fabric. That thread will show through, even in a framed piece.
Common sense pretty much dictates reasonable approaches to the black of your work.
The Question of Knots
Many stitchers say “never use knots” because knots show through to the front by making bumps! Ok. Well. That really depends. If you’re using a discrete knot and you know it’s not going to show through on the front with a bump – especially if you have heavier embroidery on the front of the work – then it doesn’t really matter if you use a knot.
“But the knot may come out and threaten the integrity of the work.” Mmmm. On a framed piece of embroidery, I don’t see that happening. Not much moves inside a frame. And even if the work did shift a wee bit, would it be enough to extricate a knot from a piece of thread? Not likely.
If you want to use a knot on framed work, most times, it doesn’t make a difference.
If you want to use a knot on unframed work, it usually doesn’t make that much of a difference, either. You need to make judgements using common sense to determine where and when you can do certain things like carry threads, use knots, and the like.
But back to the but…
When the Back Matters More
When you’re embroidering a piece of decorative table linen – or a household linen like a pillow case, a guest towel, a floursack towel, a sheet or something similar – your work isn’t framed, and the back is not covered. The back will be visible. The fabric will likely be laundered.
These considerations might change your approach to the back.
This doesn’t mean you should sweat it. Don’t lose sleep over the back of the work. And don’t feel like you have to avoid this type of embroidery because the bacK is somehow daunting because it’s exposed.
Precautions to Consider
Just take certain precautions to help you keep the back neat.
For example, you can avoid carrying threads without running them under the backs of stitches already in place. You can avoid large, bulging knots. Try to be aware of your thread as you stitch, so that you know if a knot has formed. Try to begin and end your threads neatly without a lot of excess thread hanging off your stitched areas.
And you can even choose different stitching approaches, keeping the back of the work in mind.
A Stitch Change
On the table runner that I’m working on right now, I’ve made a couple changes in my approach, because I wanted to minimize the build up on the back of the work.
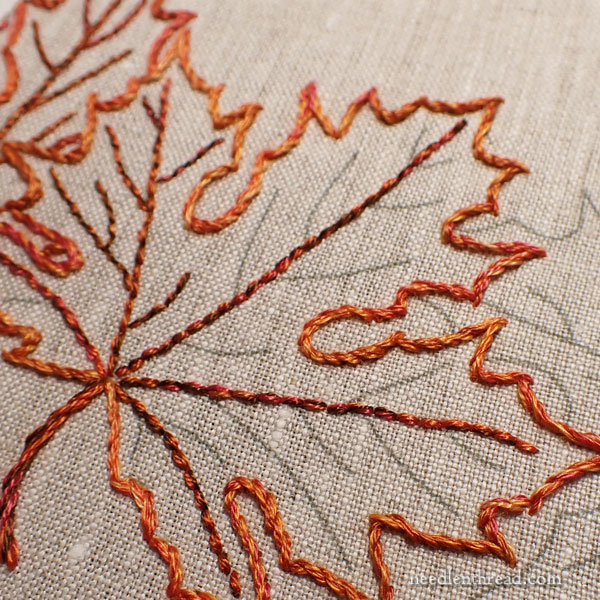
You may remember that the veins on the inside of the leaves – you can see them in the photo above – are worked in a whipped backstitch.
Backstitch on the front of the fabric forms a stem stitch on the back of the fabric:
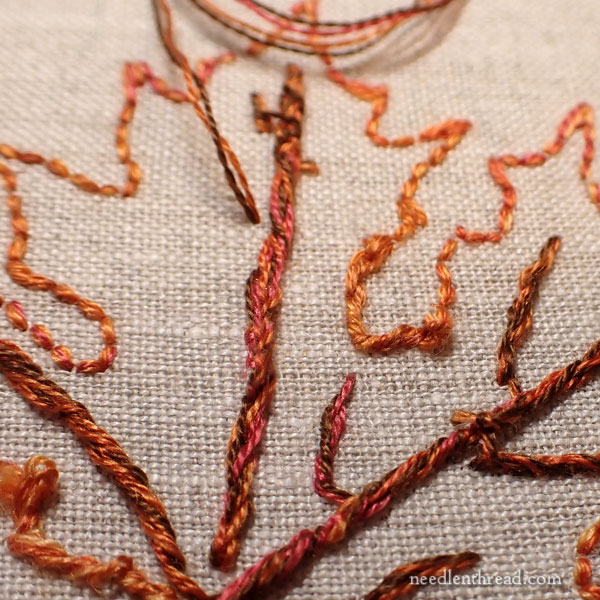
The main veins on the leaves comprise three strands of floss.
And three strands of floss make a heavy stem stitch, as you can see on the back of the embroidery in the photo above.
This is kind of bulky. And the bulk grows if I use those lines to carry threads or to end or begin threads by whipping around the backs of those stitches.
I didn’t really like the bulk, so I decided to change my approach to the backstitch.
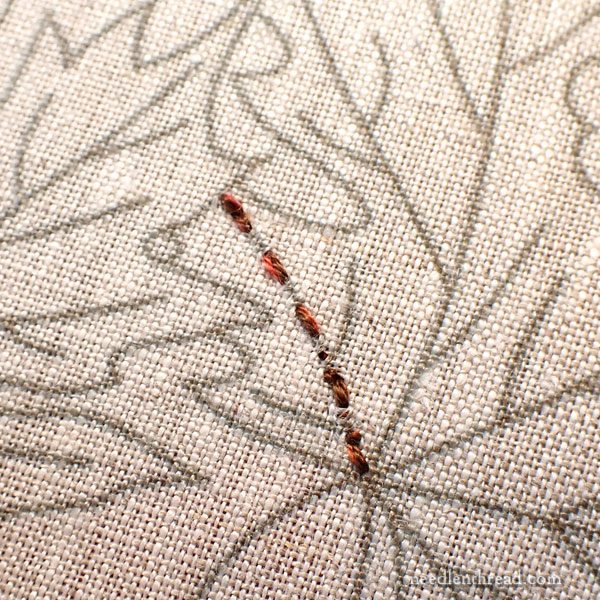
Instead of doing a regular backstitch, I switched to reverse running stitch.
With reverse running stitch, you work an equally sized and spaced running stitch in one direction down the line (shown above)…
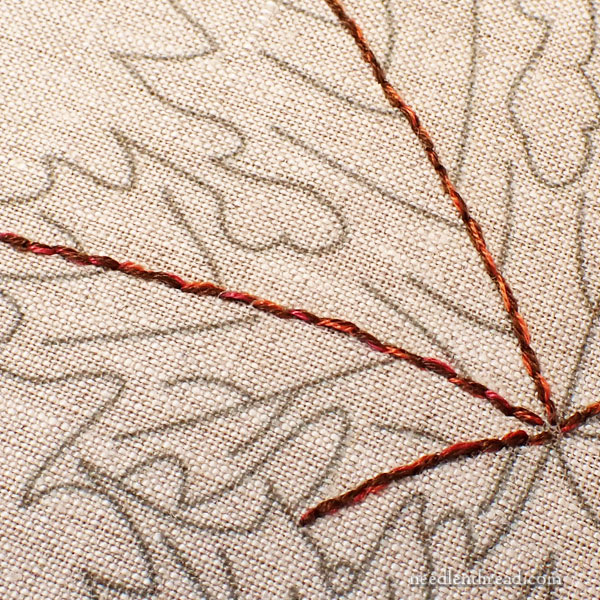
…and then you turn around and come back down the line, filling in the spaces between the running stitches.
On the front, it looks more or less just like backstitch.
The reverse running stitches may wobble a bit more than backstitch. I find I can make a much smoother backstitch line more easily than I can a reverse running stitch line. But since I’m whipping these stitches, if there’s a bit of a warble in the line, I’m not too concerned about that.
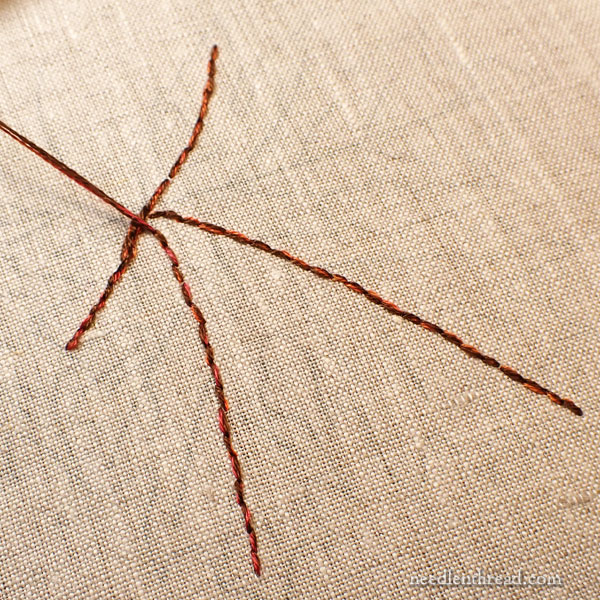
On the back of the embroidery in the photo above, you can see that the line created by the backs of the reverse running stitch also looks like a backstitch.
There’s a Whole Lot Less bulk than there would be with a regular backstitch.
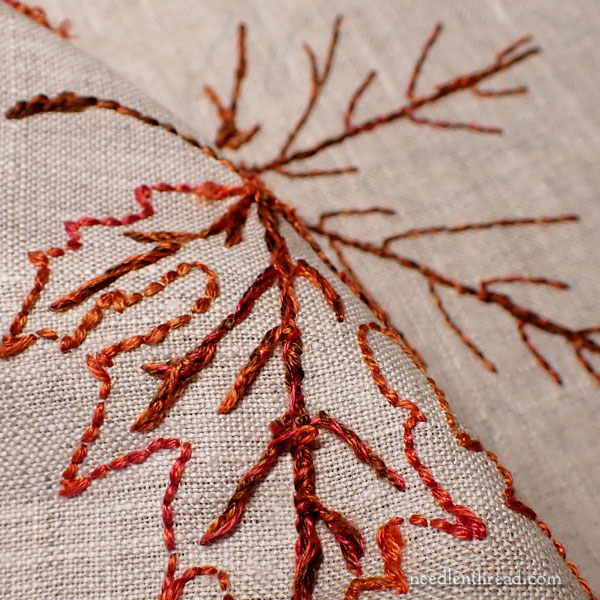
In the photo above, the front part of the photo shows the back of the regular backstitch worked with three strands of floss (forming essentially a stem stitch on the back of the work).
In the back of that photo, the finer lines you see are the back of the reverse running stitch, also worked in three strands of floss.
The back of the reverse running stitch looks much, much cleaner.
So I think that’s a good call, to switch to reverse running stitch instead of backstitch for the vein areas on the leaves. It will help keep the back of this embroidery a little neater, a little less bulky.
Starts & Stops
When it comes to starts and stops with this type of embroidery, there are a couple approaches:
You can use a knot to start, and when you stop a thread, you can whip the backs of the nearby stitches and do a small hitch knot around the end of your whipped length.
You can use a waste knot with tiny tacking stitches to start, and then stitch over the tacking stitches and trim the waste knot. And then you can use tiny tacking stitches in nearby stitched areas to end the thread, and stitch over the tacking stitches.
Or you can do a combination of both.
I prefer the latter approaches, because I don’t like the tails that must be left on starting knots (you never want to trim a tail too close to the knot), and because I don’t like running into knots with my needle as I embroidery, especially where lines merge.
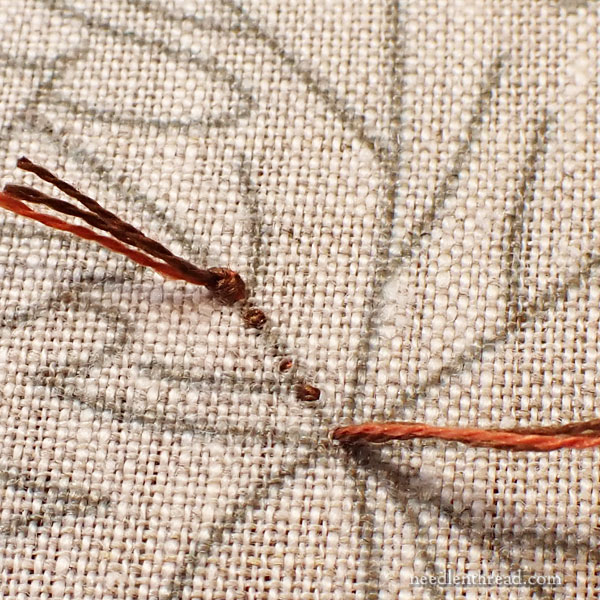
In the photo above, you can see the waste knot on the front of the fabric. From the waste knot, I took three tiny stitches spaced apart along the line, towards my starting point for the embroidery.
Then, I stitch towards the knot, covering those tiny stitches, and I trim the knot off.
That is a good, secure hold, and I’ve never had a problem with it not holding up in laundry or with general use.
To end my threads, if there is an adjoining design line or filling area that will be covered with embroidery, I work three or four tiny holding stitches along that line and trim the thread, and then I stitch over those holding stitches.
If there is not a place to end with holding stitches, I take the thread to the back, whip around the backs of the stitches and then work a tiny hight knot and cut the thread.
More Information & Tips on This Type of Embroidery
I wrote a project e-book called Floral Corners a long while ago, and it still is a best-seller here on the website. There’s also a set of ready-to-stitch towels with the designs from Floral Corners pre-transferred on them.
In the downloadable PDF for Floral Corners, I cover all kinds of stitching tips for this type of embroidery, including starting and stopping your threads, carrying threads, changing stitch directions, working sharp corners with different types of stitches – along with all the instructions for embroidering the designs.
That particular PDF is great for beginners who are just getting into this kind of embroidery for household linens and the like. It will answer a lot of your questions. And you don’t even necessarily have to work the designs! It just takes you step by step through how to stitch this type of design. You can read about Floral Corners here.


There’s horror stories of cross stitch being so neat on the back that it’s come back from the framers back side showing. Worse – stories of cross stitch mounted on sticky mounting board wrong side out. Fact? Fiction? No idea, but I could see it happening if a framer has zero knowledge of needlework.
I’m with you, on things that will be seen from the front only, the back isn’t the big deal some make it out to be. As long as things don’t show through or make lumps. Items like towels or pillowcases where the back will be seen, yes I do my best to keep it neat.
I’ve always wondered when the pristine back attitude came about. If you look at 15th, 16th, 17th, and 18th century embroidery, the backs often aren’t beautiful. I have a hypothesis that pretty back requirement was the hand-embroider’s backlash to machine embroidery, which can’t produce a neat back. By requiring a neat back, the hand embroiders differentiated themselves the cheaper machine stitched stuff.
I totally share your feelings about people flipping over a work to inspect the back. They’re hunting for things to critque.
Thank you for putting all these tips in one place! I love making my work practical which means household linens… which means towels, simple bags, table linens… which means the back shows and they WILL be laundered. Another recent project where the back mattered was embellishing newborn cotton knits where I wanted the back smooth on baby skin. The reverse running stitch is a wonderful idea!
I must confess that I love to look at the backs of embroideries. Not to make any judgements (“Judge not, lest ye be judged…”) but to see how others have solved problems/challenges. Backs are beautiful, too!
PS: Floral Corners is a wonderful pdf pattern and resource book.
Thank you, Mary for all you do
laura