About

Mary Corbet

writer and founder


I learned to embroider when I was a kid, when everyone was really into cross stitch (remember the '80s?). Eventually, I migrated to surface embroidery, teaching myself with whatever I could get my hands on...read more

Contact Mary

Connect with Mary


Archives

2025 (78) 2024 (135) 2023 (125) 2022 (136) 2021 (130) 2020 (132) 2019 (147) 2018 (146) 2017 (169) 2016 (147) 2015 (246) 2014 (294) 2013 (294) 2012 (305) 2011 (306) 2010 (316) 2009 (367) 2008 (352) 2007 (225) 2006 (139)
 

New Tulip Monograms (I – L) and News


Amazon Books

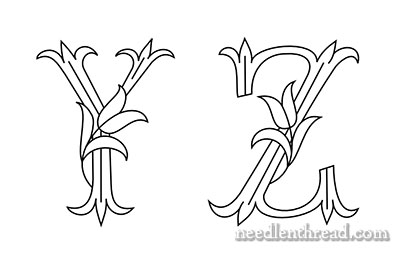
To start the week off, here are the next four letters of the Tulip Monograms – I, J, K and L.

I’m trying to crank these monogram embroidery patterns out for you as quickly as possible – I know there are quite a few of you waiting for some of the later letters in the alphabet. I think it’s better to keep the letters in order, though. There’s just something about alphabetical order for keeping things tidy!

So, without further ado, here’s I though L, followed by the PDF!

Monograms for hand embroidery, letters I though L - free printable
Continue reading “New Tulip Monograms (I – L) and News”

Unraveling the Secrets of the Pull Skein


All this talk about embroidery floss organization lately has raised some good questions from fellow stitchers, from newbies and experienced alike.

One recurring question has to do with the embroidery floss pull skein, and how to pull thread successfully from the pull skein without having to wrestle a knotted clump of embroidery floss to the ground to subdue it.

Let’s address that question today. I’m going to give you the key to unlock the secret of the pull skein! We’ll also discuss the whole notion of the “blooming” end of the embroidery floss.

how to pull embroidery floss from the skein
Continue reading “Unraveling the Secrets of the Pull Skein”

Glorious Dorset Buttons Galore!


I love Dorset Buttons.

I love their history.

I love their charm.

I love their versatility.

I just love Dorset buttons!

And I love what creative people are doing with Dorset buttons these days.

So, when Anita sent in photos of her latest adventures in Dorset-buttonry (I don’t really think that “buttonry” is a word, but it should be), I just knew I’d have to share them with you!

And, in case they inspire you to try some buttonry yourself, I’ve also included several links below to good Dorset button-related tutorials.

Handmade and embroidered Dorset buttons
Continue reading “Glorious Dorset Buttons Galore!”

Floss Pulling – One Strand at a Time


When you work with stranded embroidery floss (like DMC or Anchor cotton floss, stranded silks, and the like), it’s pretty standard procedure to separate the number of strands of floss, one at a time, from the whole thread of six, and then put the number you’re going to use back together again to stitch with them.

This is called stripping your embroidery floss, and I show you how to do that in this tutorial here.

Stripping your floss serves a purpose: it keeps the strands (if you’re using two or more) from twisting around each other, so that you get good and smooth coverage with every stitch.

Whether you’re doing counted work or surface embroidery – whether it’s cross stitch or stem stitch – stripping the floss makes a huge difference in the way your stitches look. It’s a good practice.

When I wrote about this thread organization system the other day, I made the comment that I like using precut threads hitched through a hole, because they allow me to pull out individual strands of floss without having to strip them from the rest of the threads (well, the comment was something to that effect, anyway). I don’t have to replace the unused portion of the strand. I can just pull out one tiny little thread at a time.

This garnered a bit of comment and a whole flood of questions via email, so I promised I would clarify.

And here’s the clarification of how this whole one-strand-at-a-time floss pulling trick works.

Separating one strand of embroidery floss at a time
Continue reading “Floss Pulling – One Strand at a Time”

Tulip Monograms for Hand Embroidery: E-H


Last week, I shared the printable for letters A – D in this tulip monogram alphabet with you.

If you missed that article and you want to collect the alphabet printables for this set, or you want to see one of the letters stitched, feel free to jump over to the A – D article. You’ll find the printable at the bottom of the page.

Here are the next four letters, E through H.

Tulip monogram for hand embroidery: E
Continue reading “Tulip Monograms for Hand Embroidery: E-H”

Thread Organizing for a Large Needlework Project – All Done!


Last week, I asked you all how you organize threads for large needlework projects – because, you see, I’ve gone off the deep end and I’ve set up a pretty ridiculously large project that will probably take me three hundred years to complete.

When I asked the question, I was already hooked into organizing the 200 colors required for this project – there are 95 solid colors in it, and 105 blended colors.

I found that the organizational aspect was actually kind of fun, but it took So Much Time. It was a project in itself! Still, I figure if I’m going to subject myself to a super-duper-long-range project, it makes good sense (based on the Principle of P’s: Prior Proper Planning Prevents Poor Performance) to organize thoroughly in advance.

So many of you offered great suggestions for organizing threads for projects! A couple of you mentioned the system that I’m using, which is called Annie’s Keepers. Today, I’ll show you that system, the parts involved, and how I’m using them for this particular project.

Annie's Keepers Thread Organization System for large needlework project - slides and tabs
Continue reading “Thread Organizing for a Large Needlework Project – All Done!”

Embroidered Farmers Market Bags & Vintage Patterns


As we wind down the week, I thought I’d share with you this twin set of embroidered Farmers Market bags, made by Melissa for her sister and her farmers market sidekick.

I’m a sucker for farmers markets, especially in the fall! Here in the Midwest, we have an abundance of good ones that are heaps of fun to potter around early on a Saturday morning.

But I don’t go to them in style. When I go, I pretty much crawl out of the house, looking pretty much like I just crawled out of bed.

I don’t have embroidered totes to tote around my stuff, like these two adorable bags. I think they’re a great idea, and I thought they’d serve as inspiration for other FM enthusiasts out there!

Embroidered Farmers Market Tote Bag - Dancing Mushrooms
Continue reading “Embroidered Farmers Market Bags & Vintage Patterns”