


The backstitch is one of those basic stitches used in many types of hand embroidery, but, although it’s a basic stitch, it’s extremely versatile and can be used in any kind of surface embroidery project, from beginner’s embroidery all the way through expert.
Like the running stitch, the backstitch creates a line made up of straight stitches, but unlike the running stitch, there is no space between each stitch.
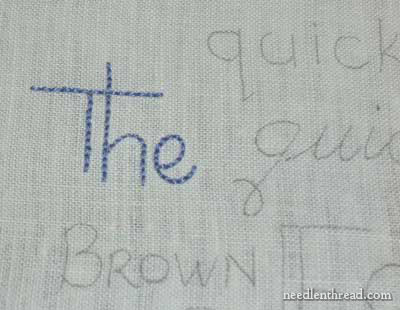
In the photo above, you can see the backstitch being used to embroider a word in my hand embroidered lettering tutorials.
In that tutorial, I also cover how to “travel” the threads on the back of the fabric, to keep the work neat. If you’re looking for information on how to use the backstitch to embroider words or letters, you might want to check out that embroidered lettering lesson.
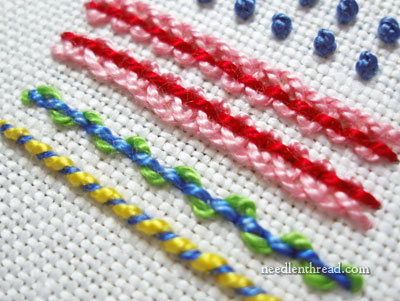
The backstitch is also used to form the base of many composite stitches. In the photo above, it is used as the base of Pekinese stitch, laced backstitch, and whipped backstitch.
Backstitch stitch can be worked on straight lines, curved lines, tightly curved lines. When it is whipped with another thread of the same color, it creates a solid line that looks a little ropey, stands up a bit from the fabric, and that smooths itself around curves quite well.
Here’s an example of outlining done with whipped backstitch:
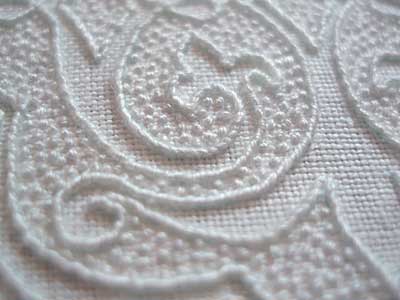
You can read more about it in this article on adding texture to embroidery with simple stitches.
There are many other stitch combinations that employ backstitch, so never underestimate the value of this simple stitch!
Backstitch Video Tutorial
Backstitch can be worked on pretty much any type of fabric. In the video below, I’m working with perle cotton #5 on linen. You don’t have use an even weave linen – you can use plain weave fabric of any type.
Here’s the video:
Do you want more inspiration & information on hand embroidery?
There are all kinds of reasons to sign up for the Needle ‘n Thread daily newsletter! Check them out and sign up today!
If you’re looking for more video instruction in hand embroidery, you’ll find lots of embroidery how-to videos here on Needle ‘n Thread.
If you like what you see on Needle ’n Thread, if you want to be a part of keeping the website thriving (and free of annoying network advertising), why not become a patron on Patreon? Check out my Patreon page here, where I’ll occasionally add special needlework bonuses for patrons.
If you shop on Amazon, you can support Needle ’n Thread without any extra expense to you by visiting my Amazon Recommendations page here, where you’ll find books and sundries for the needleworker available on Amazon.
Mary, Your videos and descriptions are great. Thank you for making them available. I’m teaching a young person basic embroidery and finding your videos so helpful. Have linked to your videos in my blog article on making a puppet. with great appreciation, Jane
Thank you so much for these videos! They’re so nice. I wasn’t sure how written descriptions on other sites were going to help me learn very easily. And, thank you for starting with the basic stitches…
Thanks again.
I love these little videos. They are so helpful for a beginner like me. I hope this website stays put for a long time while I learn to stitch. Thanks so much.
That was so helpful. I could not figure it out till I say it done.
A self-taught (teaching, actually!) newbie here. Thank you so much for these videos! Reading stitch descriptions was not helping very much – seeing it done is an immense help. I appreciate your site so much!
Thatnk you so much for these videos! They’re great and extremely helpful.
The videos are helpful; thanks. I actually know how to do basic embroidery, but am always looking for tips and additional teaching. I wonder if in the next set of videos. if you could also give us some tips about navigating smooth curves. Again, thanks much.
Nice video thank you
Please, please, please don’t ever get rid of this site, or your videos. Since finding it, your site has been my best and most favorite resource for teaching myself how to hand stitch, and I can’t imagine what I’d do without it. I watch the tutorials over and over, while trying them myself, and it makes it much easier to understand than written instructions, which I can’t grasp for the life of me. Wonderful, wonderful, wonderful! Thank you so much for the greatest tool a newbie could ever ask for.
great video
simple and effective
a guy from malaysia
thanks
Thank you so much for your awesome videos! I cannot tell you how many books I’ve read and tried to follow with no success. Your videos are so easy to follow and have helped me tremendously. You’re the best!
Thanks for videos. They will help my students when doing their first stitches. Well done. I teach 11-15 year old pupils and at home they can use the website if they get stuck. Marvellous!
Regards
Carmen
These videos are SO much more helpful when doing a stitch you've never done before or just checking to make sure you're getting it right the first try! Can't do that with written instructions or still photos or drawings. Keep up the GREAT work with these videos! WONDERFUL web site!
I tried to teach myself how to make a French knot using so many instructions with illustrations in books, to no avail. My elderly neighbor tried to show me, but her memory failed her. Now, after watching your tutorial, I have finally mastered this stitch! Thanks so much.
thank you so much!
I'm learning to handsew clothes and your videos are great.
hi Mary,
i came across your website when i surfed the net for french knot….your way of explanation is not understood by all…only people with knowledge of embroidery are able to catch up with you….
it would be even better if you display the required needle types for each embroidery with pictures..and the types of thread available in the market..and the basic things one should have before doing embroidery…
and one more thing people with low speed internet are not able to view your videos and it is irritating so it would be even better if u provide some links to download the contents.
thanks in advance,
abhi
Thanks so much for this awesome video! I’m trying to re-learn after 20 years spent forgetting everything I was taught. I don’t know about needles and all of that either, but my guess is I’ll be able to get help when I go to the store for materials. I’m bookmarking your site. Please keep the site running 🙂
Mary, you are so awesome! Thank you for being here to teach us with your videos. I decided to take up embroidery again and forgot some of the key strokes. Great refresher for me…and learning some I didn’t know.
These videos are great, I’m going to use them at school when we teach sewing later in the year – if that’s ok with you!
Sure thing, Claire – from one teacher to another! ~MC
Tus trabajos son fantásticos, me gustan mucho. Te felicito.
Saludos
Josefina
tijerasycuchara.wordpress.com
Mary, I really appreciate your videos. I am practicing back stitch, stem stitch, satin stitch on cotton backed with pellon using dmc floss or cotton poly sewing thread. Total beginner, but learning a lot when I make mistakes and having fun! Thank you for your guidance, Ambal
Thank you so much mary you have saved me a lot. You are way better than my needlework teacher too. Thank you again… p.s.do you have the cross stich. Please reply…
Hi, Krissy! I don’t have a cross stitch video yet, I’m afraid. I plan to do one this year. In the meantime, though, I bet you can Google “cross stitch” and come up with some good instructions. Sorry about that! Good luck with your stitching ! MC
Thank you SO much for your website. I love the email updates and watching your projects come alive and progress. I use your videos and find them helpful. I learned embroidery from my mother and now that she is gone, I find myself looking to your site for help. Your work is beautiful and I can only aspire to do such wonderful work.
Why are not all the instructional videos posted. I can watch the stem stitch but back stitch and few others. I am using an iPad so are some of them posted in flash and some not? Thanks for the help
That’s right, Tiffany. Some of the old videos are pre-iPad… I’m updating them all slowly, and should have them finished in the upcoming months. ~MC
thank you! it was very helpful!
dis is cool
dude
I wanted to know when doing a back stitch are you supposed to start from left from right??
If you are right handed, and you are “scooping” the fabric for each stitch (rather than taking the needle and thread all the way to the back, and then all the way to the front again) you would work from right to left. If you are “stabbing” the fabric (taking the needle & thread all the way to the back, pulling through, and then coming out on the front again and pulling through), then the direction doesn’t really matter. ~MC
I am having problems with the zig zag backstitch. I am doing a picture called “Old Towne.” I have not done embrioidery for a long time and my mother and
grandmother are both deceased which could have helped me. I have been on your site for several stitches which I figured out, but this one is mind boggling. Can you help me?
Thank you so much for the video on backstitch. I just took a crayon tinting/embroidery class and my backstitch was awful. Now I don’t know what I was doing, but immediately following your demo for right to left scooping the fabric (I was not stab stitching before but scooping somehow)my stitches are PERFECT! Thank you!!!
Thank u so much for all your tips, i am learning backstitch in art and i appreciate all your hard work and help! many thanks Olivia xx
found this very very useful thank u
thank you so much i understood the stitch clearly
i was taught wrongly
Hi, your videos are really helpful for all 🙂 , I have some questions!
1) The thread you are using is pearl cotton # 5, can we use any size of pearl cotton thread e.g # 3 or #8 to make this stitch?
2) Is it necsessary to use pearl cotton only, I mean can an embroidery floss also be used to make the back stitch instead of pearl cotton?
3) Which needle type & size you are using for back stitch?
Thanks and waiting for your reply.
You can use any kind of thread for any hand embroidery stitch. Some stitches look better with chunkier threads like pearl cotton, or with a couple strands or more of regular cotton floss. For backstitch, a crewel / embroidery needle is suitable, and the size depends on your thread. For a #5 pearl cotton, I was probably using a #3 crewel needle.
Thanks Mary, for your helpful reply.:-)
Hola me encantan las manualidades de bordado que hace…me gustaria que me enseñara mas de las puntadas que elabora..
SALUDOS CORDIALES
Love your website. So helpful. I’am just learning cross stich. I’am finding that I have to keep redoing my stiches because they are not the same. Is there anything I can do to not make this so hard on me. Also when they call for the pattern to have a back stich outline do I do that first or fill in the cross stich first? Thanks so much for your website. Kari
Hi, Kari – cross stitch first, then the back stitch!
On FB. Some one got some Disney material and said it cam from Backstitch???
Just check to see if it was you
Thanks in advance
Judy
Hi, Judy – the tutorial for backstitch might be directed here, but I’ve never done any Disney-related embroidery or posted any Disney-related designs or patterns here.
There must be a special place in heaven for someone who can design such a user friendly, beautiful and well organized website where she so generously and clearly shares her depth of knowledge.
As an artist who uses hand embroidery and started out just grabbing any needle, any thread and just stitched…I have come to your site many times over many years and found just the help I’ve needed. Thank you.
Mary, as always your tutorials are THE BEST! I have linked this one to your blog on a round up of the best backstitch tutorials. Thanks for all the great content you produce! I consider you the authority on embroidery 🙂 Kirsten
Good afternoon Ms. Corbet,
My wife is a devoted fan of the University of Mississippi. Several embroidery shops were visited, including a national chain called EmbroidMe, with a request for an Ole Miss logo above the pocket of an white cotton oxford cloth blouse:
http://www.bing.com/images/search?q=ole+miss+logo&view=detailv2&adlt=STRICT&qpvt=ole+miss+logo&id=9406EDAB7AA896380763E713FCF77BE16E106CBD&selectedIndex=0&ccid=etgUMnPD&simid=608029411742123664&thid=OIP.M7ad8143273c3a6734b09052de75ffa78H0&ajaxhist=0
All refused the work because they said it was a copyrighted logo. My attorney says this is hokum unless a commercial venture is intended. But with no luck with the pros it was decided to see if I could do it with my own hands.
Following your excellent instructions good results have been produced.
There is a fly in the ointment. If the logo in the URL, copied herewith above, can be seen it would be known that the two words “Ole Miss” are stacked and the lay out is approximately a square. The logo has been condensed to approximately one inch.
Therein lies the rub: At that scale it is difficult to faithfully reproduce some of the subtler shapes in the pattern. I realize that some of the nuances, such as the stroke overlap at the top of the ‘O’, and the white spaces in the middle of the “e” and the “s”s will go away. But some of the details such as the dotted ‘i’ are still sought.
The six strand thread was pared to three (maybe go to two or one?) and a smaller needle employed. Smaller and smaller stitches have been adopted until the limiting factor, the width of the threads in the blouse, has been reached. Once or twice, in an effort to make even smaller stitches, it was found that the thread came back to the front of the work unfettered because the hole used to come back to the front of the work was the same as the one used to go into the cloth.
Good use has been made of the Pellon Stick and Wash-Away for transferring the pattern exactly.
It is surmised that the back stitch is the thinnest stitch available (correctly?) and would be employed to make the blue outline and the stem stitch used to infill the red area because it would create a contrast in texture and stand up a little higher than the back stitch.
And so unless I can figure out some way of getting more detail from this approach the only option available is to enlarge the logo. But the mindset of this pretty, petite southern belle is well known. She would prefer a dainty, bantam pattern over a large, coarse composition.
If any suggestions for getting more detail from the embroidery are known they would be much appreciated.
Your servant,
Allen Pitts, Dallas Texas
Hi, Allen – I think the refusal of the work by embroidery companies is because, for them, it would be a commercial venture, since they would be selling you the product. It’s funny how that works! You could always find a place with an Old Miss license, who could do the work for you. Often, schools have “gear shops” that have licenses for that kind of work.
In any case, I think you could solve your problem by using split stitch with one strand of floss. It makes the tiniest of lines and is great for outlining and detail work. That’s what I would do!
Best of luck! I think you’re sweet to do that for your wife! 🙂
Just wondered what you like to trace your pattern with….a mechanical pencil?
Thanks, Betsey
Hi, Betsey – I do use mechanical pencil when I’m tracing a pattern with pencil onto fabric. I usually spray starch and iron the fabric first, assuming I’m using a natural fabric like linen or cotton. The spray starch helps release the pencil line afterwards. Hope that helps!
Thank you for sharing this information. The information was very helpful for me and saved a lot of my time.
I’m just getting into embroidery as a hobby, and your website is a treasure!
Thank you very much