


Here’s a video tutorial for the seed stitch used in hand embroidery. This is a very simple filling technique! Seed stitch looks great when it’s worked either in a uniform pattern (as it is in the video) or when it’s worked randomly. Some photos of seed stitching are also included.
Seed stitch adds not only color but also texture to an area that you want to fill. Depending on how you work it, seed stitch can provide heavy filling or very light filling. For example, if you want an area to be densely filled, work your seed stitches close together. If you want an area only lightly filled, work them randomly and far apart. You can also shade with seed stitch, by varying the proximity of your stitches. For darker shaded areas, the stitches would be close, and, as you work towards the lighter areas, you would space the little stitches out more. Think of stippling in art!
Essentially, seed stitch is merely tiny straight stitches. You can double them, so that two stitches lie right next to each other, or you can work them as single stitches, as I do in the video.
Here are some basic examples of seed stitch in photos.
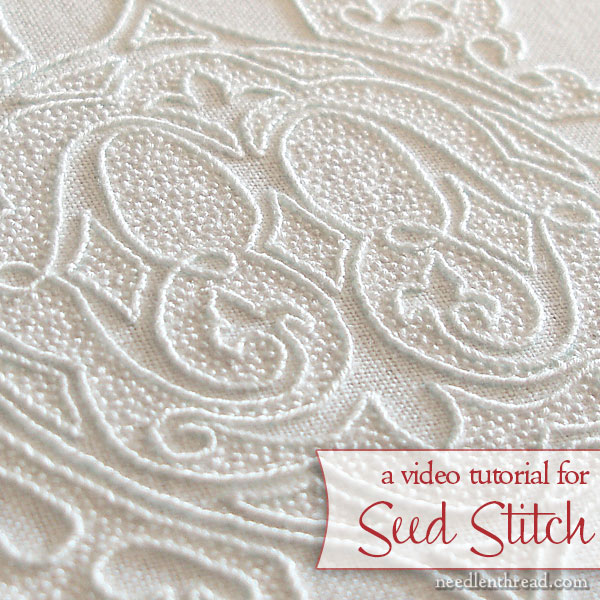
The leaf above is worked in white on white, using coton a broder #30. The outline is worked in a whipped stem stitch, and inside the leaf, seed stitching is used to add density and texture. (More photos of this particular piece of white on white embroidery worked in simple stitches).
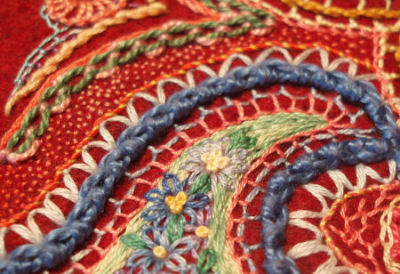
You can see seed stitching in this project right below the green and pink chain. Here, the seeding is worked randomly, as a light filler. (More photos of this “sampler” worked on red felt – it will eventually be the cover of a large needle case.)
Now for the video. Again, this is a very basic, simple stitch! In the video, I am filling half a leaf, using purple coton a broder. There is no sound in this video, as the stitch is self-explanatory, once you see it worked. Enjoy!
For more video tutorials for hand embroidery stitches, check out my collection of how-to videos for hand embroidery here on Needle ‘n Thread.
Looking for inspiration & information on hand embroidery?
There are all kinds of reasons to sign up for the Needle ‘n Thread daily newsletter! Check them out and sign up today!
If you like what you see on Needle ’n Thread, if you want to be a part of keeping the website thriving (and free of annoying network advertising), why not become a patron on Patreon? Check out my Patreon page here, where I’ll occasionally add special needlework bonuses for patrons.
If you shop on Amazon, you can support Needle ’n Thread without any extra expense to you by visiting my Amazon Recommendations page here, where you’ll find books and sundries for the needleworker available on Amazon.
Mary – Is their no audio to this? How many threads are you using?
Hi, Janice! This is one of the videos I’m re-doing. No, there’s no audio on this one. There are a couple stitches in the how-to videos that don’t have audio, because at the time, I had problems with figuring out how to do it…. By the end of the summer, these old ones should be replaced with better, high-res videos with audio. In the meantime, though, I’m using floche in this video, rather than regular stranded floss. To get the same size in the stitches with standard floss, you’d use two strands. With seed stitch, you can get away with three strands, which will make a fuller “bump” if you keep the stitches small. Hope that helps! ~MC
Hi Mary,
Livving on the boarder between South Africa and Botswana there is hardly nothing to be fing for a member who wants to embroider or even someone to teach you how.
I cannot thank you enough for a wonderfull website where I can learn and read up. Your website helps a lot and is the atmost beautiful ever found on tyhe intranet.
Thank You
Heleen
Zeerust
South Africa
Hello again, Mary ~
I’m starting a new project with a pattern that does not provide suggestions for the stitches to be used for each part. (It’s a partridge in a pear tree; I’m starting early for the holidays.)
The pear, as far as I can make out from the photograph of the finished embroidery, is made with seed stitch. Now, seed stitch is not a stranger to me — but the picture shows the pear done with two different colors. How is that accomplished? Do you just fill in half with random stitches, then switch to the other color and continue? Or is there some secret method, known only to you an Enchantress of Embroidery like yourself?
With kind regards ~
Deborah
Hi, Deborah – wellllll….I think I’d have to see a picture of it to know how they did it. You could always thread up two needles, one with each other, and randomly stitch the colors in, switching from needle to needle, depending on how they have the color scattered about. But to know for sure what they did, I’d have to see it. If you want to send a picture, you can email me at mary(at)needlenthread(dot)com, if you like!
Do you have any tips on doing seed stitch in a random way? I find it much more difficult to get stitches random than to have them fall into a pattern. I’m thinking of this for a filler stitch in a large area. Thanks for any suggestions you might have!
I love your website and work.
I have just started practising some embroidery stitches and I found your videos excellent and very clear. Thanks so much for all the information you provide here.