


Here’s a video tutorial for a rose bud made out of bullion knots. The bullion knot can be used to make beautiful roses and rose buds, and, believe it or not, they’re actually really simple to make once you get the hang of it!
The video tutorial for the bullion rose bud is rather long. It covers not only making the bullion rose bud, but also beginning and ending your threads when making little flowers like the bullion rose bud.
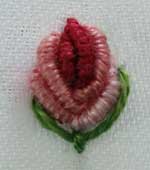
This is the bud that I make in the video. The filming was done a bit farther away than usual, but I think you can get the gist of the method pretty clearly. This is the order of stitching:
1. The first center bullion in stitched in dark pink or red. It’s the bullion on the left in the picture.
2. The second center bullion is stitched in dark pink or red, to the right of the first stitch. It’s a little bit longer than the first stitch.
3. The third bullion is stitched in medium pink, to the right of the second stitch, starting just above and to the right of it, and wrapping down below the middle of the two center stitches.
4. The fourth bullion is stitched in medium pink, to the left of the first center stitch. The stitch actually begins above the first center stitch, and wraps around below bullion #3.
5. The fifth bullion is stitched in medium pink, immediately to the left of bullion #4, and a little bit lower, wrapping around below and slightly to the right of the last stitch.
6. The sixth bullion is stitched in light pink, to the right of bullion #3 (on the right side of the bud). It starts slightly lower than bullion #3, and wraps around below the end of bullion #5.
After the sixth bullion is completed, a fly stitch is used to add the green at the base of the bud.
This may sound confusing, but if you watch the video, you’ll see how easy it really is to make perfect little bullion rose buds!
You’ll need three colors to make this bud: a dark pink or red, a medium pink, and a light pink. I’m using 2 strands of DMC in the video, with a milliner needle, on a tightly woven, high thread count muslin.
Here’s the video:
If you want to learn basic embroidery stitches, check out the rest of the embroidery video tutorials available in my collection of how-to videos for hand embroidery. Feel free to share the link with stitching friends, or people just getting into the art of embroidery!
Have fun with it!
Looking for inspiration & information on hand embroidery?
There are all kinds of reasons to sign up for the Needle ‘n Thread daily newsletter! Check them out and sign up today!
If you like what you see on Needle ’n Thread, if you want to be a part of keeping the website thriving (and free of annoying network advertising), why not become a patron on Patreon? Check out my Patreon page here, where I’ll occasionally add special needlework bonuses for patrons.
If you shop on Amazon, you can support Needle ’n Thread without any extra expense to you by visiting my Amazon Recommendations page here, where you’ll find books and sundries for the needleworker available on Amazon.
Wonderful video – thank you SO much! I wanted to embroider these down the front of a christening gown for my sister’s baby, but couldn’t get them to look right and was ready to give up. Now I see what I was doing wrong, and they’re going to look great. You’ve made my day!
Thank you!! It has been many years since I smocked dresses for my girls (the oldest is getting married in two weeks), but just recently had the desire to take it up again. Your website is wonderful! Thank you for taking the trouble to create the video demos. You can easily spend a lot of money on supplies and plates, but as a dabbler, I appreciate the trouble you have gone to.
Anne Stone
Sandy Run, SC
This is a fabulous resource, thank you for sharing this with the cyber public! I am working my very first crazy quilt, in memorium for my mother-in-law, and I want to embellish and embroider the piece with all kinds of beautiful stitches. Now I will be able to do so with confidence! Bless you!
Thank you for this wonderful video!
Your instructions were a great help – I embroidered my first bullion rose this weekend.
I created a rose rather than a rose bud. To do this I worked around the centre bullion knots in larger incriments, using different colours. I’m very happy with the result.
This is such a wonderful resource. I wish I had found it sooner!!
Do you mind if I post a link on my blog? I’m sure some of my pals will find it very helpful.
Best wishes..Bernie
Thanks, Bernie! & Thanks for the tip on making a rose!
Glad it was helpful! Link away!
Your site is absolutely wonderful! Thank you SEW much for these great videos & instructions. I have sent your link to lots & lots of friends who are all trying to learn such handwork. They have all been very impressed.
Most Appreciated,
Thank you so very much for your informative site and tutorials. You are a blessing to the sewing community.
I have a question, are you useing 2 full strands of dmc or did you pull apart on strand to get the two strings. thanks
HI –
I pulled about the floss (or stripped it) and took only two strands from the six…
MC
Thanks so very much for this video. It’s helped me get the process down re: the bullion stitch. However, I am currently working on a sampler on linen (32 count) that requires bullion roses. I have made 2 of the 3 needed, but each one was a challenge because of the relatively ‘loose’ weave of the linen, compared to the fabric you used in your video. The challenge is to keep the stitch from unwinding or being ‘swallowed’ by the fabric as I try to finish it off. Any suggestions?
Thanks again!
Hi, Marg –
How many strands of floss are you using? You might try to increase the number of strands by one or two, to see if that helps. If you’re using a relatively fine floss and winding the bullions tightly, then I could see how they would have a hard time staying above the fabric. I’d increase the number of strands of floss and see how that works!
Best,
Mary
I used to embroider and have just returned to it after many years. This site is so wonderful. It teaches me new stitches/methods and refreshes my memory from those I once did. Thank you so much for the clear videos with your nice voice explaining every detail. You are keeping this craft alive!!! Linda in Israel
that is so wonderful..very clear tutorials..you helped me alot…thank you!!!
A really helpful video, thanks Mary.
I have passed your link to friends and some of the groups I'm in as each tute is well worthwhile viewing.
Wouw…., I`m very happy to found jour videos. I will try to stitch this bullion rose.
Regards Gaby.
Thank you so much for the help on making the bullion rose. I haven't made any in years and your video was very helpful. I also made a little frog with the bullion stitch but can not for the life of me remember how I did it. Can you help me?
I've never made a frog with bullions There's a great book called the A-Z of Bullions, published by Country Bumpkin, and they have all kinds of things you can make from bullions in it, from animals to flowers to clowns and on and on. Maybe a book like that would help….
Hi Mary
Am great fan of u .. n i really admire ur talent…
Pls keep posting ..
Love you n ur work
I am so glad I found this website. The instruction videos are clearer than anything else I have found on the web. I’ll be coming back here again and again.
Your video of the bullion rose is very good. I am left handed and have trouble with videos since I look at it backwards. Do you know if there are any left-handed embroidery books or videos?
Hi, Ree – the best left-handed book out now is Yvette Stanton’s left handed embroiderer’s companion. Her website is Vetty Creations – you can see the ad for it in the top right column here on Needle ‘n Thread. Here’s the link to her website: http://www.vettycreations.com.au/ If you’re in the States, you can find the book at Nordic Needle. It’s well worth the investment! ~MC
Hello mary, your videos are wonderful … I have just started to learn embroidery and i never fail to look up the new stitches taught in class at your website… Thanks!
Hello,
I am delighted with your work, thank you for sharing.
All you do is great, God bless.
Merry Christmas to you and your entire family.
I’m from Brazil and its fan.
Kisses
Mara Cyl
Extremely happy to have found your site. Your videos and explanations are just what I needed. I had made the Boullion Rose stitch a while back but couldn’t get it going again. Now I can freshen up on other stitches. You have a wonderfully helpful website. THANK YOU.
me gusto haber encontrado esta pagina de bordados . seguire en contactopara nuevos proyectos . abrazos
Hi
Your vidios help me very much.
I think that without them I would have embroidered much less
so thanks
Clil
Thank you so much. This video helped me a lot to learn variety of embroidery stiches.
Thanks for the rocking tutorial! My first bullion rose was a complete mess! but i know i CAN and WILL do better in future! By the way, i found this awesome and amazing site through
WonderHowTo.com. Thanks again, you inspire me.
hi,exalant video
Hi Mary,
Its was a friend of mine who first acquainted me with embroidery some time back. I’ve did a wee but of embroidery those days and then I kind of slipped away. Now I was trying to embroider a saari of mine and I came across you while I searched. If I hadn’t I probably would’ve given up the idea as I couldn’t comprehend the instructions in some of the sites I across. Thank you so much for helping me… Now I’m a big fan of yours. Your videos are very clear and precise. And the tips you give is superb. Love your work. God bless you!!
Love Tintu
After watching the video you have made it so simple to make these roses. Thank you so much. I want to put them on face washers for Christmas Present.
I absolutely love your embroidery video tutorials.
I had tried doing this one before, but it didn’t work out. This time, I realized what I had done wrong. I had used all six embroidery threads! No wonder it had looked so bulky and ugly!
I have a little different application for embroidery. I use it for decorating tiny doll clothes. It makes them so beautiful. I am on my third round of making them as gifts. I have a rosebud fairy which I used your wonderful tutorial for.
Thank you, again!!
hermoso, gracias gracias por el video hace rato aprendí pero nunca mas volví a practicar con tus vídeos ahora lo puedo hacer.
abrazos
The videos for satin stitch and bullion rose don’t come up.
Very good!
Mary, Hi! I just discovered your site. I just joined a smocking club and am starting to learn heirloom sewing which uses a lot of embroidery. I was practicing a bullion stitch this morning and wondered how I was supposed to end this stitch so I googled you. I was so excited to see that you had starting and stopping info on the bullion rose video but then, RATS! for some reason I couldn’t get the video to play. The screen was there but was black, the start button wouldn’t work. I have a new computer with sufficient Adobe etc. prog. to run all kinds of videos. What is the problem do you think?
🙁 JANE
Hi, Jane – a few of my videos on here are old, and were hosted on Google video back in the day when it existed. I’ve been re-doing all the videos, but I still have about 15 to re-do, and that’s one of them! However, the video does still work – I just have some formatting to do to get it going again, since You Tube recently automatically migrated them all from the old Google video hosting. I’m working on that today and hope to have the video going again shortly. It’s not the best video in the world – but it will do until I get the new one done and up in the near future! So, do look for it a little bit later today! Thanks!
First of all, I want to congratulate you on the most helpful hand embroidery site I have come across. It is so well done and the videos are clear and easy to understand. Having said that, I want to give you an especially BIG thank you for your bullion rose tutorial. I am a beginner at hand embroidery and was making cloth napkins for my mom for Valentines Day. I used your tutorial to make a beautiful bullion rose that looked so difficult but in actuality was easy to work after reading the site and watching the video. Got it on my first try! It gave the napkin a touch of elegance and my mother loved it the best of the four I did. Thank you!
Hi, Tiffany – so glad the video came in handy and helped you through the project! Thanks a bunch for your nice comment! ~MC
Hi Mary!
Your tutorials are great and videos are exceptional!! 🙂 What a wonderful website.
I just started learning and so glad that I found your website. Thanks really for sharing!
Regards,
banu
u r doing excellent job u r my teacher. god bless u.
Going to try this lovely Rose pattern
I am new to the embroidery world. Recently, I decided to take it up for relaxation purposes. I want to thank you for all of your help along the ways. However, I want to especially thank you for this. It was fun to do and gave me just the right touch for my own blogs header.
hello .i am iranian .I can not speak English.What should I do to download videos.Need to register?
I wrote up this statement with the help of Google translation.Thank you good site.I am an Iranian woman I am female teacher . I teach them …. embroidery . Internet are not readily available . I ‘m downloading movies with a lot of hard costs.
از شما متشکریم .یک ایرانی
Hello, Maryam – Thank you for your question. The videos on Needle ‘n Thread cannot be downloaded at this time.
Me gustaria aprender hacer rositas.
This is the very best explanation for bullion rosebuds I have seen, thank you.
Do you sell this Dvd I am 84 yrs and working very hard to get back into some of smocking from the past after recently loosing my Husband. Barbara.
Hi, Barbara – I’m glad the bullion rosebud tutorial was helpful for you! I’m sorry, but I don’t have these tutorials available on DVD at this time.
Hi, I have come across this crisscross rolled edge stitch, that I find equally beautiful, convenient and resourceful for edging by hand heirloom baby collars, or sleeves ….and I am trying different approaches with not enough luck so far. Does anyone happen to know how is it worked and wishes to share?
Thank you so very much in advance! Regards