


I’m pretty sure Shakespeare’s soliloquy could be re-written for the embroiderer: To lick, or not lick, that is the question… but I won’t bother!
Whether you thread your needle by licking your thread or not, at least you ARE threading a needle!
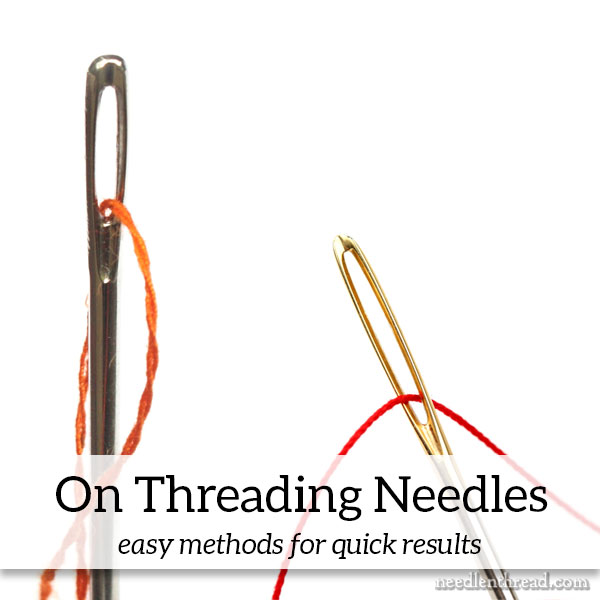
But in case you didn’t know that there are (easy) options for threading a needle – other than licking your embroidery floss – I thought I’d present a couple tips on how to thread an embroidery needle without wetting your thread.
Thread Size and Needle Size
The first thing to consider when getting ready to thread your needle is the size of your thread and your choice of needle. If a needle is too small for the thread you’re using, it’s going to be much more difficult to thread!
Needle and thread size should correspond. You don’t want to use a needle that’s too BIG for your thread, as it will leave visible holes in your ground fabric. On the other hand, you don’t want to use a needle that’s too SMALL for your thread, either – you’ll cause yourself undue difficulty in stitching, having to tug with effort to get the needle and thread through the fabric, and you’ll wear out your thread more quickly.
After doing a bit of needlework, you’ll probably get the hang of what’s right and what’s not for your needle and thread. An easy rule of thumb is that the thickness of your needle should match the thickness of the thread. If that’s still not doing it for you, go slightly larger rather than slightly smaller.
The Other Side of the Needle’s Eye
Before getting into specific methods of threading a needle, here’s a point to consider with practically every machine-made needle out there:
One side of the eye of a needle is slightly larger, access-wise, than the other. This is because the eyes of needles are punched by a machine, and the side that gets the bulk of the punch is usually more open than the other side.
If you have difficulty threading a particular needle, try turning the needle to access the other side of the eye.
Methods of Threading a Needle
If you lick your thread, I’m not one to say “Oh shame on you, you thread-licker, you!” I sometimes lick (as in barely moisten) my thread, too. But generally, I don’t.
There are four ways I thread my needle:
1. The Fold-and-Pinch Method: Margaret mentioned this in the comment on one of my needle reviews this week. (I reviewed Pony brand needles and hand-made Japanese needles earlier.)
You take your thread and fold it around the shaft of your needle. Slide it off, pinch the fold, and stick it in the eye. Pull it through so that the folded over part is all the way through, then situate the length of the tail however you like it. You might have to hold the pinched fold close between your finger and thumb and lay the eye on the folded thread and gently “saw” the needle down onto the thread. This method works great with size 10 and larger needles. It also works with size 11, depending on the thread you’re using. It’s a bit tough with #11 with one strand of DMC, but it works fine with one strand of YLI stranded silk.
2. The Pinch-and-Saw Method: For needles smaller than #10, snip the very end of your embroidery floss or thread so that it isn’t puffy and frayed. A clean cut is necessary for this method. Pull the thread between your thumb and forefinger, so that the tip of the thread is barely visible between the two. Lay the eye of your needle up on the tip of the thread, and, using a gently sawing motion, move the needle down between the skin of your thumb and forefinger. You will “saw” the thread into the eye of your needle.
3. The Gotta-Have-Help Method: Get a fine needlethreader and use it. There are many brands available – you can find them in the needlework section of most hobby, craft, and sewing places. But if you can, invest in a fairly good one. They aren’t expensive. Clover makes one that has a longer wire, and has two sizes, one on each end. The little tin ones you commonly see in multipacks don’t seem to last long for me. I’ve got a Clover one, and I’ve also got two extra-fine threaders that I found at a little shop. They have larger plastic tabs on the end, and one has a thread cutter set into the tab. They also have tiny magnets on the back. They both work great.
4. The If-All-Else-Fails Method: (Well… what can I say?) Lick the tip of your thread. But barely. You don’t have to saturate it! I’m pretty sure the children I teach in the summer work their saliva glands into Mass Production Mode just for the joy of soaking the ends of their threads. No, no! This isn’t necessary. If you must do this, then the tiniest bit of barely moist contact will do the job. Major water run-off is not at all necessary or desirable!
My reasons for not licking thread are mentioned in my review of Pony brand needles. But… if you have to, you have to. I think if you practice with the first two methods, you’ll find that you don’t have to rely on the last two that much!
So, grab a needle and thread and practice dry threading! You’ll be the envy of thread-lickers world wide!
When I’m threading flat silk, I have found that the needle threader is just about essential – it splits so easily otherwise. What my teacher does, is lick the thread, and *then* snip it very cleanly with a sharp scissors – the licking lays down any stray bits. I do this if I don’t have the threader handy.
Snipping the end of the thread at an angle is also a great way to thread a needle. I use this all the time. Try it…
Even the least expensive threader will last quite a while if you apply a little crazy glue to the area where the two thin metal wires are inserted in the gadget.
I have also tried a variation on #2 that seems to work fairly well with small needles. Once you have the tip of the thread between your thumb and forefinger hold the needle eye just above the tip of the thread. As you tightly hold the thread, use a a rolling motion of your thumb and forefinger (your nails will be moving away from each other) to push the thread up and through the eye. (As your fingers roll the thread should automatically be pushed up and towards the needle.) You must have a neat, pointy tip on your thread to make this work well. (I agree with Meeta’s suggestion to cut the thread at an angle.)
I use method 2 usually, and try method 1 if the thread is a bit frayed.
In a beading class a few years ago, the instructor gave a list of ways to thread a needle. She combined your methods 1 & 2, and listed one other: Hand your needle and thread to a friend – “can you thread this for me?” 🙂
Thanks so much for the extra suggestions, everyone! I did the angled snip thing last night, and it works great!
Jeanne, funny! I think that’s the best technique yet!
Mary muchas gracias por compartir sus consejos.
Mary there is another method. Cut a strip of paper the width of the eye. crease it down the center widthwise. open the paper. Now lay the thread tip on the crease. fold the paper over to enclose the thread. now thread the needle with the paper.Voila!
I can’t see buying a ‘big machine’ to thread a needle. What I use is a wire beading needle, the kind that is twisted fine wire with a loop for the thread. Put the needle over the loop and thread through the loop.
For a big needle and thread (I do crewel with wool), you can loop the double wire end into a bigger loop and still get a better threader than any I have found for wool.
The only problem is finding it. I put a piece of colored tape in the middle of the wire.
Rather than licking I find a light application of beeswax stiffens several threads and holds them together. A clean snip at a 45 degree angle always helps with threading.
you can actually lick it then twist it and then do the sawing method
Good ideas on needle threading..If I may add another which I picked up, for frayed edges, a small spray of hair laquer and a twist helps to hold the thread together and stiffens the end.
I found these Dritz Flexi-Needle Threaders in Hancock and have found them invaluable- especially since I’ve taken to using all the strands together.
Mary,
I am having trouble with the knot on my needle being hard to pull through my thread. I am a beginner so any help you can offer me on how to tie a knot on my needle would be much appreciated. Thanks so much for your help and your website!!
Hi, April – Normally, you don’t have a knot near your needle. Just thread the needle and pull about four inches or so of thread through the eye. Don’t knot it. Just hold onto both threads as you stitch. Hope that helps! ~MC
Mary,
Thanks so much!! Such a simple solution, now I am ready to stitch 🙂
we can apply some bath soap for stiffening the tip of the thread.
Hi! I tried to follow the link on ‘On Threading a Needle,’ which was ‘choosing the right needle for your embroidery.’ The website no longer exists, but I did find the article here: http://www.homehighlight.org/home-and-family/parenting/8-tips-for-choosing-the-right-needle.html
My German Grandmother was a seamstress in the early 1900’s. She caught me licking the thread to thread my needle and scolded me saying, “You don’t lick your thread, you lick the eye of the needle!”
Apparently the liquid works as in a capillary action, meaning that it’ll “pull” the thread through the eye. Works every time.
I haven’t embroidered since I was about 8 or 9, over 30 yrs ago. I know about threading, my problem is how much floss, or how many strands rather for jean versus cotton.
This is my question? I use DMC floss that has six strands.
Hi Heather and Michelle – how many strands of floss you use depends on what you are stitching. You can use one strand for very delicate stitching, two strands for a little heavier, three strands makes a nice bold line, all the way up to all six strands, which makes for a very chunky embroidery stitch. The bolder you want your stitching, the more strands you use. You might want to read this article on separating embroidery floss: https://needlenthread.wpengine.com/2013/08/embroidery-tip-how-to-separate-floss.html
Since I also make beaded jewelry, I use wax to get the thread ready to thread. Need not use much either. Just on the tip of the thread. Just run the tip on the cake of wax.
Love your site.
Haha, I do the pinch & saw method. I never realized that’s a “thing.” As I’ve gotten into the fiber & needlework world, the more I’m seeing that it all comes intuitive to me.
By the way, I love, love, love this site. It’s a wealth of information for a newbie like me.
I always lick (barely moisten) the tip of my thread to thread my needles. Every once in a great while I just snip the end, but most of the time that doesn’t work for me. I learnt to thread needles by licking the thread, and I still do it that way 🙂
Sarah
. . .either that or I lick and then snip. That works like a charm!
I did not see you mention waxing your thread. Would you recommend this as a viable option?
Hi, Norleen – you can wax your thread, but I don’t recommend it for floss for just regular surface embroidery, because wax will darken the thread and make it a little sticky and stiff. You won’t get the same look with your floss.
I use pearl cotton 5 which is round rather than flat and is very difficult to thread into a size 24 or 22 needle. I unpick the end of the thread to separate the fibers then flatten them out and do the clean snip.
Thank you for a very informative site I do very basic stitches and stick to these but looking on you site are very helpful tutorials which are fabulous. I going to do more variety of stitches now thAt I have lots of tutorials. There is so much to look at on your site again thank you, as you get older you need a tutorial to remind you how you do a stitch lol regards barb
My mother once told me that when my brother was quite young, he asked her why she tasted the thread when she was sewing. She didn’t tell me her answer.