


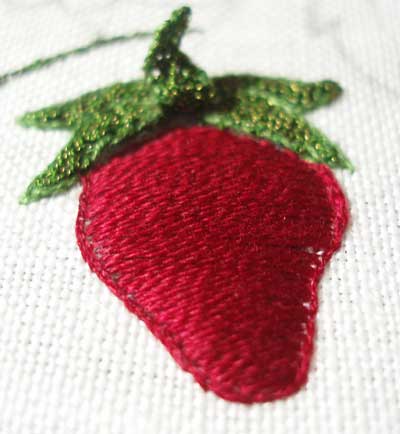
Here’s a little progress report on my latest embroidery experiment. I’m working on a strawberry, satin stitched with Gilt Sylke Twist. The leaves are finished, the strawberry is padded, and I’ve begun the satin stitching. So far, I’m having a blast!
I embroidered the strawberry leaves in detached buttonhole using the green Gilt Sylke Twist. I’ll try to explain verbally how I detach the leaf, since I didn’t actually take step-by-step photos. Sorry!
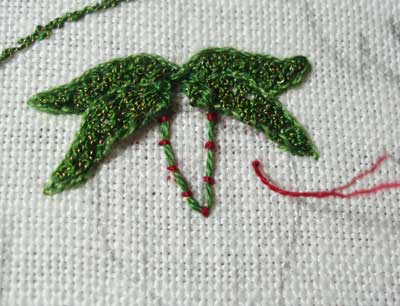
I decided I would do the center leaf after all. I was debating about this at first, as I mentioned in the first steps of the Strawberry Project.
I want the center leaf to stand up above the berry, so it has to be separate from the ground fabric. The outline I used for the detatched buttonhole is just a simple backstitch where it’s attached to the ground fabric, and a couched line where it will be separated from the ground fabric.
You can see the red couching stitches in the photo above. Once the buttonhole filling is complete, the couching stitches are snipped away, so that the leaf can stand up from the fabric. The only place I actually worked through the fabric on the outline of the leaf was at the very top of the leaf, where I stitched through the other leaves already there. Get it?
It was a leeeetle bit hard working the detached buttonhole in the area above the other leaves. I just had to be careful not to catch the stitches in the leaves below.
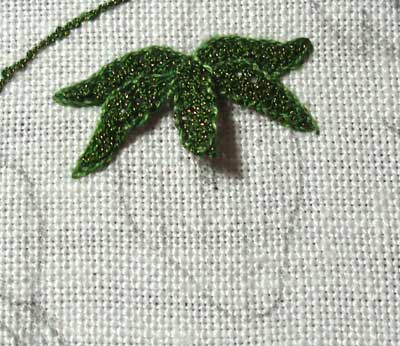
So that’s the leaf, finished. I whip stitched the edge in a lighter green. I wanted the leaves to have the sort of crinkly look typical to strawberry leaves, but I don’t know how well that comes across.
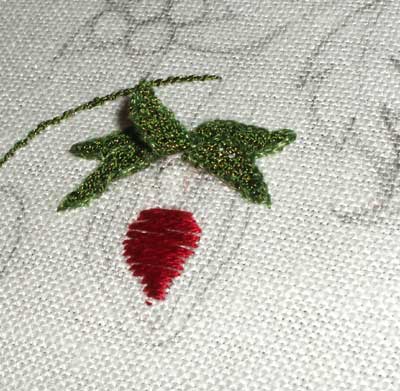
Then I started filling in the padding on the strawberry. For the padding, I’m working with two strands of a dark red DMC cotton. When padding something with multiple layers of padding, you start in the center with a satin stitch padding over a small part of the center. Then you work the padding in layers, changing the direction of your stitches. You want the last layer of padding to run perpendicular to your topmost layer (the visible layer) of satin stitch.
When working the padding stitches, I didn’t carry my thread across the back of the area, because I didn’t want the back to build up, too. Instead, I jumped sideways for each stitch.
I kept working the padding in layers, until the shape was filled up. Here, there are three layers underneath the layer you see on top.
In both of the above photos, you can see the center leaf turned up. The GST is pretty stiff, so the elements worked with it are somewhat bendable.
For the final layer of padding, since the GST is going to be stitched down the length of the berry, I stitched the padding (using one strand of DMC now) horizontally across the berry. I also worked a split stitch outline around the shape.
Then, for the exciting part!!
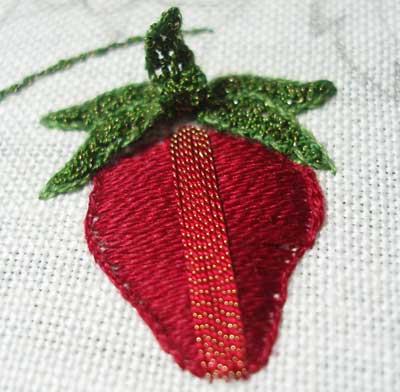
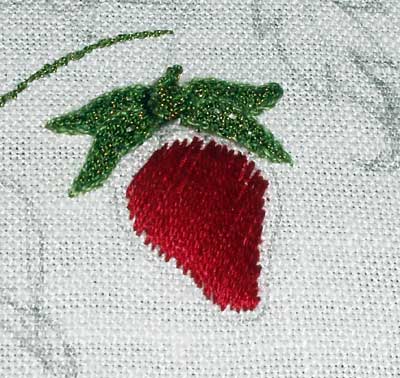
I began the satin stitching in the GST. Some things I did differently from normal satin-stitching, because of the stiffness (and the expense) of the thread:
I didn’t carry the thread across the back. I emerged at “A” at the top of the berry, went down at “B” at the base of the berry over the split stitched line, and then, jumping sideways, I came up at a point “C” to the right of “B” (at the base of the berry) and then went down at a point “D” to the right of “A” at the top of the berry. After the first two stitches, I didn’t like the way that was working.
To come up right next to the previous satin stitch was difficult, because of the stiffness of the thread. It caused the stitches on top to arch away from each other. I gave them a little pinch on the back to rectify this, but for subsequent stitches, I moved from one side to the other of the previous stitches.
So, here’s a diagram of where I went up and down for the satin stitching:
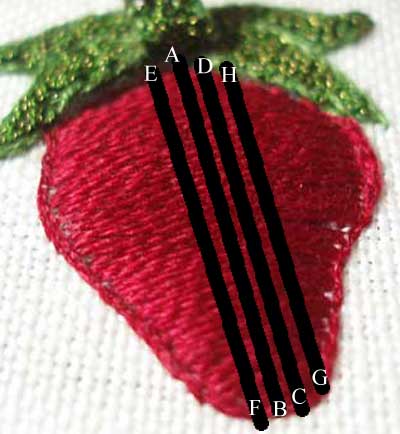
Up at A, down at B, up at C, down at D, then jump to the other side of A, and go up at E, down at F, then jump to the other side of C and go up at G and down at H.
This seemed to work better, but it required more thread to pass across the back. Still, it was a lot less thread than carrying the whole stitch up the back, and it turned out looking ok!
The next update will be the completed satin stitch on the strawberry, with lattice couching over the satin stitching. I’m doing the lattice in the pink GST. I’ll couch the lattice down with regular embroidery floss, but I’m not sure what color to couch it with?? Green?
Mary – This is beautiful! The new thread looks lovely – I can imagine it is even nice in real life.
Thanks for the description, Mary..
Deepa
Wow, the satin stitches (laid stitches?) look incredible. When I started reading your stitching method, I woundered how they would sit given the stiffness of the thread. Alternating sides is a good idea but is it causing a build up of thread at the back? How about threading two needles and stitching alternate stitches with needle one then needle two so that the stitches on the back are slightly larger?
Speaking of needles, I started with a #8 Japanese needle but switched to a #9 which seems to be better especially as I like to half hitch the thread to the needle if it is one that comes unthreaded easily. Also this allows me to have a tiny tail. I was doing reverse chain stitch through satin. I’m going to be doing detached button hole so I don’t think that I will use the Japanese needles for that part, I’ll try a tapestry needle. There shouldn’t be too much strain on the thread if I’m not stitching through the fabric. I also like the sound the thread makes going though the fabric. It reminds me of our camping trips when I was a child. I loved the sound the zipper of the tent door made.
I’ve ordered this kind of backwards, I should have said first that I have my first cone of GST – YIPEE. I have redde and guess what I thought I would stitch? Strawberry fever seems to be going around at the moment.
I think I would have stitched the leaves after the strawberry but I can see why you did them first. You wouldn’t want to couch the outline through all that padding and GST. I think I will do mine separately and attached them later.
Looking forward to seeing more. The lattice should look great. How about couching with #1 gold? I’m interested to see what you decide for the flower. I loved the suggestion for the spiral trellis. White petals and yellow center sound right.
Sorry this is sooo loooong but I’m so excited about the GST.
CA
Just a comment from someone who has stitched with the GST on the Plimoth jacket. Tricia recommends using a sharp needle when doing the detached buttonhole for when you are going through the fabric at the ends of the row. I had initially used a tapestry needle when I first worked with the GST and found that it was easier using the sharp needle to go through the fabric at the ends and that the gold on the GST broke less often for me.
Rosemary
Amazing! I haven’t the patience for this kind of work, but do love watching it – both in progress and finished. These things are more interesting to look at when one understands how they were achieved.
Thankyou so much for describing all of this process 🙂 🙂