


Continuing on the the embroidered monogram on a linen guest towel, today I want to show you how to manuever around curves with padded satin stitch. If you haven’t read the articles yet on the guest towel, you might want to check out the first article on setting up the guest towel and the second article with an update on the stitching.
These are photos of the curves on the “B” monogram. Satin stitch takes curves – even tight curves – well, if you keep in mind the concept of “fanning” your stitches. I want to show you two things in this post: 1. the pictures without any markings, so you can see the stitches; and 2. the pictures of the embroidery with lines showing the change in direction on the stitching.
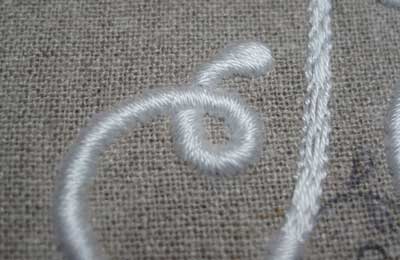
Here’s the curly-que tail on the back of the “B.”
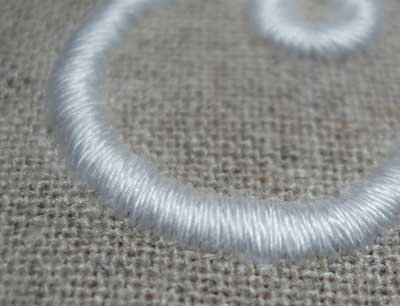
Here’s the base of the back of the “B.”
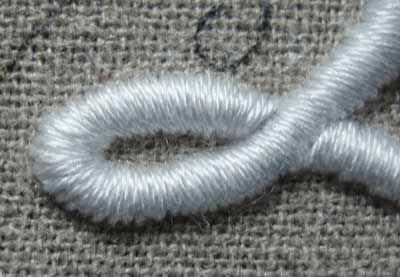
Here’s the tight loop on the inside of the front of the “B.”
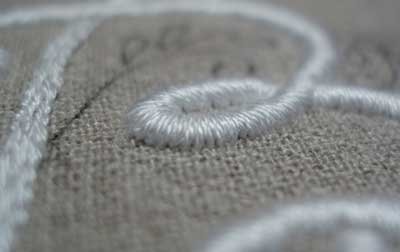
And the inside of the front of the “B,” from a different angle.
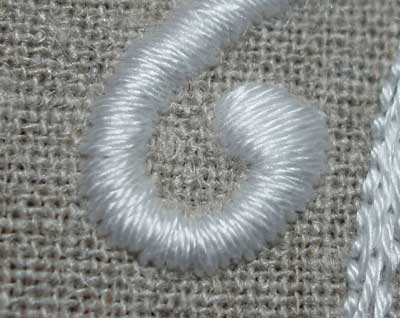
And this is the curl at the top of the front of the “B.”
The curly-que on the back tail of the “B” and the inside loop on the front of the “B” are the tightest curves. The principles are the same, whether you’re working on a tight curve or a gradual curve, so we’re going to look at the tight curves, since they are usually the more difficult to work around!
When you’re working around a curve – whether tight or gradual – your stitch direction changes. You want to ease your way around the curve, but in tight spots, that easing has to be done a little more dramatically!
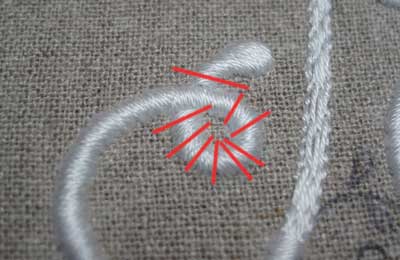
So as you work around a curve, you fan your stitches. The stitches on the inside of the curve need to be a lot closer than the stitches on the outside. But the trick is to not overlap the stitches, no matter how close they are on the inside; otherwise you’ll lose the smooth effect of the satin stitching.
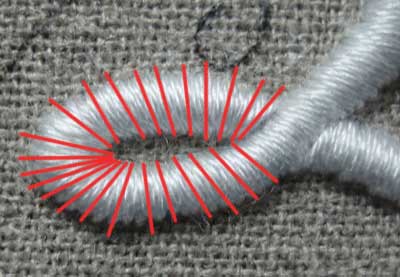
This photo shows a bit better the dramatic change in direction. The outside of the curve (especially when working a padded satin stitch, as the padding helps hide the fabric underneath) can even be spaced a bit further apart than normal, in order to compensate as you work around the tighter curve. However, if you aren’t padding your stitches, you’ll want to make sure there is complete coverage of the ground fabric.
The trick to making tight loops look good is keeping your stitches as close as possible on the inside of the loop, without allowing them to overlap, and spacing them “just far enough apart” on the outside to allow them to fan properly and to get your stitches going in the direction you want them to go!
Satin stitching on a curve is not hard – it just takes practice. One thing that might help is trying your stitches from different directions. Try coming up on the inside and going down on the outside of the loop. If this doesn’t work well for you, turn it around – go up on the outside and down on the inside. Stick with what works best for you. I bring my needle to the front of the fabric on the inside of the loop and take it down on the outside, because I think it’s easier to see exactly the stitch direction.
Another helpful trick, if you’re not padding your satin stitches, is to mark your stitch directions in pencil inside the lines. This will help guide you around the curve. If you are padding your satin stitches, you could use a contrasting color of thread – just regular sewing thread works! – and baste in some directional lines that can be pulled out when you’re finished with the curve.
Ok, I’m going to finish this project today, so I’ll post photos of the completed monogrammed towel, washed and pressed and ready for display as a class sample, soon!
If you’re taking up a monogramming project, feel free to send me a photo! I’d love to see other people’s work!
This project is in four articles, besides this article. You can find the other parts of the project through the following links:
Part I: setting up the project, transferring the design, discussion of threads
Part II: stitching, information on padded satin stitch and other stitches employed, some trouble shooting.
Part III: that’s this article!
Part IV: The finished guest towel!
Hi Mary
Thanks for sharing your embroidery experience.
A few months ago, I enrolled an online embroidery class. Progress on my blog :
http://patchworkbroderieetcetera.blogspot.com/search/label/Broderie%2Fembroidery
Paule – Reunion Island
WOW – Paule! Beautiful examples of monograms. The colors and stitch choice are stunning. Thanks for sending the link!
Everyone else – do check out Paule’s blog! The monograms are really beautiful!
It looks so simple and so beautiful, Mary!
Thanks again!
Mary What a wonderful tutorial. Thankyou.
Thankyou for this, Mary 🙂
I think I MUST start practicing a Satin Stitch over padding stitches. So far with practicing satin stitching I’ve not been using any padding, thus there are no stitches underneath to help me hide the fabric. And with that being the case I find I often have spots that look like I need to go back and fill. 🙁
I have to assume that going back over areas where you’ve already been, trying to neatly fit additional stitches inbetween stitches from your first pass, is a no no? Is it always a no no to go back, even if you’re only going back a stitch or two? If you need to do that it must mean you’re not getting it right the first time, eh? – Jeannine
Hi, Jeannine –
The problem with going back and filling when you’re doing satin stitch is that usually the space isn’t large enough for a “whole” thread. If it is, by all means, fill it. But usually, you’ll end up with an overlap or crowded spot, which detracts from the smoothness of the finish on satin stitch.
Now, there are other techniques that going back doesn’t really make that noticeable of a different – for example, that’s why long-and-short stitch is a pretty forgiving filling technique. You can take sneaky little stitches to fill in, and it’s usually not noticeable at all!
I understand…yes, that’s the thing. Sometimes I can go back and fit a stitch in and it will look fine. Other times it sorta goes all wonky! Thanks so much, Mary. – Jeannine
Thank you for the tutorial. gorgeous I love Monogram.
Good morning of France
i read this article and its very helpful for begginers, however something that was wondering and you dont really mention or make clear in the article is that when doing the stain stiches do you drop the needle out of the outline or inside? i know the outline is suppose to make the stiches look neat but i wasnt able to tell by the pictures if you do it inside or outside.
always thanks for your help. Your website is fantastic!!!.
Hi, Jules –
You stitch over the outline!
Hope that helps!
MC
It is beautiful, the embroidery detail and finishing is very good, i always thank you
Hi Mary,
I have been reading your lessons on monogram embroidery and would like to give it a try. I love the pattern you used for the linen towel. Do you recall where you found it? I love its simplicity.
Thank you,
Marta Summers
Gracias por compartir tus técnicas, eso habla de un gran corazón.
Dear Mary
Love your site, it is such a help to me as a novice and i have been inspired to stitch a monogram for my daughters birthday, H for Heidi. However i have just unpicked a section – my first section – for the third time and am at a loss working out the angles for the omega shape on the bottom left hand side of the H. I wondered if you could help with some ideas for the angle of stitching to take me around the omega and up the central left hand stalk of the H. I hope you know which monogram i am talking about i have tried to cut an paste and cant seem to do it! I realise now this was 2008 so don’t hold out much hope!
Kind Regards
Ericka Moon
from Newark, England,
Hi, Ericka – I’d probably work horizontally across the whole leg, rather than at an angle, and then each side of the “foot” will split naturally with the design, if that makes any sense (and assuming you’re doing satin stitch). Otherwise, you could consider a different stitch – like split stitching one color on the outline and filling with another color inside with split stitch. I’ve done that effectively on several monograms, if you check under my monogram index here: https://needlenthread.wpengine.com/2016/09/embroidered-monograms-tips-techniques-index.html
Thanks for the tip on marking the lines inside the letter. Makes a big difference
Merci pour ces précieux conseils.