


The hand-embroidered monogram I’ve been working up on a guest towel is finally finished! The whole point of this “little” project was to work it up as a class sample, so I tracked the statistics on it so I would know how to gauge our class time and our supplies.
So here’s the finished product, with the final statistics on how long it took to embroidery the piece, how much thread, etc.
Time-wise, it took me about 8 hours and 15 minutes to embroider the monogram. A little bit of that time was taken up in removing stitches (I started with the wrong sized thread, for example, and at another point, I didn’t like the shape of some of the petals on the ornamentation, so I took those out, too). The majority of the time was just regular stitching, though. I didn’t rush, really, and, looking back on the project now, I think I could’ve sped it up a bit if there had been any real pressure to get it done faster.
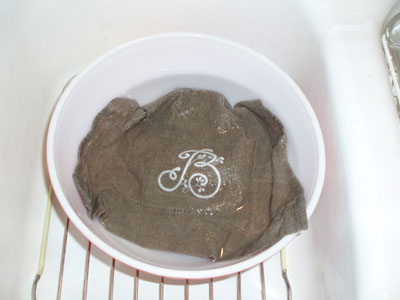
After I finished the embroidery, I filled a glass bowl with cool water and rinsed the piece. I let it soak about 10 minutes, and then smoothed it onto a towel to dry.
Before it was completely dry (still a little damp), I ironed it, wrong side up, on several layers of flannel covered with a pillow case. It’s important, especially with any raised embroidery like this, to place the piece on something well-padded when you iron, in order to avoid crushing the stitches.
Now, keep in mind that, as a guest towel, it is reasonable that this thing will have to be washed. So I didn’t treat it with any kind of ginger care or anything. I treated it like a household linen that would go through a regular washing and ironing process! The only exception is padding the surface of the ironing board really well, and ironing on the wrong side of the work.
After it was all ironed and ready to show off, I took it outside to photograph it, since the light was pretty good!
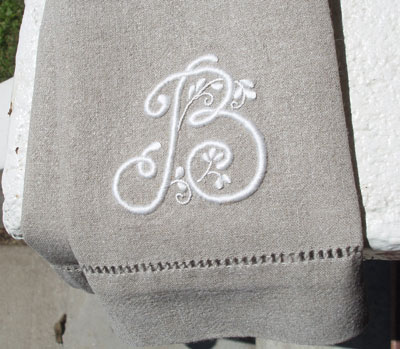
And there’s the completed piece. I do like the natural colored linen. I was thinking I might touch up that drawn thread edge with white stitching, just to set it off, but perhaps not. It might look too “accented,” if you know what I mean! What do you think?
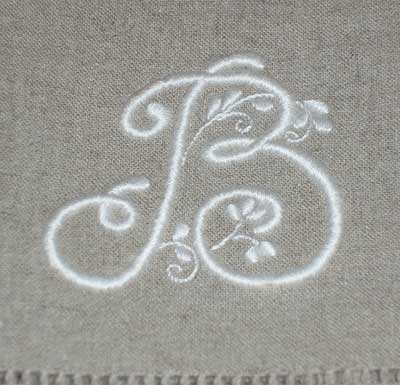
And here’s a close up.
Overall, I’m pleased with the way it turned out. It’s always a good thing to work through a project that you’re going to be teaching, so that you can know what points will need careful instruction and so forth. So I’m glad I managed to work up the whole sample. It isn’t perfect, which is good – so I know the pitfalls when I teach the monogram!
By the way, I used about 35 strands of #20 coton a broder, and the strands were about 14″ long, so about 13.6 yards of thread (I think that’s about half a skein, maybe…)
Hope you enjoyed the monogram!
You can follow this project step by step with the following links:
Part I – Setting up, transferring design, discussion of supplies, and beginning the stitching.
Part II – Continuing the stitching, discussion on working padded satin stitch, stitches used, and some trouble-shooting.
Part III – Discussing taking the curves with satin stitch: how to work around the tight curves in a monogram, stitch direction, and so forth.
More Hand Embroidered Monograms?
If you’re looking for more information on hand embroidered monograms, including tips, techniques and designs, check out the following:
A collection of hand embroidered monograms with discussions of tips and techniques used to embroider them
Favorite Monograms – a collection of 16 complete monogram alphabets perfect for embroidery
Yes, I think the accent must be on the B, as you have.
And I can’t believe you are not ready!! Good luck
(I could’nt understand what you mean with “ginger care” – is it those products to help ironing? – and get lost with “#20 cotten a broder” 🙂 I always lost myself with thethickness threads. I think you have some previous posts about threads, but i haven’t yet reached them)
Soooo pretty! I don’t think it needs anything added to it. I love it just as it is.
I hope you had a great Monday morning class with the little’ns! -Jeannine
Beautiful! I’m not sure I would actually USE it though! Even if I were a guest. I love the natural color linen with the white embroidery. Nice contrast. Another lovely piece!
Hi Mary
I was looking forward to this post. Exquisite embroidery… Bravo !
It’s beautiful! I think that adding any white thread to the drawn thread edge will draw too much attention away from the monogram itself; I’d leave the hemstitching as is. I may have to order a set of linen towels from the place you got yours, and monogram a few guest towels myself. Thank you for the inspiration.
It’s beautiful! I may have to make a set of monogrammed guest towels for myself. Thanks for the inspiration.
I wouldn’t add any white thread to the hemstitched border — I think that would draw too much attention away from the monogram itself.
Mary, it looks beautiful. Good Job! Your embroidery is so perfect and white really stands out on the oatmeal color.
What a lovely monogram ~ so elegant. I am inspired to make one for my sweet bride-to-be’s shower.
It’s just lovely!
Maybe just a few of the flowers repeated near the border to ‘tie’ the B to the border?
I don’t think they are necessary, but an option if you wanted to do such a thing 🙂
Hi Mary, I can see what you mean about the padding giving a nicer finish.
The letter I am sewing is on red velvet that has interfacing on the back, and I am using DMC metal effects in Gold (stranded). I can only use 10cm of thread at a time as it splits and frays, so I didnt pad it out.
When I have finished my cushion cover I will send a photo.
Mary
It’s beautiful. I would have a hard time using them too, but we do have to show off our accomplishments and love positive feedback. I hope at my age I can get this good. But I sure do enjoy seeing your finished works. I hope you had a good day with the youngsters.
Nora
Hi-Mary,
It is very lovely. Very padded. I doubt it will be used! It is too pretty. Why don’t you try adding some oatmeal knots at the long side of the letter and in groups of three below the hemstitch to really tie it in. Otherwise, simplicity of the piece is quite beautiful , too.
Every time I see the tutorial(4 parts)there is something new I learn. You are really a good teacher!!
Hugs
Maria del Valle
Wow! Very Impressive, It looks like it was machine embroidered!! What a wonderful job. Hope I can get as good as you some day!! That's what I am striving for ,work like this.. Thanks, Sue
Whenever I do my hand embroidery, my fabric always puckers all around the embroidery. What is going on?! How do I iron or embroider so that this does not happen? Am I supposed to pre-shrink my cotton threads? The towel presses perfectly and then looks terrible and wrinkled around my embroidered letter. It’s so frustrating. PLEASE HELP ME! Thanks!
Hi, Emily – Do you use a hoop? If you’re using a hoop, and keeping the fabric nice and taut, then the problem is probably that you’re pulling too hard on your stitches. Try to pull your stitches just so that they are in place, but not any further. The threads might shrink a tiny bit when washed, but not enough to cause heavy puckering. My advice is to make sure your hoop is holding your fabric nice and taut, and then only pull your stitches enough that they are resting in place, but not so much that they pull on the fabric threads and distort them.
Hope that helps!
MC
Wow, beautiful. I love the natural color linen with white. And the stitches are beautifully done. To say that they are so well done they look “machine embroidered” is not a compliment I would personally appreciate. Machine embroidery can never be so beautiful and have this delicate human touch (of course!) that adapts to all variables.
One thing though, is that the over-under is reversed at the intersections. That is because you followed the line unbroken through the intersection and at the crossing after the loops your only option was to make an “under”, but from a hand-lettering perspective, you should have made the “under” the first time and made an unbroken line thru the intersections AFTER the loops.
Doing the letter backwards would solve the problem.
Hey, Mary!
I’m a beginner in embroidery, your designs are actually what inspired me to get stared. I’m not very good at identifying stitches yet… could you tell me what stitches you used?
Thanks a bunch!
Leanna
Hi, Leanna – this piece is all satin stitch, with the exception of the little stems, which are stem stitch. Hope that helps! ~MC
sre.Muchas gracias por tomarse el tiempo para de poner estos articulos y enseñarnos,uds.hacen cosas maravillozas,felicitaciones.AIDA-
I would like to order some of your embroidered tea towels for a guest powder room…
Mary, where do you buy the linen towels for embroidery? I’m always looking for nice linens with finished edges, but have not been fortunate to find yet.
Thank you for the beautiful inspirations.
Hi, Jane – I think this one was from All About Blanks. It’s an “ok” linen towel – it’s rather loose and soft, though, and it shrinks something fierce, so make sure you pre-wash it, if you get one of them. I like the linen glass towels available from Access Commodities (wholesalers). I think, retail, you can find them through Attic Needlework. Also, there are some available Wool Gatherers.
This is fabulous!! I have been searching for a simple tutorial for monograms and this is it! Monograms are my favorite but I’ve never dared to try one until now. You covered the essentials including the details of what to buy, how to prepare, how to start, and how to finish. Thank you!!
I’m glad my article on hand embroidered monograms is helpful for you, Jan! I have several other tutorials on monogramming here on the website, too. You can find them under this index: https://www.needlenthread.com/2016/09/embroidered-monograms-tips-techniques-index.html
Hope that helps!