


When I set up for filming some embroidery stitch videos this week, I had the opportunity to try out a set of Evertite Stretcher Bar frames. So here are some photos and a bit of a review…
First of all, it helps to know what stretcher bars are and how they are used. Essentially, they’re just four sides of a wooden embroidery frame that have interlocking corner joints, kind of like straight dove-tail joints (if you’ll excuse the oxymoron!). They’re sold in pairs, so that you can mix and match the sides to suit the size of your project. For example, if you have a project that’s 12 x 14 inches, you would buy one pair of 12″ stretcher bars and one pair of 14″ stretcher bars.
Stretcher bars, in general, are great! They give you the taut surface necessary for certain techniques – or for embroidery in general – without the fuss of setting up anything more complicated. It takes about 20 minutes to set up a project on a stretcher bar frame.
Stretcher bars come from a variety of manufacturers, apparently, reflecting different quality of workmanship. The stretcher bars you find, for example, at chain craft stores like Michael’s – while they work ok in a pinch – are not my favorites at all. For one thing, the edges of the frame are sharply square, as opposed to rounded. The wood itself is not finished in any way, and can often be splintery. The corner joints are not always reliable – I’ve bought some at Michael’s that had mis-cut joint notches, so that the corners slipped out and wouldn’t stay together. And, lastly, the wood is rather hard, with streaks of “really hard” that run through it, making it difficult to sink the tacks. The quality of the workmanship is reflected in the price of these frames – the longest length pairs are no more than $3 / pair.
Then there are the nicer stretcher bar frames that you’ll find at your local needlework shop. They’re slightly more expensive (but still not that expensive), they’re made of a softer wood (which takes the tacks better), and they have rounded corners. They’re sanded smooth. These are nice frames. I’ve seen them run anywhere from $3 / pair for the smaller sizes up to $6 / pair for the longer length sides. And sometimes, you can find them on sale.
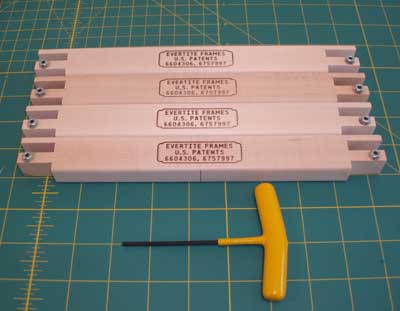
And then… then there are Evertite Stretcher Bars – technically called Slimline Tension Adjusting Stretcher Bars.
My first impression is that they are “meaty” frames – slightly thicker than even the nice stretcher bars. They are smoooooothly sanded, with rounded edges.
The Evertite frames have a few unique features:
First, they’re marked with center points on each bar (this is where you begin tacking your fabric).
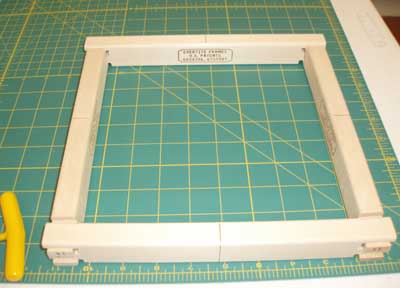
The bars fit together snuggly. They take a bit of pushing and working, in fact, to get them together – which can be better done with a small mallet. But I managed without one, so it’s not too difficult.
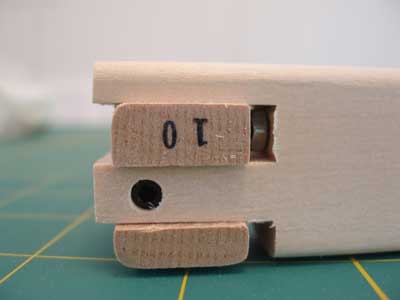
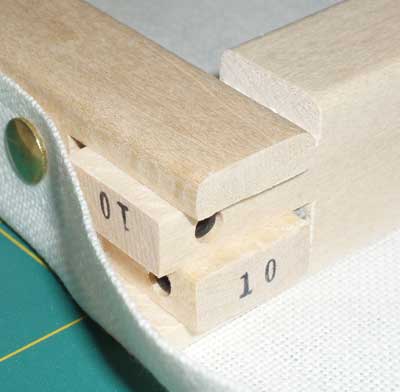
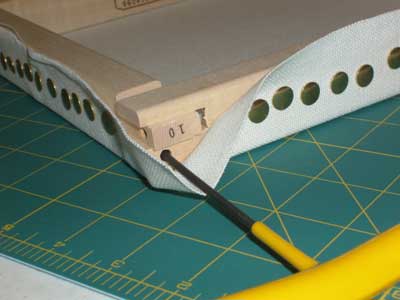
On each end of each side of the frame, you’ll see the little apparatus that makes Evertite frames so unique. There’s this little bolt thing set into the frame, and this bolt can be loosened or tightened, according to the needs of the stitcher. When it’s tightened, the head of the little bolt pushes against the inside of the other bar, forcing the frame apart and making the fabric mounted on it tighten up. When it’s loosened, a space develops between the head of the bolt and the adjoining bar, so that the frame pieces can be pushed together slightly, loosening up the fabric.
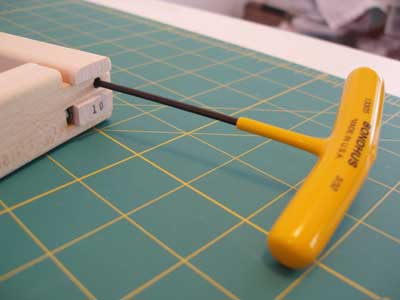
This handy-dandy little tool makes loosening and tightening the bolts a cinch. I’m not sure what this kind of tool is called – I call it the Yellow-handled Tool Thing, which seems to suffice. You can buy the Yellow-handled Tool Thing separately when you purchase your Evertite frames.
Now, how do you set up one of these things, and what are the advantages of using them?
First, the set-up. Gather your tools and supplies.
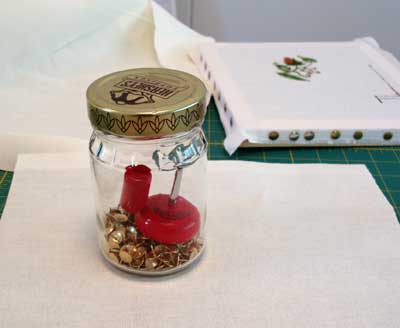
For me, this consists of my piece of fabric and my tack stuff, which I store in a glass jar. I have one of those E-Z Tack-it kits, with the magnetic pusher and the little matching tack remover – and these, along with all my tacks, reside in an old Hershey’s chocolate sauce jar.
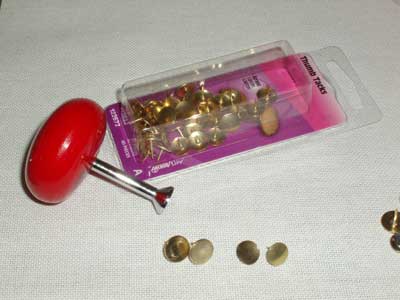
A note about tacks: when your E-Z Tack-it tacks start to break up (and they will – the heads come off fairly easily), I recommend picking up regular brass tacks from your local hardware store. I think they work better, and why wait around to special order something as common as brass tacks? In the photo above, the E-Z Tack-it tacks are on the left, the everyday brass tacks from the hardware store are on the right. They’re not that different – the EZ tacks have a perfectly flat head, while the hardware store tacks are slightly rounded. That’s it.
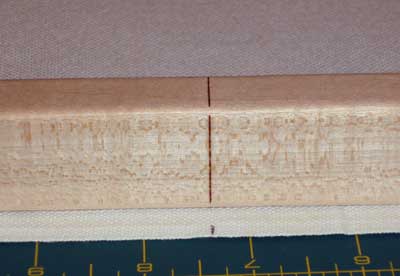
Mark the center point of your fabric, and line it up with the center mark on the frame.
With needlepoint canvases, you would probably tack your project onto the top of the frame bars. I tack my fabric on the sides, for three reasons: One, it gives me more finishing room around my project – a good inch more on all sides. Two, I don’t like having my fabric edges on top of the frame, where my thread can catch on them. Three, I use the Needlework System 4 floor stand with the stretcher bar clamp, and having the tacks on top reduces the efficient functionality of the stand. It just doesn’t grip as well when the tack heads are running interference.
Ok, so, you’ve lined up your fabric. Tack the center point of one side of the fabric onto the frame.
Moving out from the middle, tack across to one side, then go back to the middle, and tack across to the other.
Here’s a very nice point about the Evertite frames – you don’t need the magnetic tack pusher, unless you have problems with your hands or fingers (arthritis, etc.). I used my thumb and pushed the tacks into the frame with relative ease, and that saved time.
When tacking, keep in mind that you need to leave the corner joints accessible. Normally, I’d fold down t
hese edges and secure them, to keep them out of my way, but I have to be able to get to the bolts, so I’ll leave the corners like this.
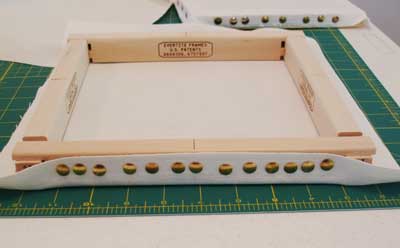
After tacking the first side, tack the side opposite it. Then tack the other two sides in the same manner as the first. It’s when you’re tacking the second and fourth sides that you apply a bit of tension to the fabric or canvas – but you don’t have to pull it hard – just tight enough, without any warping to the fabric.
So the four sides are done, and the fabric is open for the Yellow-handled tool thing.
And this is where the fun part comes – tighten the bolts. Your fabric will get downright hard with the tension. Then, if you want to loosen the fabric up, you loosen the bolts and push the frames in.
It’s easier to tighten your fabric than to loosen it, I thought.
Overall, what do I like about the Evertite frames?
1. They do what they say they do – provide a stretcher-bar frame that can be tightened and loosened without having to remove your work from it or reposition the tacks.
2. The quality of workmanship – every detail is thought of, from the smooth edges to the center markings on the sides, to the length of each bar being “branded” on the end, so you know at a glance what size bar you’re grabbing.
3. They provide a (relatively) affordable, effective, and easy option for framing up a piece of embroidery, canvaswork, or goldwork. Especially if you’re going to do goldwork, you want the kind of surface these frames supply – taut and level. (Slate frames provide the same kind of surface, but are a heck of a lot more labor-intensive!)
4. They are re-usable, and you can mix and match the sizes of pairs, relatively affordably.
5. Relative affordability – they aren’t as expensive as a slate frame or as most roller bar frames, etc. They are more expensive, though, than other stretcher bar frames.
What are the cons to the Evertite frames?
1. Availability – they don’t carry them at any local needlework shops around here… BUT they are available online, and you can find them here through Needle in a Haystack in California. They generally have a good supply of them available and can special order, too.
2. They are more expensive than regular stretcher bars (even the nicer stretcher bars). Example: regular stretcher bars that are 15″ long cost around $3 – $3.50/ pair. The 15″ Evertites cost around $16 – $17 / pair. NOW – that being said – you’re paying for two things: one, the ability to tighten and loosen your fabric without removing it from the frame; two, hand craftsmanship. Is that price difference worth it? I think it depends on your individual circumstances. By the time you buy the whole frame, you’re looking at about a $30 price difference.
My personal opinion on the price difference? I like the Evertite frames, and I think the tension feature is worth it, for the right kind of project. I wouldn’t buy them for play stitching, but for the right kind of project, yes, it would be nice to have a few sets on hand! And finally, I’m a fan of hand craftsmanship. I like supporting local folks who work with their hands to produce a quality product. So when I have the opportunity to do so, I do so.
Evertites are produced by Evan Burroughs, the same fellow who made the slate frame I reviewed. (Update, 2019: Unfortunately, I don’t have any current information on how to contact him.)
I’ve got some larger sets of the Evertite frames written into my hobby budget… and once I achieve them, I know exactly what projects I’m going to set up on them!
If you’ve used the Evertite frames, what’s your experience with them? Do you like them? Are they worth the price difference? Would you recommend them to other stitchers?
I like so much to read your conclusion. I agree with your point of view.
Thank you for this information, Mary! I’ve seen something like this (I don’t know if it was the same name brand) at AC Moore, but I really wasn’t sure how to use it.
I feel I could tackle this easily enough. Honestly, I find the idea of dressing the slate frame a bit daunting.
A Michael’s craft store has just been built quite close to where I live. I can’t wait for it to open! I have great hopes that they’ll carry a good variety of embroidery supplies. I have no idea what they’re like, I’ve never been in a Michael’s before. But it sure would be nice not to have to drive 40 minutes there and back again to AC Moore, for DMC thread and such. – Jeannine
I would love some of these. Have used siesta bars that work on the same principle, but these sound so much better as you can adjust the tension. Thank you for the review
Mary, thanks for this very informative post. I found it very helpful and love the feature of being able to tighten the embroidery over time without having to untack and retack…
Glad you all like the review… I’m quite sold on these frames. I just went back to work on the one I framed up when I did the tutorial. The fabric is just so perfectly taut. It’s really wonderful! Then I loosened it up for bullions, and tightened it again – it worked perfectly!
They’ve gone onto my wishlist!
Hi-Mary, I viewed the site for Traditional Stitches and roamed around the site. I found a Legacy Linen in Dower Quality, 2 colors, pale gold & an oyster like color. They said it is the first time in 100 years that this has been made. Have you tried it yourself? Maybe you can review it, Mary? It is on my wishlist.
Hi, Laura –
I’ve used the Alabaster Angel Legacy (it’s listed under their “Dower” linens). I love it! But there hasn’t been a Legacy linen yet that I haven’t liked. My favorite all-around Legacy linen is Alba Maxima, and for finer (white) linen, their Ecclesiastical linen is excellent (perfect for whitework / cutwork).
I’ve been trying to figure out how exactly to review linens… Photographs (even up-close photos) of fabric are not really adequate when it comes to getting a feel for what it’s really like. Any ideas?!
MC
Hello Mary. I want to thank you for all of the hard and time consuming work you do with providing so much information related to embrodiery. Well, I bought a slate frame from a local needlework shop. The frame is 18 inches by 18 inches. I liked how easy it was to place the tacks into the soft word (not too soft). Now after seeing your review of the Everitte Frames, I can see some cons with the frames I have. 1) There is no center line marked on the wood – so for me the set up on the slate word was more challenging. 2) I had to kind-of tighten and-or retighten the canvas as I was placing it on the bars. 3) Plus, the fact that the tops coming off the tacks (due to re-tighten the fabric) really was frustrating!.
Given all of the above, I am still happy with the tightness of the canvas on my (cheaper) slate bars. This project is a preprinted canvas that comes in a kit – so there is no extra fabric. Plus, I have to agree with you — get the Everritte Slate Frames for the “nicer projects”.
Thank you, again, Mary. I enjoy your blog. Linda K
Okay. I have a feeling this website is going to get me into deep trouble as time goes on! But so far, you’ve saved me hours of frustration in trying to figure out how to bind a hoop.
I read (okay, scanned) the instructions on the slate frame. I don’t believe that will happen here.
I’ve used stretcher bars similar (but not nearly as nice) as the ones explained here. They were nice to work with. I didn’t know about the nice tacks – and I didn’t use nearly as many as you did in the illustrations. I certainly didn’t know about the tack remover. That is why my embroidery stayed attached to the wood pieces when I framed it.
I do have a question regarding your Rooster set up. I think I like the fabric you are using. It looks a bit more substantial – some of the linens I’ve worked on were cheap at best and presented problems with some of the stitches.
I never considered preshrinking the fabric but as a sewer, it makes perfect sense. The puzzler is: you mentioned that you were going to make the rooster piece into a pillow and that you wanted to be able to wash it later. What about the wool yarns? Are they already treated so they can be washed later on? What about shrinkage? Also, what about the possibility of color run? You are using very vivid colors in your design. We just had a basement flood and a box that I had my unfinished needlework projects got wet. (I didn’t ask where it had been stored!) I had used cotton floss on the project and the red in the design ran. I will still frame it. I know now to test and treat my cotton floss but what about the wools? Do you treat them or just trust and pray they won’t run?
Hi, Brenda!
Thanks for your comment! I actually framed the rooster in a tray. Crewel work is often used on pillows and so forth, but they have to be gently washed – they’re not anything I’d stick on the washer. I’d also test colors before using threads on something I know will be washed. It’s not worth going to all the work and praying they won’t run, but not knowing for sure! But since this guy is framed under glass on a tray, he’ll be ok. I don’t always preshrink all my fabric – only the stuff I know I will wash later on.
I LOOOOOVE stretcher bar frames, and the Evertites are the best, because you can stretch the fabric further after it’s on the frame, which is nice!
Hope that helps!
Hi Mary
You mentioned that you ‘framed the rooster in a tray’. Would you mind telling me what a tray is please?
Thanks again for a great article.
Cheers …
Wendy
Hi, Wendy – It’s a square red tray, made by Sudberry. They make wooden trays, boxes, and things like that, to mount with needlework. They’re nice quality….
~MC
Hi Mary, That little Yellow tool thing is called an “Alan Key”. It is a hexagon shaft and comes in several sizes. This one that you have,comes with a yellow handle, but normally they are just “L” shaped. They say you learn something every day and my dear hubby was kind enough to tell me what your tool was called.
Thanks, Anne! I’m familiar with an Alan wrench, so it must be the same concept! Hm… I bet an Alan wrench would work and would be slightly more economical! Thanks to your hubby, too! ~MC
Hi Mary, Thanks for mentioning my shop in your post! I received a link to this from a friend in Oregon just today. Yes! I carry the Evertites. My friend wanted me to tell you that yes, I have great customer service. 🙂 I keep all sizes of Evertites in stock up to 18″ usually! (Sometimes higher.) Nice explanation on using them too! Thank you again, Theresa
Mary
thank you so much for all your tips and advice and interesting blogs-there are a few of us in Western australia who actually stay up late at night to catch them before we go to bed!!
I am on the search for the ideal stand and frame–am almost at the point of no return–going for the NWS4 system(I would prefer something made out of wood but!!) and am now wondering whether I can attach the Evertite frames to it?
thanks for your assistance with this.
Helen
Hi, Helen –
I use Evertites all the time with my NWS4 stand. You’ll want to make sure that you buy the “frame clamp” attachment. It works perfectly with the Evertites….
My experience with wood stands has been negative, for the most part. I’m still trying to find the ideal trestle stand for slate frames, but most other wood stands I’ve tried have ended up being dismal experiences in the long run. I’m still glowingly happy with my NWS4 stand… though I did have to replace a washer on it for the first time last month!
MC
Hello Mary.
I am recently retired and have been surfing the web where your delightful site shows up multiple times regarding the many facets of needlework.
The Needle and/or Thread Painting has been my passion for many years. However, my mother, grandma, and great grandma didn’t call it this new term. I can’t remember what they called it other than embroidery. Beginner’s embroidery or simple embroidery was stitching just along the lines.
Thank you for your patience and hard work. You have introduced me to the evertite stretchers and given me courage to try silk threads in a very small project. In addition, you have refreshed my needlework interests with your many tutorials and your follower’s comments.
I refer back to your site often for places I may order online supplies. I live where there are no needlework shops closer that sixty or more miles.
I talked my piggy bank into helping me buy a couple of Trish Burr’s books. Oh what fun they have been! I need to fine other designers who publish similar books. (There is also a serious lack of needlework books within my area.)
Well, enough babbling for now. Keep up the wonderful work.
D. 🙂
I just ordered the stretchers and the tack kit. Thank you for this comprehensive information. I have a stretcher frame on a stand in the barn. I didn’t know how to use it. You have really clued me in.
What amazing stretchers! I have never seen these before and they are wonderful. I learn so many things here and it is always a treat to learn of new tools.
Pick me, pick me…. This frame looks like the quality is super.
Melynda
I am ordering a set of Evertight frames – a set in size 12, and a set in size 14. I want to make large designs for pillows etc. What size should I order for small designs?
Sandra
I find the 9″ and 10″ are my most frequently used frames. The 8″ ones are a bit small, but I do use them now and then…. but mostly, I use the 9″ and 10″ Evertites. ~MC
Mary,
I have a question for you. I am very interested in the Needlework System 4 Floor Stand that you speak so highly of. You also indicated that you loved the Evertite Stretcher Bars. I think they are your favorite. Do you use the Evertite Stretcher Bars with the Needlework Floor Stand or do you use the Needlework Stretcher Bars? I Have never used stretcher bars, up til now I have only used hoops. I would be interested in trying the stretcher bars. Since I know nothing about them, I was using your website information to steer me in the right direction. I have been searching for a place near me that sells the Needlework Floor Stands, but so far I haven’t had much luck. I might have to take a long road trip. I love your website and plan on using it a lot.
Thanks for any help,
Becky McNutt
Hi, Becky – I always use the Evertites with the Needlework System 4 stand. The frame clamp attachment for the NWS4 is what you’ll need to use Evertite stretcher bars. You can actually use quite a few different types of stretcher bar frames and so forth with the frame clamp – I’ve even managed using hoops with it. It’s a good all-purpose clamp. I think the scroll bars option on the NWS4 stand would not be quite as versatile. Hope that helps! ~MC
Hi Mary- I have Studied your posts about frames and I have a question. My dear godmother gave me a floor frame (!!). It has two horizontal dowels to attach the fabric to vertically, but there is only the frame board itself to attach on the sides. The directions show it attaching only to the top and the bottom. Another frame I bought for $2 operates the same way (it is not a floor frame), you can only attach vertically.
So my question to you is, can you really do that? Can you get away with only attaching the top and bottom? I did not succeed with this using the first frame I got (non-floor type) because the sides of the fabric got sort of stretched out and floppy. But it is not a well made frame and the fabric I used is like a bed sheet.
My new floor frame is Very Nice!
I hope all this info is not confusing.
I am scared to death to go through all the steps to attach my new pattern, an icon of St. John, and then mess it up!
Thank you again and again for all your helpful info. I am an avid fan.
Hi, Brigid – I would definitely still lace the sides. You should be able to lace around the side bars of the thing, right? Tension in all directions is important, and so is the ability to tighten it up again, should it go slack. MC
I tried to click on the Stitcher’s Paradise link but it said it couldn’t find it. I found it from another link and the actual address is:
stitcher’s-paradise.com
Thanks, Paula – I updated the link! -MC
I love Evertites. I do needlepoint and especially for larger projects they are a must. Many needlework teacher now ask that you put the pieces on the Evertites. They are reuseable and are woth the cost.
Mary;
the information you have given me is priceless. It would be interesting to see in video you using the stretchers. I have always used little hoops and as my skill and interest grows I am wanting to expand to a stretcher. But, I have often been frustrated by a hoop that is too big and awkward. Will a stretcher be different? how do you get your arms/hands around to different places on the fabric? Is a stretcher ok to hold in your hand or do you have to have a holder for it? Maybe I missed a few things while reading your blog on this issue and I will continue to glean from what you have written-so I thank you in advance for your time and energy in all that you do. You are an amazing woman! C from KC
You can hold small stretcher bar frames while working on them, but it’s really easier to use them with a floor stand that will accommodate them so that you can stitch with both hands. I use the needlework system 4 stand with the the frame clamp for stretcher bars. Hope that helps!
I’ve made many canvases for painting but we used stapler guns instead of tacks. Is there any reason this wouldn’t work with these stretcher bars? Electric guns work so well for arthritic hands.
Thanks
Hi, Barb – I don’t see why not!
So happy I decided to search your site for recommendations on stretcher bars before I ordered anything. These look great – I just ordered from Needle in a Haystack. I’m working a needle painting project in a class with Tanja Berlin and stretcher bars were recommended. I started using a hoop and realize it’s already loosening and I haven’t gotten far. Anxious to get these in the mail. As always, thank you Mary for your wonderful reviews and instructions!
You’ll love ’em! Did you get the T-tool, too? It’s essential….
Yes; and some tacks. I probably could have picked both up at the hardware store, but it saves me a trip to get everything at once. One of these days I’ll make a trip over the bay to Needle in a Haystack. It’s not that far, but the traffic getting there can be a nightmare. One of these Saturdays I’ll get there. There are so few places that supply good needle work items. Can’t wait!
Hi Mary, Your reviews are excellent – especially for someone like me who is ready to make an investment in a system. Given my personal preferences, I am leaning toward using Evertite stretcher bar frames with the NS4 stand. My only concern is this…I plan to have projects that are fairly large (12×16, 18×22) and I am concerned that the top half of the project will not be easily accessible if I use the stand and sit back on a couch. Will I always need to lean forward in order to reach the upper portion of the project? I also have a side question: I have an excellent floor lamp/magnifier that I use. Will having the Evertite frames on the stand allow me to still use that lamp, or will I be forced to buy the lamp that clamps onto the stand? Any insight you can provide will be greatly appreciated. Thanks!
Hi, Fannie – the frame head tilts, so you can usually reach the farther ends on projects if you have the head tilted slightly. This is another good reason to get the extension arm, too, because it gives you more options for adjusting the distance away from you, the tilt, and all that.
I don’t have the attached lamp, etc., I just have my floor lamp next to my frame, on my left side (since I’m right handed).
Hope that helps!
Thank you Mary. This helps. I am going for it…NS4 and Evertites!
I would like to know if I have a canva of 24″ and then I have another project of 27″, can I use the same frame?
Hi, Silvia – Once the frames are assembled, they are a fixed width. So you can’t really use a 27″ wide frame to hold a 24″ wide piece of canvas. But you can mix and match the width bars with the height bars, to get different configurations, so if both pieces of canvas are, say, 18″ high, you could order one pair of bars for the height of the pieces, and then you’d have to order two pairs of bars, one to accommodate the 24″ canvas and the other to accommodate the 27″ canvas…. assuming that they aren’t both to be set up at the same time.
Is it possible to sew a border of fabric around the fabric you intend to embroider, in order to make a smaller embroidery area fit a larger frame?
Yes! I do it all the time. This is commonly done for silk gauze work, for embroidery going in larger slate frames, etc. I use strips of scrap muslin or calico and sew them to the edge of the ground fabric and then mount them on the frame.
Question about the fabric and the advertise. What do you do with the ends to keep them from fraying? Do you see,tape or just attached it to the frame?
Thanks
Hi, Mary – I neaten the edge by sewing it with the overcast foot on a sewing machine. You can do all of the above, though. I’m not a huge fan of using tape, but I’ve used it in a pinch.
I sometimes work very large canvas, and work them in “roll frames”. I sew the top of the canvas to the top of the frame, and the same at the bottom. (The frame has a strip of heavy canvas to sew canvas to) I love the idea of the Evertite Frames, but, do they come in different sizes? Extra large even? I receive e-mails from you and I am a faithful reader. Thank you.
Yes, Laura – they come in various sizes, up to somewhere in the 30+” (they might go up to 40″ on special orders – not quite sure).
Hello Mary:
I love these! I have four pictures that I’d like to stitch that are each 18×14 inches. It will likely take me 2 years each so I’m willing to invest in good frames. the part that will have stitches is actually 18×14, so if I want to tack on the side of these frames as you have done, which size of stretcher bars do you recommend? I don’t know if the ‘hole’ in the middle of the rectangle when you have all four bars assembled represents 18×14 if you order that size of bar, or if that is the size to the outer edge of the frame…..do you get what I’m asking? Thank’s for your help!
I have a similar question to Natalie Dupuis December 29, 2015 and could not find your answer.
I am a beginner and love your website. Your knowledge is amazing and your works breathe taking. Thank you also for vendor information.
Here is my question: my stitching area is 11×14 and I assume I need to add 5-7 inches to each side for framing so what size of stitching bars I should use? I am going to buy first the stitching bars and later I would invest in a stand.
I hope you are doing well. Best regards, Halina
Hi, Halina – if your adding 6″, you’d need 17×20.
Mary,
Your review of the evertight stretcher bars and tutorial on using them has been very helpful. I ordered a pair of the bars and will look forward to using them. I love the smoothly rounded edges and center marking, and the hidden connection at the edges which will not snag my embroidery work. Thanks again.
Lynda
Have you ever tried the stretcher frames I have been seeing lately? I realize this article is several years old and these might be relatively new. They have something on the bars that hold the fabric without tacks. Have no idea how it’s done because I’ve only seen them online and they don’t show putting the fabric on them. Just wondered. 🙂
They’re usually some sort of Velcro strip or something similar. I like Evertites – they’re consistently good, and I don’t mind the tacks.
Hi Mary
I have dealt with ‘Traditional Stitches’ in Calgary, Alberta, Canada.
They are one of the best to deal with on line. I highly recommend them.
Sharon Gray
Winnipeg, Manitoba, Canada.
Hi Mary,
Tristan Brooks is now at http://www.tristanbrooks.com
Evertite here I come!
Have 12″ Evertites-so in order to be able to tack the fabric to the sides rather than the top, then my fabric should be at least 13″ square? Thanks!
Hi, Beth – no, for evertites, you’re going to want two inches larger all around the size of the frame, so 14″, not 13″ for 12″ frames. Hope that helps!
Am planning to use the Evertite frames for Celeste Chalasani’s Craftsy Stumpwork class. Since the project uses a backing fabric (two layers of fabric), are there any tricks to attaching both fabrics to the sides of the frames evenly? Thanks!
Hi, Beth – just take them on together, at the same time, but make sure that they’re both lined up on the grain. You don’t want either fabric to be offset onto the bias at all, or you’ll end up with puckers or a warped finish.
Oh my stars!!! Mary, you’ve answered about every question that could arise dealing with stretcher bars (not to mention everything else). I am so very grateful to you for your skills, knowledge and teaching abilities.
YOU make my stitching life so much more in quality and in pleasing to the eye! Thank you. Jo in SC
How many tacks per inch should be used with Evertite frame? It looks like one tack per inch, approximately. Does that sound about right?
I place them so the heads are about 1/4″ apart – it might be overkill. Some folks recommend a tack per inch, and I think that works well on needlepoint canvas, but I prefer them a little closer when working with surface embroidery fabric.
The yellow handled tool is a hex wrench with a T handle. You instructions are very clear and your work is amazing!
Absolutely look forward to your site. I learn something in every one. Took a class
several years ago at an EGA Regional Seminar and the teacher recommended the Evertite frames. Had never heard of them, and she got them for me, and I became a big fan. So easy to get tightened and make stitching easier.
Of course every thing you write about is marvelous. God Bless you, and a very Happy New Year.
I am receiving a gift from rsn royal school of needlework soon and would like to purchase an ever tite system to fit The project. Along with the tool I need to tighten I surely would appreciate ordering by phone If someone could give me it would make it so much easier for me to do an order Thank you shirley whitcher
Design size 14 1/2 By 9 1/2
Hi, Shirley – you’ll need to contact a retail shop that sells Evertite frames. You might try Needle in a Haystack, here: http://www.needlestack.com. They will have a phone number on their site where you can place an order and they’ll help you order the right size bars, the tool, etc. I’m not a retail shop. Hope that helps!
This is great! Had I known you were here….. I have marked this as a favorite and plan to come back. I have cross-stitched and done crewel for years – even BEFORE the 80’s!! I have recently seen several canvas work projects that my stitching friends have done and, well, now I’m on to new and exciting experiences. I did try some needlework many years ago and did not do well. I should have sought a source for some help. Now I feel I can try again. This sight is wonderful and I plan to tell my friends about it. You have answered the very questions I had about stretcher bars and which I should try. Thanks for sharing!
Are evertite good for gold work? I can’t work slate frames into my budget yet. For my first experimental goldwork project I am going to use a high count linen, muslin backing and my hip or lap hoops which are wrapped. When my skill level increases, I will try to invest in another kind of frame but until the I seek your advice.
Yes, I use them often for goldwork!
Hi
How much for 6 x frames (embroidery 3.5 inch) plus 5x tools, (tacks, screw tool, push in tack tool), posted to New Zealand.
Thanks Heather
Hi, Heather – I am not a retail shop, I’m afraid. I’m more of an information blog. If you want to purchase any of the supplies I review of Needle ‘n Thread, you’ll usually find resource links at the end of the review. For Evertite frames, you can find them in the States at Needle in a Haystack
I have a possibly stupid question: won’t the sides/tops of the frames start to have so many holes that the tacks won’t stick any more? Would you use wood filler to help with this?
Maybe this situation would only come up in Extreme Use Cases. But this is the sort of thing I worry about! O_o
Well, I’ve used several of mine for years and years with multiple projects, and I’ve never had a problem. Often, I end up tacking in the same holes over and over again. I’ve never had to fill the holes with anything!
Thank you! I figured I was being excessively worried, but I had to ask. I appreciate your reassurance.
These frames sound lovely. Nicely finished wood is a pleasure to work with, anyway, and with the other features… well, when it comes time to work with frames, count me in. (Right now, I use a combo of QSnaps and old fashioned hoops.)
Mary. I am new to hand embroidery and I’m finding my biggest challenge is enough tension in my embroidery hoop. I have even bought what I thought were better hoops trying to solve the problem. Would switching to a frame help this issue? Are they good for just everyday embroidery. And can an unfinished embroidery be left on the frame? Thank you. Sharon
Hi, Sharon – Yes, unfinished embroidery is normally left on a frame until it is finished. The drawback to a frame is that you cannot use it for a piece larger than it is – the embroidery must fit within the parameters of the frame – unlike a hoop, which you can move around on a larger piece of embroidery. Hope that helps!
I have shopped with Traditional Stitches many times and they are great to work with. They are friendly and helpful.
Giselle Barrieau
Just a note that the Evertight link isn’t working.
Thanks, Oriole – I have removed the link. I don’t have any current contact information for Evan Burroughs, but if you’re trying to figure out how to order or contact him, you could try contacting Needle in a Haystack in Alameda, CA. They carry the Evertite frames and they might know how to get ahold of him.
Hi Mary,
Quick question………I have a large linen cross stitch sampler project to start and my Evertite frame is ready to go. Problem: the project is about 24″ x 28″ on 36ct linen. I’m not sure if it’s correct to only load a portion of the linen on the frame, since the linen piece is too large to stretch the whole thing on an equally as big frame. If I am careful not to pierce threads with the tacks, do you see a problem tacking down one section of the fabric at a time? I want to use my Needlework System 4 stand too.
Thanks a bunch for any gelp.
Colleen
I do not think that it would be a good idea, Colleen. The tacks always make a fair hole in the fabric, even if you don’t pierce the threads. Plus, there will be tension on the fabric around the tacks, which will distort that area.
I love th sound of the Evertite frame but after a few searches they don’t seem to be available in the uk
The yellow thingy is a “T” Handle Allen Wrench. Yellow thingy works too. 🙂
Hi Mary, if my fabric squares are cut at 12″ can I use the 12″ Evertite Frame? Thank you
Hi, Jennifer – you’d probably use a 10″ Evertite frame with 12″ pieces of fabric, to give you an inch on each side to pin. You could get away with an 11″, but it would be close. I’d go with a 10″ if I’m using 12″ squares of fabric.
If you need the whole 12″ of fabric to be free from pin holes, though – if the 12″ square is your entire design area – then you need a larger piece of fabric (the rule of thumb is 3″ on each side of your design area, but I usually shoot for 2″). If you go with 3″ around a 12″ design area, then you need an 18″ square of fabric, in which case a 16″ frame would work. If you go with 2″ around your design area, then you need a 16″ piece of fabric, and you can then use a 14″ Evertite frame.
That yellow-handled thingey is often called a “tweaker”.
Mary – I don’t know if you try to keep links accurate, but if so, please check this out.
Your links to sources for the Evertite stretcher bars are out of date. For several I get a notice that the cite does not exist or has been moved. The Tristan Brooks cite is live, but that source does not appear to carry the bars. I say that because I was not able to find them under any of the drop down lists. Stitchers’ Paradise appears to carry only the bars longer than 20 inches (well beyond my ambitions). Needle in a Haystack I can find in a general search, but not at the link this offers.
More generally, thank you for your work. I enjoy knowing there will be something I want to see in my in-box! Kristen
Hi, Kristen – if you go to Needle in a Haystack’s site and click on Search Our Catalog, you’ll see a place for “Stretcher Bars” – and that’s where you’ll find them listed. I’ll update these links. Thanks!
Hi Mary, thanks for that fab review. I’m yet to use a frame, I use the wonderful Phillipa Turnbull’s seated crewel work stand which I love but I can certainly see the advantages of not having to squash my gorgeous Jacobean beaded embroidery into a hoop. Aren’t we so lucky to have the ability to share so much with so many via the internet? I have basically taught myself to stitch with the aid of the A-Z of embroidery stitches and YouTube videos so that there is NOTHING I won’t tackle. I am hoping we will still be able to go to Beating Around the Bush in Adelaide, Australia in October as I have a full week booked and am chaffing at the bit to get cracking. Thank you again for your willingness to share with our fellow stitching community. Take care of yourself. Blessings, Alain
Hi Mary! I have acquired my Needlework System 4 and a few of the Evertites. I have some embroidery projects marked and a cross stitch picture to do, but I’m stuck on 2 things and am coming to you for help, please? One is, I know that I’m going to use 18 count Aida cloth for the cross stitch but I don’t know what brand to buy. I see Silver Standard, Gold Standard, etc…, and then some suppliers don’t classify at all. Do you have any suggestions? Two is, how do you put the tacks in on the side instead of the top? Thank you, Mary!
Hi, Jennifer – Thanks for your questions. For your first one, regarding Aida cloth, I never use it, so I’m not really sure what brands are available and what the difference is in quality. I’ve never heard of categorizing Aida cloth as “gold standard” or “silver standard” – that must be some kind of level within a specific brand. I don’t know what the difference is. Just a suggestions, though: if the piece you are making is going to take you a lot of time, and you consider it a “magnum opus,” then I would probably choose linen over Aida cloth. Linen is a superior fabric all around. It will hold up better over time. For the tacking question, tack the fabric to the sides the same way you tack it to the top – just with tacks through the fabric, into the sides of the frame. The tutorial above shows the fabric tacked to the sides of the frame rather than into the top of the frame. Hope that helps!
I need a floor from that will accommodate a 60×48-inch finished canvas. I will need to be at least 10-inches wider, i.e. 70-inches (seventy). I have looked at quilting frames, but they seem insubstantial. It will take several years to complete this project. I am an experienced needlepointed (40+ years of constant needlepointing).
You might have to have something that size custom made, I think. A couple choices: Maybe try contacting Matthew Sanders on Etsy. (TF Woodcraft: https://www.etsy.com/shop/TFWoodcraft) – he might do custom slate frames. You could also try Needle in a Haystack (www.needlestack.com) – they might have a source for custom made sizes for slate frames.
Thank you for this! I think I’ve found my solution. I’ve used hoops for around 55 years. And my vintage hoops at that. The crap at “JoMichaels Lobby” may be good for purchasing in bulk to give away with a starter teaching kit, but you can have my vintage hoops (as they say) when you can pry them from my cold, dead hands. And I genearally use a 6″ hoop because it’s easier to control the tension than in, say, a 10-12″ hoop.
I’ve tried Qsnaps, but didn’t like the absence of tension in the corners.
I was given a set of scroll bars some years ago … but tensioning the sides is dicey at best because you have to tension and untension every time you scroll the fabric. And the sides are **short** … I was wanting to do something “bell pull” shaped … couldn’t get rollers of the proper length … and I really wanted to work it vertically without scrolling. Not happening with scroll bars.
But this? This is the perfect solution.
Why yes, I have been following linkz on your zite all day. 🙂 why do you ask? 🙂 🙂
Susan
I had never heard of these stretcher bars,Thankyou fir giving such a good .review
I think I will try Evertite bars for stitching stockings and other more complex pieces. But what are the brand names of the “nicer” stretcher bars that I can ask for at online needlework stores? There aren’t any local stories in my area. The larger craft stores all have the cheaper Edmunds brand that I do not care for.
Thank you!
Cheers!
Off the top of my head, I don’t know about the brands of other stretcher bars. They’ve always looked somewhat generic to me. I’m familiar with Edmunds, from seeing them pretty widely available, but … I don’t know about other brands. Maybe check with Needle in a Haystack (needlestack.com) – they carry other stretcher bars, and they might be able to help answer any questions you have.
I see Evertite Slimline Stretcher bars at Stitchers Paradise and Evertite bars at Needle in a Haystack. Is there a difference?
I need to order 12×12. I think 2 pars plus the tightening tool is what I need. Is that all. I have tacks and the magnet tool.
Many thanks
Elizabeth
The slimline have a smaller profile for each bar, I think. I use the regular ones, because… well, I’ve had them forever and I haven’t had a need to replace them, so I’m not exactly sure what the slimline are like. If you need a 12×12 stretcher bar frame, you have to order 2 sets of 12″ bars (there are two bars in each set that you order). The T tool for tightening is a must. And of course, you’ll need tacks for mounting the fabric on the frame.
I have been doing needlepoint for many years and have never used the Evertite-Stretcher Bars, but have decided to do so on my next project that measures 18 x 13. If I apply the canvas to the bars on the side as you suggest, what size evertite-stretcher bars should I purchase? Also I use the K’s Creation Metal Needlepoint floor stand to hold my project. Will the Evertite bars fit into that stand?
The bars would have to be 1.5 – 2″ shorter than the length and width of your canvas, so that the canvas folds over on the sides. BUT – with needlepoint canvas, I would not pin on the sides. I would pin on the top. Canvas doesn’t fold as easily as fabric and you’d have the corners sticking out, which would be a pain. With needlepoint on stretcher bars, the canvas is normally tacked to the top of the stretcher bars and not folded over the sides.
Hi Ms. Corbet! I’ve been stitching mostly in hoops since I started (about 6-7 years ago with a 2 year hiatus due to lack of space), but since I like being able to enclose my design, I tend to go for bigger hoops. Now I’m wondering if it’s worth investing in an Evertite frame for pieces that I plan on framing and either gifting or selling. Since I primarily work on cotton (linen is prohibitively expensive for me), would this be a good investment? Would this entire procedure even work on cotton?
Yes, the Evertites will work on cotton. I prefer a frame to a hoop, if I’m going to be framing a piece of needlework. If you finish your work with a hoop (ie, what they call “hoop art”) it probably wouldn’t make a difference, but I don’t usually finish my embroidery that way, so I prefer using stretcher bars. Hope that helps!
Hi Mary,
I have an Evertite frame still together (without fabric attached) for several years. I’m wanting to take them apart, but afraid to damage them. They are together very well! Do you just pull and tug until they come apart? Do I need to loosen them first? Thank you!
You should go ahead and roll back the little screw things before you take them apart, so that they are flush with the wood on the inside. And then, yes, you just sort work them (in a scissor motion) on each corner, until they start to wiggle out and you pull them apart. It’s worth taking them apart – then you can mix and match sizes to produce different sized frames.
some tricks that make using stretcher bars much easier:
1) it’s quite hard to sew right up to the area on the bars, never mind where the fabric lays on top of them. add 2 or 3″ to each dimension of your sewing area when picking the bar lengths, to allow yourself space to work. Cut your fabric a *further* 2″ larger in each direction, so you have space to turn it over the bars and tack it on the sides.
2) to make the corners of the cheap kind stay tight and square: go to a hardware store and buy some metal corner reinforcement pieces, 1.5″ or 2″ per leg, with each leg no wider than the width of the stretcher bar (they look like a little chevron shape, with a hole on each end), and flat headed screws that will fit into the holes but not fall through, shorter than the thickness of the bars. any power drill (Ikea offers a cheap one) will allow you to easily attach these to the ‘underside’ of the stretcher bars at each corner, before putting the fabric on. Totally reusable, so you just need 4 corner thingies and 8 screws, unless you want to have multiple frames made up at once.
alternatively, you can permanently glue them with wood glue, but then you can’t reuse the bars for a different size frame later.
3) to hold the fabric to the stretcher bars, don’t fight to get regular tacks in – instead, use the kind of stapler used to hang posters on bulletin boards and telephone poles. (if the staples don’t go in all the way, whack em in with a hammer.)
4) For lighter fabrics, you may want to use heavier backing fabric and then baste the surface fabric tightly to it, so it isn’t strained too much by the tacks or staples.
A more traditional method, suitable for material that needs to stay light or sheer, is to put a kind of sleeve of canvas on each edge, which you then sew your surface fabric to temporarily – I can’t really explain fully without images, but I’m sure instructions are somewhere on the internet. (If not, it’s in the Royal School of Needlework’s Guide to Embroidery book, which is a wonderful resource in general.)
I have a few Evertite frames and I love them. I am working on a cross stitch project now on 32 count linen and some if the stitches are 1 over 1. Using a 20 inch x 10 inch frame. I am looking for a floor stand that will be comfortable use that I can turn over to anchor the threads. I have a floor stand similar to the Edmunds floor stand but the evertite fram is a little heavy and it is cumbersome to flip over to weave in threads especially couching with gold threads. I can’t seem to find any floor stand that works with Evertite frames.
I use the Needlework System 4 with the frame clamp.
Hi. I would be new to crewel work if I include it in my interests. I am reading your site and see the information about Evertite frames. If tacks are used, is this a one-time use frame? It seems multiple uses would eventually mean too many tack holes on the frame?
I’ve been using some of my Evertite frames for almost 20 years, so definitely more than a one time use frame! You do end up with multiple holes, but you can use the same holes over and over again.