


One of the most frequently asked questions I receive via e-mail is “How do I begin my embroidery thread without using a knot?” Way back when Needle ‘n Thread first started, I wrote a post (with a really corny title) about waste knots. But sometimes, it’s better to see it in pictures, so…
I worked up a series of photo tutorials on starting threads when you embroider. There are several ways to begin your embroidery thread, and I’ll be covering my favorite ways with these tutorials over the next week or so. I’ll also categorize them in an easy-to-find index.
The Waste Knot
We’ll start with the easiest one (in my opinion…), the waste knot, which is great to use when you’re stitching along a line. It’s very convenient to use when you’re beginning a thread that is not adjacent to any other embroidery stitches, although I sometimes like to use a waste knot even if I am adjacent to other stitches, too.

You begin on the front of your fabric, and yes, you do use a knot! Put a small knot at the end of your thread. Then, with the top of your work facing up, take your needle down into your fabric about an inch or so down the line from where you will begin stitching.
You want to head towards the waste not as you stitch. I’m going to use a stem stitch here.
Take your first stitch forward, then turn your work over:
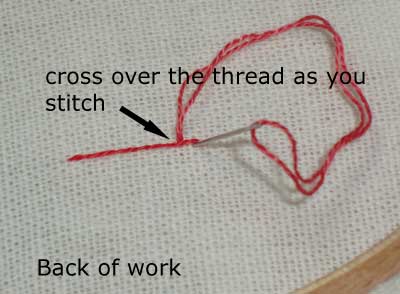
I’m turning the work over here, so you can see the back. Usually, when I use a waste knot, I don’t turn the work over. I use a finger to move the thread on the back up and down, to make sure I’m crossing over it. Once you get used to the whole concept of a waste knot, you’ll also get used to manipulating the thread on the back up and down, so that you don’t have to turn your work over.
Each time you come up to the front of your work from the back, you want to cross over that thread that’s lying across the back of the line you’re stitching, so that you are, in a sense, couching that thread down.
Alternately, some stitchers like to pierce through the line of thread on the back, rather than cross over it, stitching through the back thread down the line. I don’t really like doing that, especially if I’m using a thread that has any “fuzz” to it, because the fuzz can pull back up with your stitching. Also, I think on some threads, splitting the thread tends to weaken it or fray it, which would make this whole concept somewhat useless!
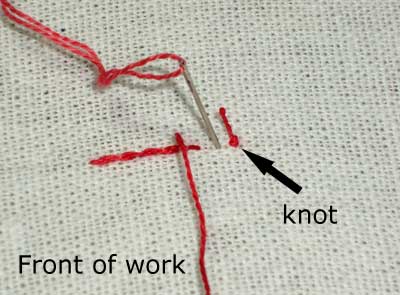
On the front of the work, you want to stitch up to the knot, checking the back to make sure that you’re crossing the thread (or using your finger on the back of your work to move the thread up and down so you can cross over it).
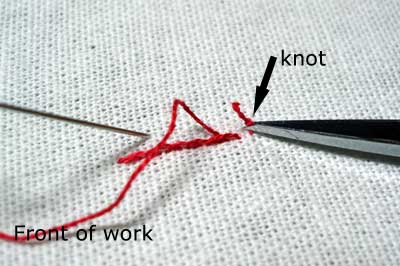
When you’re within a stitch of the knot, pull up on the tail of the thread to lift the knot off the fabric, then snip the thread right under the knot, close to the fabric.
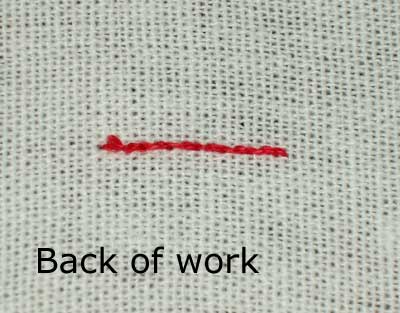
On the back of the work, you will have a neatly couched line, and your thread is now secured without leaving a knot in your work. Simple, isn’t it?
Pros of the Waste Knot
1. It’s very easy to use for straight lines and gentle curves, and it works great for surface embroidery, needlepoint, cross stitch, and other counted techniques.
2. It conserves thread, compared to some other ways of starting threads. At the most, you lose around an inch and a half of thread in the anchoring process and in the knot.
3. Once you get used to it, you can manage a waste knot solely from the front of the fabric, which is convenient.
4. It’s a great way to start a new thread when you’re not working adjacent to any other embroidery stitches (or even if you are, if you want).
Cons of the Waste Knot
1. To work it efficiently, you need to get used to it. Until you can manipulate your thread without turning your work over, it’ll take time and it’ll be a bit of a pain to have to turn your work over to make sure you’re stitching over the back thread.
2. There are other ways of starting your threads that do not use as much thread as the waste knot.
If you’ve never used a waste knot, go ahead and try it out! Let me know what you think!
Great tutorial! I’m going to try it today. Thanks!
Thank you Mary…Just what I need to know! How is your recovery coming along…back in the “Pink” yet?
Thanks for this tutorial. I’ve been wondering about this for quite awhile and I will definitely give this a try. I think this will help to make my embroidery look so much better (especially on the back side). ~Linda W.
Hi, all – glad you like the tutorial!
Aanie… I’m back. Not quite pink. But back! Getting pinker…!
Thanks!
MC
Very useful tutorial. Thank you so much.
Love this tip! I've been doing this for years without the knot and it's such a pain to hang onto the thread as you try to keep crossing over it on the back side. Love the knot – this is so much easier…THANK YOU for sharing!!!!!!!
Thanks so much for this tutorial. The back of my embroidery looks so much newater without all of the knots 😉
neater*
Ok. I’m going to try to phrase this question so that it makes sense. I’m using mouline special DMC 25 embroidery floss (I think it’s floss). So basically it’s 6 pieces thick. I’m trying to figure out how to thread my needle, which may sound silly. I once went to an embroidery class and the lady told me to take 2 of the pieces per usage. I thought you threaded it like a normal needle pushing through one end, making it even on both sides and making a knot there. So could someone, anyone please explain to me how to thread my needle and begin. Thank you SOOOOO much!
Christina
Hi, Christina – No problem with the question!! It’s actually a good one, because there are different approaches to this! Frankly, I never ever double my needle in the thread (threading one end, pulling to the halfway point, and knotting the thread). See, if I do that, and then get a knot or tangle in the thread while I’m stitching, I can’t take my needle off to correct it, without cutting the thread. So I think it’s always better to cut the thread the length you want it for stitching (about 18 – 20″ is what I stitch with), and then separate the number of strands you want to stitch with (this is called “stripping the floss”) by removing them one at a time from the bunch of 6 threads, then putting the number you’re stitching with back together and pulling them through your fingers so they’re even and nice and smooth, then threading the two ends into the needle at once.
Hope that helps!
MC
Nevermind the question. I figured it out 🙂 Sorry for the inconvienience.
THESE STITCHES ARE GREAT!!!!!
good website
Hi Mary – thanks for showing how to start neatly! I’ve got a question. If I do a running stitch and the line is very short (less than 2cm), how should I start the stitch? The waste knot requires a line for me to thread over but if I do a short running stitch, there practically isn’t any thread at the back of the work. Hope you understand what I mean. Thanks!
Forgot to add – it’s a short curve I’m trying to do.. the short curves in your daisy pattern. I’m attempting to use a whipped running stitch
Thank you so much for this! And I would like to take the opportunity to let you know how much we (my daughters and myself) appreciate your site. You have helped us in so many ways. This ‘waste knot’ is one of the simplest yet valuable tips you have give to us… thank you… it will create for us a much neater and cleaner back.
hey ,, i’m from sri lanka ,, i want & i like hand embroidery ,,, i used varoius types to get a frmal knowledge on this field,,, but i coudn’t,,, however this web site brings that fortune,,, thnx alot NEEDLENTHREAD.COM… once again big thnx
I have purchased books, read other tutorials but your is the best I have come across. I am a beginner quilter and embroider and at the age 64 (late bloomer) I have found a new passion. My mother sewed but no one around me quilted or did needle work. I find your web-site for a beginner very helpful. Thank you for sharing.
What method do you use for starting and finishing a French knot which is often away from the other stitching
Hi, Jill – I have two tutorials on the topic:
https://needlenthread.wpengine.com/2012/06/isolated-french-knots-part-1.html
https://needlenthread.wpengine.com/2012/06/isolated-french-knots-part-2.html
Hope that helps!
Mary, your Mission Rose Project is so beautiful.
I may have missed it, but is the project for a competition or just for your collection of pieces. I can’t wait to see a full-on picture of the finished project. Thank you for sharing your beautiful work.
Thank you so much for the lesson on the waste knot. Also for the instructions for the Itty Bitty Buttonhole leaves & flowers. I wanted something different to stitch on my felt ornament I was making, I think this filled the bill. Will post you a photo when finished.
Hi, Elaine! I’m glad they came in handy – looking forward to seeing a photo!
Just had to thank you. Your instructions are fabulous. I’ve been making a bridal handkerchief and just finished removing my embroidered initials done in embroidery floss because they looked so bad! I have now order some cotton floche, know how to hide my thread starts, and am looking forward to better results. It would be cool if you sold some starter thread sets, like of different colored floche and pearl cotton.
Thanks, Sandra! I’m not really able to offer retail supplies right now, as I don’t have space for storage or packaging. But you can order partial twists of floche from Hedgehog Handworks!
merci !thanks!
I have been given a hoop stand and I’m trying to figure out how to end stitching while the hoop is in the stand. Do I remove the hoop every time I need to end stitching ,i.e. Lazy Daisy stitch.
Explained in very clear and precise instructions, thank you.