


Continuing with this series of photo tutorials on beginning and ending your threads in hand embroidery, here’s a very simple way of ending your embroidery threads without using a knot.
I stitched a line of broad stem stitch to demonstrate this, using a waste knot to anchor my thread before starting. This method of ending threads, though, will work with practically any kind of stitch.
Once you’re ready to end your thread, take your needle to the back of the fabric (with the last stitch) and turn your work over.
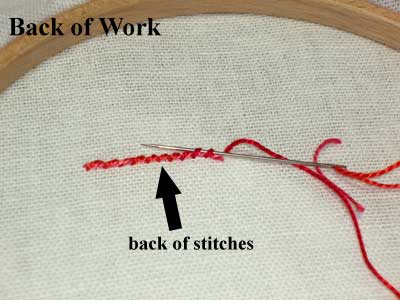
Run your needle under the back of two or three stitches.
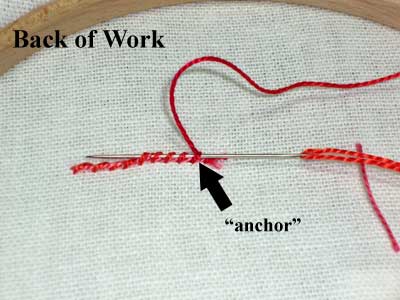
I like to “anchor” my ending thread by taking the needle back under the last stitch – it’s like making a backstitch over back of the last stitch you went under. This “locks” your working thread and makes it a little more secure. So, backstitch over the last thread you went under in step #1, and then continuing threading your needle under the line of stitches, until you’ve about covered your needle. Then pull the needle through.
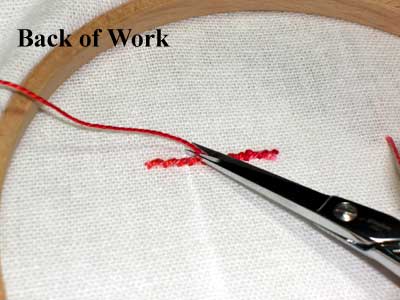
Snip your working thread.
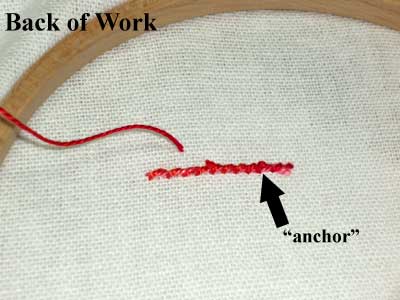
You can see here with the “anchor” stitch is. With finer threads, it won’t be as obvious, but here, I’m working with a #5 perle cotton, so it’s a wee bit bulky. Still, I use them even with cotton perle. It doesn’t make enough of a bump to be felt or seen from the front.
So that’s one way to end your threads, and perhaps the easiest way!
If you’re new to embroidery, you may want to check out the other tips and tricks on beginning and ending your threads found here on Needle ‘n Thread.
Enjoy your stitching!
We just do a simple knot. We put the thread though one of the stiches in the back then put the thread round and round for one or two times and then pull the needle. That makes a knot. The knot can be made very small invisible. While starting we just put a knot right in the end of the thread then just start stitching. if the know is very small that it comes out from the cloth we put the needle down immediately and put it from the middle of the thread.
Hi Mary,
I don’t know if I’m just an old dog and trying to learn a new trick is too hard or what but, I am really struggling to figure out how to end a stitch without a knot when it’s single stitches that are not close enough or no “bulky” enough (or linear at all) to anchor the end to the material. For instance my current project has small clusters of french knots and rows of individual chain stitches (lines up “lazy daisy” stitches to look like the leaves of a fern). They are just far enough apart from one another that it seems like it would be to loose if I were to thread under the back threads, (like you are showing us). I can’t help but wonder if it really would hold up to a lot of washes (it’s a pillow case for a 10 year old)or if it’s just that because it’s a new concept to me (not knotting) so I’m just anxious. I do understand if it’s a line of stitches or satin stitching…just not sure how to go about it if the stitches to pull the needle under are few and far between. Please help?? My biggest desire is to improve my work. thanks so much in advance. I hope you can make sense of my writing down the picture that is in my head!
Hi, Heather!
Ah – it’s a good question. If you have clusters of French knots, there shouldn’t be a problem – a cluster would create enough threads on the back of the fabric to anchor your thread. You want to run it under, and then “backstitch” under again, perpendicular to your first run-under, if that makes sense. That will catch and secure the thread. With the lazy daisies, is there a stem close by? If not, can you run the thread under your final stitch, and maybe pick up one thread of your fabric, underneath the stitch on the top, and then “backstitch” into that stitch, to secure it? The idea is catching the thread, but occasionally, in cases like this, I pick up just a tiny thread of fabric in an inconspicuous place (like under the stitch, where it can’t be seen). This secures the thread. Let me know if that makes sense. Maybe I can work it up in photos later this week, to show you what I mean.
You can also drop me an e-mail if you want, with an image of what you’re stitching: mary (at) needlenthread (dot) come.
~MC
Hi Mary,
Thank you for your fast reply to my first email. I truly appreciate your help. I have started my project and I found that the when ending my thread, my loops are not the same in your example. I was wondering if I am doing it right, I am going through one loop at a time, through 4 to 5 and then cutting the string. Is that correct? I would hate to finish it, wash it, and then it fall apart. 🙁 Thank you again for your time! I love your site, it is very helpful!
Hi, Theresa – Instead of just running it straight under a couple stitches, whip it around those stitches, and then go back a stitch or so to “lock” the thread, and then move forward again, whipping around a few more stitches. When the item is washed, there will be just enough shrinkage, usually, to tighten the threads up a bit, and there will be enough friction there, that they won’t normally come undone. Hope that helps! ~MC
I’ve always used the pull-through method but now I’m working on a larger project using a scroll frame and a stand. Any hints on ending threads with this set-up? Do I unclamp each time I end a thread? Leave threads dangling underneath and do a bunch at once? Contort myself to get underneath? Any suggestions will be most appreciated .
Hi, Thayer – Normally, when I am working on a frame, I start and end all my threads on the front of the fabric. So, to end the threads, it’s just a matter of doing so in a spot close by that will be embroidered over by other threads. Make three or so tiny stab stitches in a close group (or back stitches) in an area that will be covered by embroidery, and then bring your needle to the front, and, pulling up on the thread, snip it off right close to the surface of your work. ~MC
Hello Mary
I have been refering to your tips on embroidary and have had good results with silk cross stitch. However I am now working on a wool tapestry of poppies with several colours close together leaving lots of ends. The method seems to result in lumps and bumbs and is beginning to look a bit untidy. Is there another method to tidy up ends which does not cause bulkiness? thanks from Pauline
I have trouble trusting the waste knot and your ending with Brazilian thread.
When I first learned to do dimensional embroidery in 1979) called usually “Brazilian” the beginnings and endings were messy,indeed there were some embroiderers that could not tolerate them and gave up altogether. I have not ,as yet,discovered a way to feel that my beginnings and endings are secure, although they are certainly messy.
Surely I am missing something or maybe just stupid?Is this a problem with all rayon thread?
Any insight would be welcomed.
Your site and stuff is wonderful.
Sincerely
Mary “Sammy” Westphal
Clarification, my projects in Brazilian are secure albeit messy, I would like them to be neater like my regular projects.
Yes, rayon thread is a little more difficult. I think a waste knot and anchor stitches work, if you backstitch into the little anchor stitches, and then stitch over that area once you start stitching. A few more anchor stitches might be helpful, too – four or five, maybe….
Is this finishing technique secure enough to be washed in a washing machine? For instance, on hand towels or pillow cases.
Hi, Chelsea -I’ve used this technique to end threads on towels and such that go through the laundry without any problem. However, you can always add a half hitch kind of knot around the back of the Stitches, if you want more security.