


Want to learn how to work the long & short stitch, for needle painting and shading techniques in hand embroidery? Here’s a sampler you work your way through, step-by-step, to build the skills you need to embroidery smooth, beautiful, well-blended shaded embroidery!
List of Long & Short Stitch Lessons and Links
- Supplies
- Lesson One: Setting Up the Project – includes design, materials list, instructions on transferring the design, etc.
- Lesson Two: Element One – Inside the Box – basic long and short stitch technique – Includes Video Tutorials!
- Lesson Two, Part 2: Element One – The Large Box (stitched on the diagonal)
- Lesson Three: Element Two – Triangles – Shading at an Angle
- Lesson Four: Circles – from flat to three dimensional on round elements like berries
- Lesson Five: Ribbon – Shading around curves and to a point
- Lesson Six: A Simple Leaf
- Lesson Seven: Another Leaf – slightly more complex
- Lesson Eight: Small Simple Flower
- Lesson Nine: Leaf with a Turnover
Mary, I can't seem to find any of the 100s in your list of threads…I even have an old chest from a friend who has had threads for ages & they aren't there either. Could you tell me what color they are so I can find substitutes? Thanks! Anxious to get started.
Sheila Keeling
Hi, Shiela –
Numbers 158 – 161 are four shades of blue. If you find a blue that has a four-shade range, you'll be good!
MC
Shiela from Ca, if you have a Michael's near you they should have those blue shades 158-161, that's where I found mine here in NC
They are new DMC colours here too!
I only found those 100s in one shop (the best one…).
Thanks for all the help!
i do not see an "editor's Floss column on the right side that is indicated under the photo…
Hi, Monica –
The "Editor's Floss" is on the right side of the web page, at the top. It's the first menu of links in the right hand column…
MC
The long and short lessons have been wonderful. Though I have not entirely been able to keep up I have learned so much and really appreciate the time spent putting the series together.
Actually, several years ago I decided to duplicate exactly anything new that I learn. So yes, I would use a design from a book and duplicate colors, etc and have done it many times. That is how I learn the first time. After that I make my own adjustments to whatever new technique I am learning. Thanks for a great site.
Mary,
I have sure enjoyed your complete instructions the pictures are great.
Would I change or go by what the instructions say. If it is how to make a stitch I would probably try it their way as that is how that particular stitch is done and try to learn how to do it. If it is a kit and it said to use this stitch and I felt another stitch might be better I would change. It is my art form and I am a changer and do it my way but the stitches need to be learned right.
Beckie N Kansas
very interesting I enjoy it a lot
–thanks–
Florist
Hi Mary
I have learned a looot about embroidery from your site,in fact you are my first teacher.Really thankful for all your tutorials.I went through the long and short stitch tutorial also.
I found another tutorial by Helen M Stevens here http://www.fritillary.co.uk/mlol_classes/lol-free/Welc.htm . After going through this I have a confusion.Here she have used only long stitches for the flower.Can we use long and short stitch for shading the petals here.Why was long and short stitch not used here.Is there a basic difference in the techniques applied.Sorry if my concept is wrong.Can you please clear my confusion.
Hi, Sarika –
There are different ways of filling shapes. I believe Helen begins with a row of long and short stitches, and then all her stitches after that are long, but they vary in length, because the first row was long and short. I'll have to take a look at her tutorial to see how she does it.
Notice that, with her threads and the way she does the filling, she achieves a different look, too – it's not quite as full, but very light.
Thanks for pointing out the link!
MC
Merci beaucoup pour le cours publié chez Elena33
Thank's
Piroulette
thank's for our lesson to Elena 33
hi mary,i love your works they are definitely stunning!!!!!!!!!!!!!!!…..
tnx very much
it really helped us a lot….
,,,,…
,,,,,,,…////thanks again!!xoxo
this is mildred love yah,!!!!!!!!!!!!!!!!
,,,…/'_'/…,,,,
Thank you very much for these lessons. I was stitching a small rose from the "Inspirations" magazine (62). It was my first stitching using short and long stitches. So I was reading and rereading your lessons. I am very proud with my result. And it is because of your lessons. Thank you once more.
One day I'll stitch this sampler too.
Mary,
I've been doing a project on filling stitches in embroidery and the last stitch on my list is long and short. Was wondering how to fill a floral pattern like this one with long and short.
http://www.needlecrafter.com/SearchKey/SearchKeywords_detail.php?refNum=10278&PHPSESSID;=bd0b71b2135ded484c8f22da343535a3
Could you pls explain the filling of turned over petals?
Deepa
Hi, Deepa –
I usually do turn-overs in satin stitch. Here's an example, in this lesson:
Leaf with a turn-over
The stitch direction of the turnover should follow the growth direction of the petal, but you have have to imagine the petal flat, as if you're looking at it from the back to get the direction right.
Hope that helps!
hmm.. yes,I did check that lesson earlier.But the orientation of the flowers and the turnovers in the said pattern seem to be a little tricky.
Deepa
Hi, Deepa –
Hmmm. I can't seem to download a larger version of that pattern, so I can only see the tiny one on the link. If you have the larger version and want to e-mail it to me, you can (mary (at) needlenthread (dot) com)… I'm off to work right now, but I'll check later in the day!
MC
Hi Mary,
The pattern has been removed from the site. I think I've saved a copy of it.I'll check out and mail you when I reach back my home. Iam at my in-laws place now for the yearly visit 🙂
Deepa
hi dear,
i am eli from iran.i am intresting in yor web site.i like to buy your book ,but i dont know,how can i do it?
merci pour vos cours en ligne,
thanks for all you do
enjoy
Hi Mary is there any way of showing the tecniques of short and long stitches on the web, I’m in South Africa in the Country side and here are nobody that can teach me. Where do you start? say for instance a dogs face when will you start the eyes, what will be first, and what last?
merci pour vos cours et pour l’autorisation de traduction ce qui est fort agréable lorsque l’on ne parle pas du tout l’anglais, merci encore pour toutes ces belles broderies
Thank you very much for these lessons.But Iam left – handed and many stitches are very difficut for me.
Thank you very much Mary for your lesson to the “Passé Empiétant” ( excuse me for my bad english ) I comed to your web site very much ,but I see the blog of Elena 33 who is very pretty .
Thank you so much !!!
Kind regards
Jennifer, from France
Good morning to you.
I live in France and I am just retired.
I always loved embroidery but had no time enough to learn it very well and to do really very beautiful things to be prout of.
My works were never as good as I would like them to be, as I don’t have the real basics to begin with !
I just discovered your website, and I take delights in it ; it is marvellous ; and your tips are just what I am looking for !
Thank you, I will never tell you it enough !
Have a nice day.
Jacqueline
Mille mercis pour toutes ces lessons.
Très bonne continuation à vous.
Bien sincèrement.
je remercie enormement pour les explications ces une merveilles….merci beaucoup
Hi Mary, I am doing a project at school and I doing it on long stitch will you please answer some short questions. Thank you for your time (;
1. How has technology changed long stitching
2. What are the high lights and low lights of long stitching
3. What skills do you need to have to be a successful long stitcher
Hi, Katherine – Thanks for your note! I wish I could help you out, but I think you are probably talking about a different stitch, not long & short stitch. Long stitch is a needlepoint stitch; it’s also a bookbinding stitch; and it’s also an embroidery stitch. But it isn’t the same thing as long and short stitch. Besides, it’s always better to do your own research and write your own answers, than to ask someone else to give you the answers. You’ll learn more and you’ll have a better sense of accomplishment when you’ve finished your project! But first, you need to determine what your project is actually about – what long stitch are you talking about and in what industry is it used? Are you supposed to interview people who use the stitch professionally? If so, are you looking for embroiderers? For bookbinders? For stitchers who work needlepoint? Hope that helps you out a little bit! If I’ve misunderstood your question, you’re welcome to use the contact form on my website here: https://needlenthread.wpengine.com/contact and drop me an email to explain your project in more detail. ~MC
I found this site after spending hours on another that though helpful is not as impressive as what you have created. I want to thank you for your generosity with what you are sharing. Your creative knowledge and experience and the commitment to mentor, teach and help us. I will avail myself to much of what you have.
I just want to thank you. I an self taught and enjoy embroidery very much. I have made up stitches that worked for the project at the time but are impossible to reproduce and shouldnt be. My daughter asked me to make her a quilt whith embroideredf characters from Zelda. No problem….5 years later I am beginning that project. I really want to do a good job and so here I am 52 years old, and learning what the basic stitches are supposed to look like. I do have a question about cleaning the quilt after it is done. How does one protect the work? I understand that alot has to do with the stitches used but I am doing complete filling in of the characters. I will send a picture of my first finished work which is a mask and I credit the finished looks primitive. I would like to be able to do a much cleaner and “painted” (for lack of a better word)on the other panels. I am going to begin working on the two main characters Link and the Princess.
Thank you Mary.
I really like the look of the long and short shading on the large leaves. Do you just know that the dark threads go on the top of the leaves and the light threads on the bottom? I am not sure I would know in what manner to apply the threads.
Hi, Shirla – It just depends on how you have worked out the shading, where you want it to look like the light is striking, what you want the leaf to look like. I think it just depends on the individual element and how it’s situated in the design. ~MC
Mary,
I’ve been asked to present a program for our Embroiderer’s Guild of America chapter on Long & Short Stitch and shading. I’d already downloaded your instructions for this series of exercises. May I use them for my examples and recommend that the members do this series to polish their skills?
Thank you for creating such a wonderful resource!
Yes, that would be fine, Anne, as long as anything you hand out or present from the website is attributed to needlenthread.com – thanks so much for asking!
Hola:
Me he quedado impresionada con tus nueve clases de puntadas largas y cortas que no tengo palabras para explicar mi alegría y expresarte mi agradecimiento.
Te pediría el favor de hacer lecciones de otras flores y pajaritos bellos como los roller y otros.
Nos ayudarías mucho a quienes amamos la naturaleza y nos gusta bordar Congratulaciones. Elisa
I recently found these lessons and completeed them. Thank you.
Dear Mary, please forgive my ignorance, but while watching the videos on short and long stitching, I cannot tell if you are using all 6 strands of the thread or only 2 or perhaps just one strand. You mention in video 1 about splitting (I am presuming you mean going between 2 “separate” stitches, not actually splitting a single strand stitch, which I think would be difficult) stitches. Can you please clarify for me?
I love your videos. Reading directions is fine, but seeing, for me anyway is much needed. If I can see it done I can do it, reading it, well let’s just say not so much.
Thank you for all you do.
Hi, Norleen – it’s one tiny strand from the six, so separate out one thread from the six and you’re good to go! Glad you like the videos!
Mary,
Thank you so much for posting these lessons. I’m thinking about working it with Appleton two ply yarn. would you recommend enlarging the pattern and if so by how much? Are there any other changes you would recommend when switching to a larger thread?
Thanks
Jessica
Hi, Jessica – I’d at least double the size of the designs, if using Appleton. Other than that, you should be ok!
Hi Mary,
I am going to be starting this lesson/tutorial soon. First I need to get a lap-hoop and a magnifier! I, for the life of me, cannot see the thread in order to split it and don’t want to turn myself off with this stitch by frustration. I am also ordering 2 of Trish’s books, the beginning needle painting and the colors/shades book that is listed on her website. In the next month or two after that, I am going to order some of her kits. (The beginner ones!) I really want to learn this technique, it’s just so dang beautiful and I see so many ways I can incorporate it into my crafts (or would they be “works of art”?).
You have done so much for me and I want a way to support you and your site. You don’t have a donate or contribute button, so I was wondering if the e-books that you sell that are listed under your shop link that are listed from needle and thread go directly to you? I just feel like the hours upon hours of tutorials that I have done from your site (both video and pictorial) I need to pay you something! If you lived near me I would sign up for your classes, even the ones that are for the 10 year old’s!
Also, I mentioned that lap hoops, at first I thought I wanted a “sit on” lap hoop, but for the fact that I can’t sit up straight for long periods of time, I was wondering if one of the lap hoops that have a small hoop on one side and a larger hoop on another would be a good alternative? I have MS and sort of “recline” more than sit up straight. I know that I have been “reclining” with a small hand-held wooden hoop works for me, but a lot of stitches I need to use both hands! (I won’t tell you the frustration I had of watching one of your videos 5 times before realizing that you were using both hands… ha ha ha…silly me!Well, I guess I did tell you, huh?). I am planning on investing in a good quality hoop that allows me to use both hands, so I want to make sure that I am on the right track. Spending 50-80 dollars on a tool is not an issue, beside a huge financial cost while living on a tight budget, I don’t mind paying money for quality products that will last me years, I just want to make sure I am investing in the right tool.
(I did follow your advice and purchased the DMC threads and put the cheap ones in my craft stash to use in some other way, perhaps using it for hand basting my quilts, don’t know, but I did purchase 62 skeins of stranded cotton, 2 silk skeins, and 5 #5 perle cotton skeins, boy that was a fun shopping trip! And what a difference! I am working on my first project that I want to post when I am done so you can see how much you have inspired me! I came to this site just to learn how to do lettering so I could hand embroider my quilting labels! You have turned me into a passionate embroiderer that I never imagined I would be. A fire has been lit under me, thanks to you, and I really appreciate it. I have so many creative ideas that are flowing and I haven’t had that since I learned to crochet 40 years ago! You are a very inspiring person, I hope you know that. I hope there is a way that I can support you in some small way for what you do for me.
Sorry I write such long comments. I start out saying I will be brief, but like I said, I am inspired and excited about embroidery ( read about it for 8 or more hours a day, learning all I can) and you know what happens when one becomes passionate about something, you can’t seem to stop that person from talking about it. Ask my fiance, he knows and he knows a lot about embroidery, ground fabric, what to use and what not to use and how much our budget is going to be set aside for it every month. I am lucky to have such a supportive person who will do anything to support my passions. ;0-)
Have a great day!
Hi, Christi – there are lots of folks who like the double ring hoops. If you recline, though, and the double ring hoop is sitting flat on your legs or lap, you might not be able to get the angle you want on the top hoop. I suppose you could set it on a pillow, at a bit of a slant, though, and get an angle on the whole apparatus that way. I haven’t used one, so I’m not sure how comfortable it would be. The nice thing about the sit on hoops is that you can adjust the hoop to work it on an angle. You don’t really have to be sitting up straight with them. You can slide the base under your leg pretty much in any kind of chair, and even if you’re reclining a bit, although you would feel the board on the base more, if it’s not flat, I think. I’m not really sure which would work better for you, then. Maybe start with the less expensive option and see how it works for you? And then if it works, you’ll be set! Concerning the ebooks, yes, those sales go directly to me, thanks for asking!
Thank you Mary!
I am going to see if there is a needle craft store near me or near my doctors office and see if they have either one and try them out. If not, I will go with your suggestion on starting out with the least expensive and try it out. I probably will, in the end, get both as I am sure there will be situations where I would use them. I don’t mind investing in good tools, I just can’t go on a shopping spree…ha ha ha
Blessings to you Mary! ;0-)
Mary,I worked all 9 lessons a year ago. I enjoyed every step. I learned the long and short stitch many years ago and developed my own way of adjusting the stitch to the different designs I would stitch. Your lessons broke the long and short stitch into different elements. It was a fun exercise to work the different elements in sequence. Thank you. AMK
Hand stitching is all I’ve been doing for three weeks during my medical leave following neck surgery. Now that I’ve finished my “basic” embroidery stitch stash, I can start stitchery that I plan to frame instead of use as a dresser scarf or pillow case.
The tutorials on your site are the best I’ve ever seen. I’ve been on this site for a few hours now and am ready for every task of making leaves, birds and flowers look real—after looking up images of the real thing for each task of course. I’m a biology nut that teaches chemistry (love it too) that also teaches quilting after school and at church….and then I do tons of hand stitching for fun. With your help here, I can hardly wait to start stitching my first gold finch or cardinal!
Thanks for the hours you must have put in while putting this site together.
Thanks, Diane! I’m so glad you enjoy Needle ‘n Thread! And I hope your neck surgery works out – no kinks!! 🙂
Merci beaucoup pour avoir permis à Coeur de Freezia la traduction de votre travail que je trouve absolument merveilleux
Adorei eu quero aprender bordar isso vai me ajudar muito
Thanks for all, thanks for sharing
The long and short stitch seems to be for shading colors. I’m a beginner. I bought a cloth child’s book with printed animals on the fabric. I thought I would add some interest to it by embroidering over parts of the printed animals. A dog is on the cover. I thought I’d highlight the spots but am not sure which stitch I should use to make it look like hair. The dog is basically white with brown spots. I thought I’d use the long and short stitch without the split stitch on the edges to make it look like hair poking out around the form of the dog. I need your professional suggestion. I am self taught only by watching videos. When I ran into your YouTube videos I couldn’t believe my eyes. Exactly what I was looking for. Thank you.
Hi, Sherry – You can use long and short stitch for animals’ coats, too, and it sounds like a great option to me for filling in the spots on the dog! You might use a couple shades of brown, or even use a variegated brown in DMC floss. You’ll just use one strand from the six, and the variegation would give you a bunch of different shades in the one spot, to just liven it up a bit, without having to switch threads for different shades. Just a thought!
Thank you ! Merci pour tout ce travail
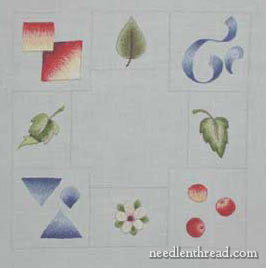
Dear Mary,
Did you outline the boxes of the nine subjects in this Long and Short Stitch Sampler?
If so, what color thread and stitch did you use?
Thank you for your time,
Mary Hanley
Hi, Mary – I didn’t, but if I were going to, I’d probably use something like Palestrina stitch (for texture) and one of the blues in the triangles or the ribbon.
Thank you so much !!
I’ll think of you by learning to embroider these points from Corsica, the island I live.
Have a nice Week,
best regards
Caroline
Bonsoir,
Merci beaucoup pour vos cours et leçons qui me sont très utiles pour apprendre le passé empietant.
Encore un grand grand merci
Cordialement
Gladys
Hi Mary I am diving into needle painting. I saw the great tutorial on leaves. But I am planning a daffodil project with very long narrow stems like the iris pictured on this page. Can you provide me with a little more detail on how you embroidered the iris leaves? Thanks so much.
Hi Mary. I noticed the iris I referred to is not on this direct post but came up when I googled “ how to needle paint stems and leaves “ and clicked on your link. Sorry for any confusion.
Do you have a kit that is marked off for shading? I’m having a really hard time with this technique. Thanks, Mya
Hi, Mya, I don’t have a kit at this time, I’m afraid! I have some projects that incorporate shading, but they aren’t necessarily available in kit form.
Dear Mary, Do you have a lesson on using the long and short stitch when using 3 or so colors in a blend, to create an animals fur for example. I am thinking that you need a few needles threaded and working at the same time? Thank you so much for your help.. Ellen Grunsell
Hi, Ellen, I don’t have any lesson on animal fur, but using three individual colors – each in its own needle – isn’t much different from what you’re doing in any of these long and short stitch lessons, except that you’re alternating the three colors here and there to get a blend. You are correct about having several needles going at one time. You might even need more than three as you build rows of fur.