


Lesson Three of the Long and Short Stitch Shading series focuses on stitching to a point. I have to admit right off the bat, my stitching on these elements is not as good as I would have liked them to be! I suppose I could chalk that up to some kind of panic to get the lessons done, but really – it’s a such a cop-out to offer excuses! I suppose you’ll just have to take it as it is! The technique is there, anyway, and I’m sure that some of my “students” here will outstitch me on the finish – which is actually what a teacher always wants, isn’t it?
If you’re just popping in on this series of embroidery lessons on long and short stitch shading, you can visit the Index of Long & Short Stitch Lessons to find all the back issues of the lessons listed in one place.
Don’t forget that I’ve also set up a Needle ‘n Thread Flickr group, where you can post pictures and get feedback.
Our objectives in this lesson are to practice stitching long & short stitch to a converging point, keeping the correct stitch direction, and to understand how to reduce the number of stitches in smaller spaces (without bunching up the stitches) in a way that looks (more or less!) natural…
Materials:
1. Project in hoop or frame, with element two: triangles centered (lower left corner of the design.
2. #9 or #10 crewel (embroidery) needles
3. Small, sharp embroidery scissors
4. DMC stranded cotton (or equivalent) in the following colors: 158 (dark blue), 159 (light blue), 160 (medium-light blue), 161 (medium blue)
NOTE: The technique of the stitch is the same learned in lesson two. This particular lesson presents two challenges: keeping the stitch direction and reducing the number of stitches as the space gets smaller.
Procedure
Begin with the top triangle. Anchor your thread according to your favorite method, or use the method demonstrated in the video tutorial of lesson two, part one.
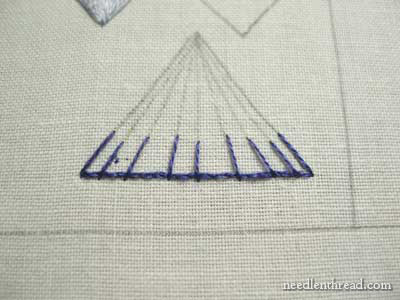
Work a split stitch line across the top line of the first triangle (the broadest part) in dark blue (158).
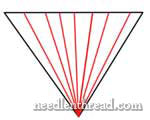
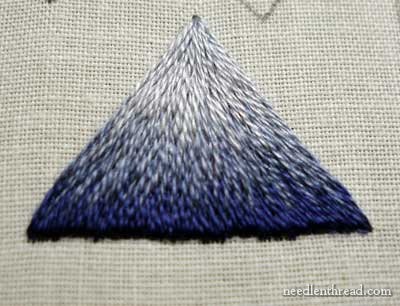
Beginning in the center of the top line, draw a vertical line to the tip of the triangle, then split the remaining distance on each side of the top line several times, drawing a straight line from any point on the top line to the tip of the triange, like so:
Triangle 1 – Top left triangle
First Row:
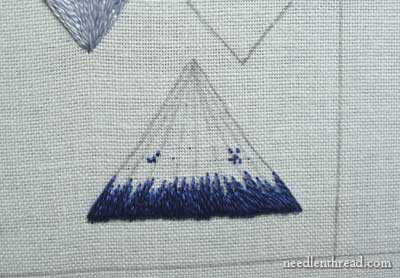
Bring your needle up through the fabric, about 3/8″ below the split stitch line, in the top center of the box. Take your first stitch over the split stitch line and back into the fabric. Now, working down the row to the right, stitch in about four directional stitches more or less the same length, dividing up the row. (This is illustrated in the videos in lesson two). The difference here is that your stitches are not vertical – they point towards the tip of the triangle. After placing in your directional lines (which are “long” stitches), go back to the center and work to the right, filling in short stitches of varying lengths, moving down the row.
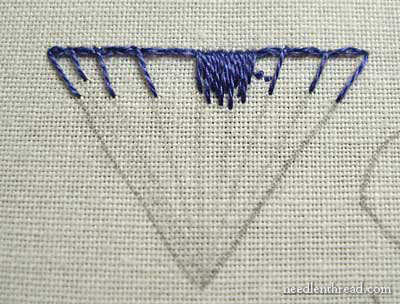
You want your stitches to lie next to each other, as they would in satin stitch, so make sure that you space them correctly – not too close that they bunch up, but not too far apart that you can see any fabric between them.
Continue working across the fabric to the right side of the triangle, altering the size of your stitches between long and short. Vary their lengths, for a more natural-looking shading. You want the bottom edge of your row of stitches to be jagged, but you still want to keep an overally consistent length across the longest points of your stitches.
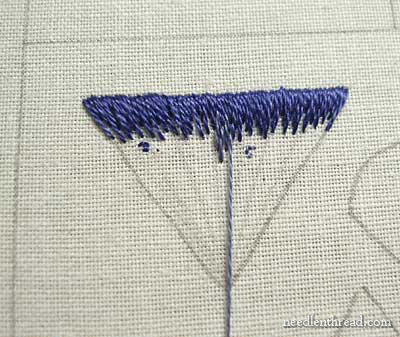
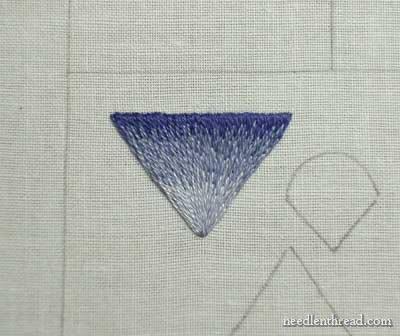
When you reach the right edge of the triangle, end with a long stitch on the pencil line. This is approximately what your progress should look like so far:
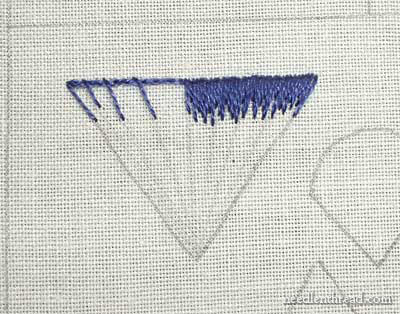
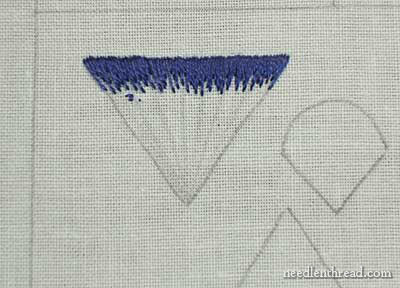
Now move back to the middle and address the left side of the triangle, finishing the first row:
Second & Third Rows
The second and third rows are worked in 161 (medium blue) and 160 (medium light blue).
Bring your needle up from the back of your fabric into the first row of stitches, in the center. Then take your stitch down into the fabric, following your directional lines.
To help keep the direction of your stitches correct, pull your working thread to the tip of the triangle, so you can always see in what direction your stitches should be pointing.
You may add directional stitches if it is easier for you, or you may simply stitch from the center over to the right side of the triangle.
Go deep into the first row of stitches and vary the entry point of your stitches, following basically the same long and short stitch pattern from the row above. Remember, though, that the second row is not as wide as the first, so you can’t fit in as many stitches. You won’t be bringing your needle up into every stitch on the first row, so don’t try! Try to gauge this as you go. Directional stitches may help you with this!
Continue working to the right side of the triangle…
… then go back to the center and work to the left side.
Follow the same procedure for the next row, working in the medium-light blue (160) and keeping in mind the following:
—- Keep your stitches directed towards the point.
—- Don’t crowd them – there will be even fewer stitches in this row!
Work from the center to the right:

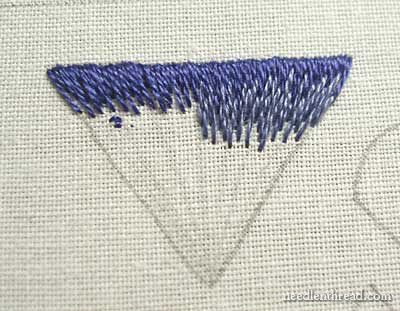
And when you finish the third row, it should look more or less like this:
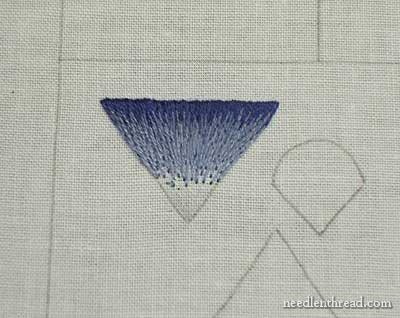
Last Row
The last row is the trickiest. You should be close enough to the tip of the triangle t
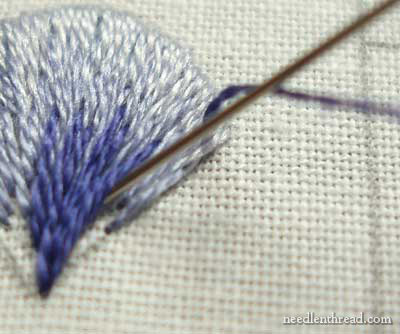
hat your first stitch reaches the tip. If you aren’t, don’t worry about it. Make the stitch shorter. The point is that you want this last row to feed into the tip, but in order to do that without building up a big bunch of stitches at the tip, you’re going to have to “tuck in” some stitches.
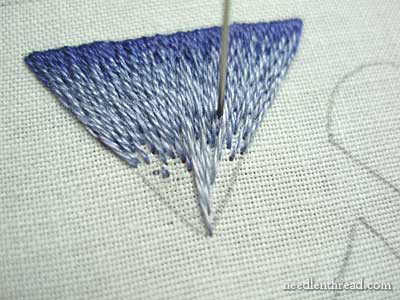
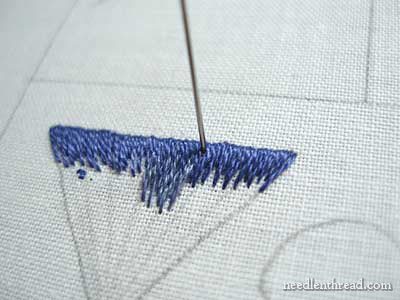
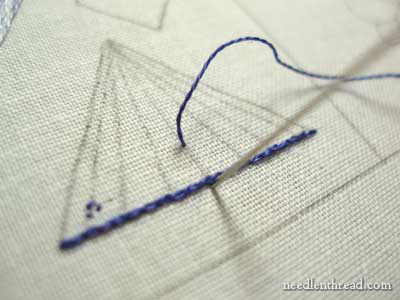
All the stitches it will take to fill the top part of this row cannot fit into the tip of the triangle. So, you’re going to work long and short stitches, but pretty much what’s going to happen is that your long stitches will “overlap” the ends of the shorter stitches, which won’t be “finished” down to the tip. And, you may find that you have to go back to fill in a gap at the top – to sneak a stitch in. At that point, you’ll angle your needle underneath the stitches already there. (This is when you’ll really find out how handy good lighting is!)
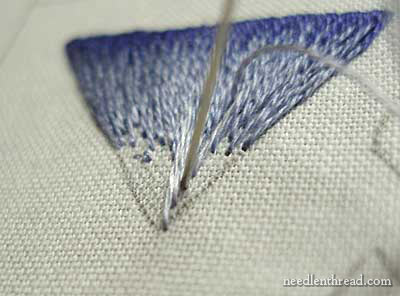
In the picture above, my needle is angled underneath the stitch on its left. I’m tucking the new stitch in, so that I don’t have a bulky build-up at the tip.
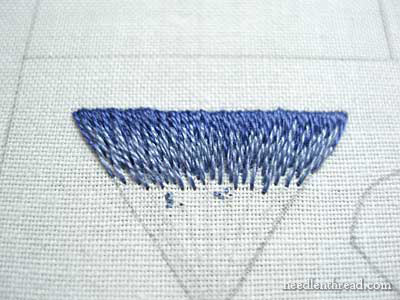
Continue filling in this manner to the right side of the triangle, taking long stitches down to the tip when necessary, eyeing it to make sure your long stitches fit:
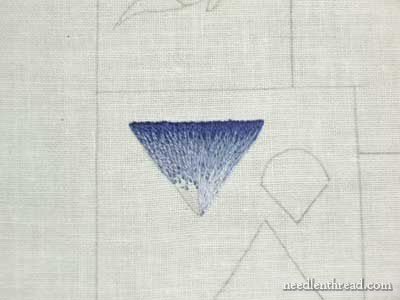
Then go back to the center and work in the same manner to the left side of the triangle:
Second Triangle
The second triangle is worked in the same manner as the first, but it is worked from the bottom (the broad base) to the tip, going upwards. Instead of writing out each direction, I’ve provided some pictures at various stages. You’ll see it’s the same exact concept as the first triangle, only your stitching direction is going upwards.
So, you have the split stitch line at the base, then you stitch from the center over the split stitch line.
Put in directional stitches if you want. I find they help, but some instructors say not to use them (although others say to use them!).
Fill in the first row in the same method as detailed above. I’m not super pleased with the edge on this first row – a bit too bumpy! You’ll do better!!
Fill in all the subsequent rows up to the tip, and there’s the finished triangle.
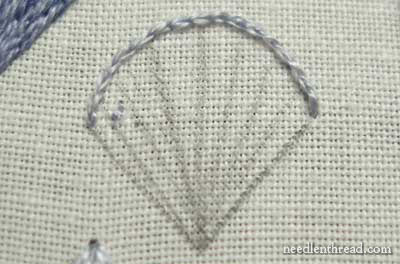
Move on to the triangle with the curved top – split stitch the top curved line in the lightest blue, and draw your directional lines with a pencil.
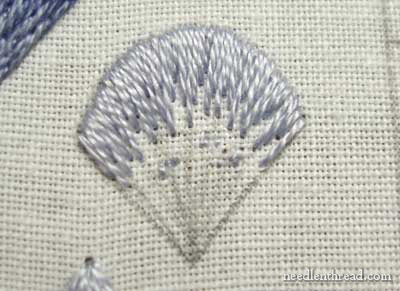
Fill in the first row in the same manner detailed above… notice that the first row is shaped like an arch. As you fill in the subsequent rows, you want to keep this arch shape by fanning your stitches around in that semi-circle.
Fill in your subsequent rows, fanning the stitches out in an arch as you stitch.
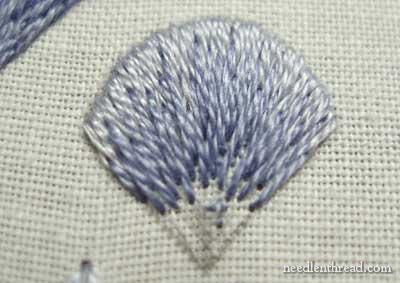
As you fill in the last row in the darkest blue, you may find you have to sneak some stitches in, but “tucking” them in.
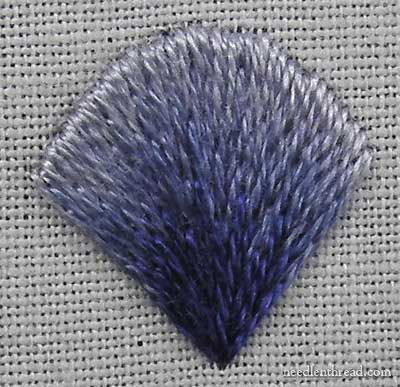
The finished little element.
Congratulations! If you’re with me to this point, you’ve finished element two and are ready to go on to element three, the circles, which are… a challenge! But a fun one!
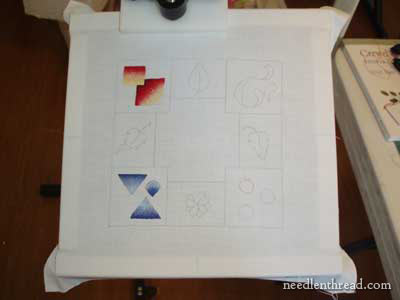
And there’s the sampler so far.
Here’s a PDF version of Lesson 3: Triangles
Long & Short Stitch Shading, Lesson Three: Triangles
For all the other lessons in this series, check out the Long & Short Stitch Shading Lesson Index!
Dear Mary
WOW!
I'm still finalizing my first part.
I believe that long ago that I do not do that type of embroidery. I thinks that is why I'm slower! Really "my hand" will not do what I say, LOL!
Thank you very much for your lesson!
Hugs
Maria del Valle
Wow is right…I've had to do some color substitutions but I can't believe the difference even a little bit of practice is making!
On the other hand, if anyone wants to see something fit to make theirs look REALLY GOOD, go look at Flicker in a few hours….I'll post mine. 🙂 My cats are laughing their fuzzy lil butts off, and contributed a lovely halo to the whole affair…
Dear Mary,
thanks a lot for your time to make us such a wonderful tutorial. I´m looking forward to start the lessons, but I have first to finish my UFOs (UnFinishedObjekts).
Cheers,
Martina
Thank you Mary, for making Needlepainting so easy for us. I really appreciate the meticulous and indepth tutorial. Waiting for the next installment
Thanks so much for these lessons. I don't know if I'll go blind first, or bleed to death, but I'm having fun doing it. I can see where, with practice, it'll be getting easier. I'm very pleased with the results, as long as I don't look too closely.
Beryl
Thank you for your incredible website. Truly outstanding. I am trying to learn crewel work and I am overwhelmed by how good your web site is and how brilliant your instructional videos and advice and knowledge are. Wow, what a brilliant teacher and expert you are. I am so impressed. Lovely to have this site. Far better than the books I have bought recently.
hello mary, every lessons so wonderful. I’ll try tomorrow. thanks so mutch
hello mary, i like all your lesson so interesting, i wish i have time to start and do some of yours there so nice and beauty, at the moment i’m doing a projeck (kanutill) i’ ll try to start something of your pattern. thank you for sharing work with us.
wow u make it seem so easy but i still cant get the hang of it. Help me i can do all the other stitches but not this one
Dear Mary?
I have two questions…
1.What is the difference between the first and the second triangles? is it simply the way you are holding your hoop?
2.once finished, my stitches appear to be too lose instead of tightly clinging to the fabric.Why do you think that is?
Thank You!
Hi, Anupama –
1. With the triangles, the shading on one goes from wide to narrow, working down, and on the other, from wide to narrow working up, and the colors are reversed. If you’re working in a hoop, you can turn the hoop, but if you’re working in a frame, you would leave the frame as is, and stitch in the other direction, which is the point of the exercise.
2. You’ll need to increase the tension on your stitches. Depending on the type of thread you’re using, some threads tend to “boing” up again, so you might actually need to hold the working thread below the fabric as you position the needle from below to split the stitch.
Hope that helps!
-MC
It does help! Thank you so much for replying:) I will try to work on my stitches as you explained.
Hi dear mary
I like all of your ideas that you write about but I really like your Stitch Fun! series.I wish i have time to start and do some of yours lessons. I’m iranian:-) and I’m happy because i found your useful site today:-)
thanks a lot for your time to teach these lessons.
thank you for your lesson . i would love to learn more
regards
Lilian
bonjour et merci pour ces tutos tres sympa !! j’aimerai m’initier a la peinture a l’aiguille !! j’ai fait quelques petits ouvrage, mais j’aimerai m’améliorer !!
donc, je vous suis de très prêt !!
merci encore pour toutes ces beautés que vous partagez !!
amicalement ! Martine
Eek. I should read more carefully! I think I’ve done my first triangle All Wrong, but I’ve already unpicked half of it once and I’m not sure I can deal with picking it all out. Since I’m using a hoop, I guess triangle 2 is pretty much another chance to do the same thing?
I think the problem is, I read the instructions, but I don’t have them in front of me while I’m stitching the way I do with a book. Sometimes I realise I must be doing it wrong (which led to me unpicking half my triangle because 3/8 inch is a lot bigger than I thought), but sometimes I can carry blithely on ….
That is: your instructions are brilliant. But this student is unpromising!
The only thing I’m not quite sure about is what you mean by ‘sneaking’ a stitch in. I get the tucking bit, but the sneaking bit applies to the other end, I assume, and I’m not sure how this is different from just adding a stitch in? Are you not splitting a stitch from the previous row in the ‘sneaking’ case? But there are more stitches there than you need, so why not? Or do you mean just going back to add a stitch out-of-order? (But I keep stitching them out-of-order because I find it easier. Is that going to get me into trouble down the line?)
Sorry. I know these lessons are ancient history, but if anybody passing knows, I’d be grateful for any hints!
I’m such an idiot. How did I miss the PDF?
Thank you so very much for sharing your incredible knowledge base with us lesser mortals. Your work is just fabulous, as are your wonderfully detailed instructions.
Thank you, and happy stitching!
Excelente muchas gracias por el tutorial de esta puntada!!