


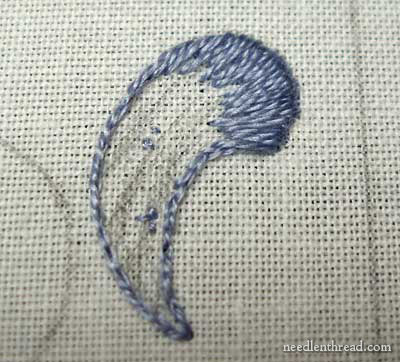
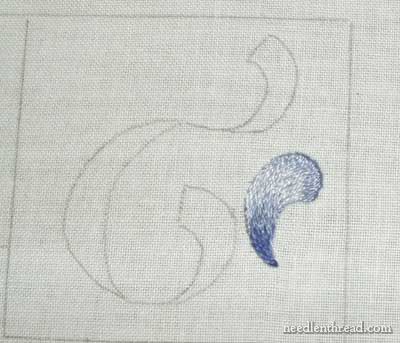
In Lesson Five of this series of Long and Short Stitch Shading Lessons, we’re looking at element 4 on the sampler, the ribbon-like swirl and the little swash shape in the top right corner.
If you are just joining us for these lessons in shading with long and short stitch, you can find all the articles related to the lessons listed under the Long and Short Stitch Lesson Index. For those of you who want to know what these lessons are all about, they are merely to help the embroiderer learn the basics of long and short stitch shading in order to feel confident in tackling more complex needle painting projects. The lessons are free and will be kept here on Needle ‘n Thread, easily accessible, so that you can follow them at your own pace.
The fifth long and short stitch lesson focuses on stitching around a curve, in order to shade design elements such as ribbon or flowing text.
For this element (the top right corner of the sampler), you will need the same shades of blue that were used on the triangle: DMC 159, 159, 160, and 161.
You’ll also need #9 or #10 crewel needles, sharp embroidery scissors, and a hoop or frame to keep the work taut.
For basic technique in long and short stitch, feel free to visit Lesson Two, where you will find three videos demonstrating basic long and short stitch. Reading and working through the previous lessons up to this point will help you as well.
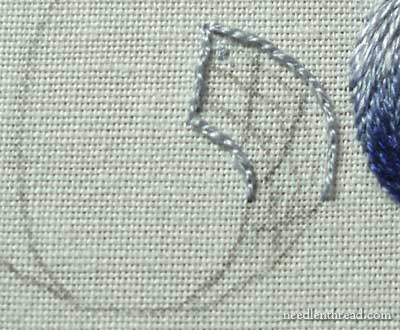
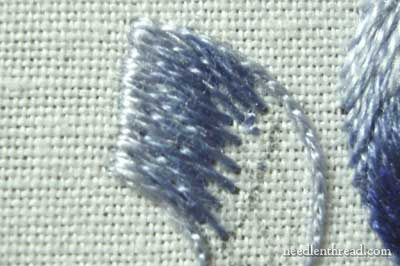
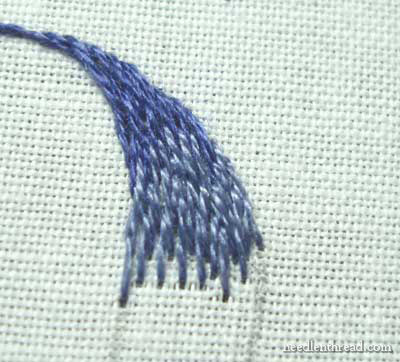
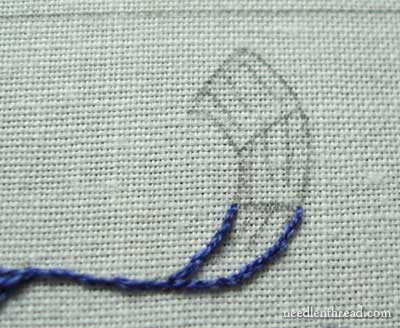
Begin with the small swash next to the ribbon. Anchor your thread and split stitch an outline around the small swash in medium-light blue (160). Begin the long and short stitch (in 160) in the center of the rounded end of the swash, working to the right side of the swash, then going back to the center and working to the left edge of the swash.
When you finish with color 160, if you still have “stitching room” on your thread, take your needle from the back of the fabric to the front, outside to the working area, without cutting the thread. You can leave your thread here until you are ready to use this color again. This way, you don’t have to end and re-start the thread each time you need to use the same color.

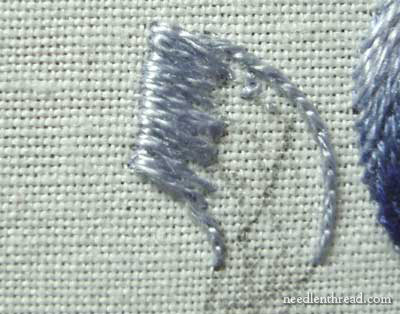
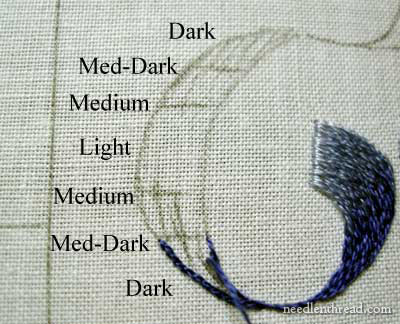
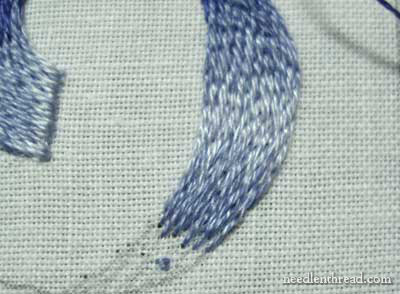
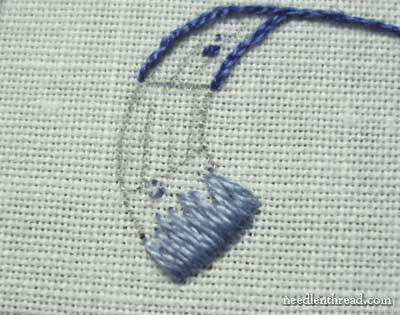
Switch to light blue (159) and stitch two ore more rows of long and short stitch, to fill the main central part of the swash. As you stitch each row, make slight adjustments in direction in order to ease your way aroudn the turn of the swash. See the phot below for stitching direction:
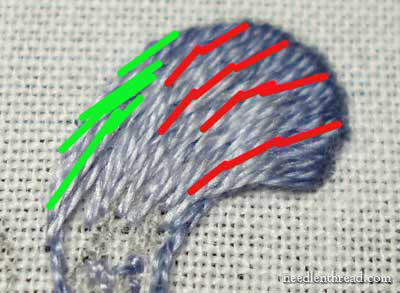
The red slashes indicate the turning stitches. The green slashes indicate the stitches that extend to the side and over the split stitch outline. As the stitches on the left approach the split stitch line, take them over the line to ensure a smooth edge. Keep gradually moving your stitches around the bend of the swahs, adjust the stitch direction as you grow. Switch back to medium light blue (160) for one row, then medium-dark blue (161) for the next row, and then end the swash at the point in dark blue (158).
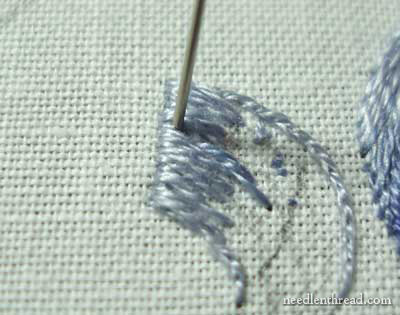
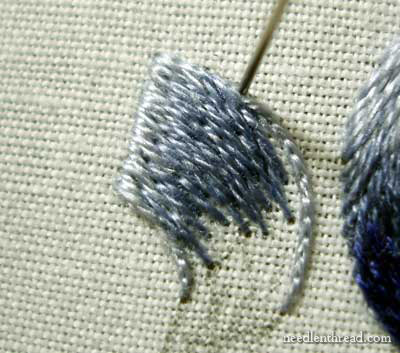
The key in getting around the curves gently is to slowly adapt your stitches to the curve. Take small stitches where need be (in fact, your stitches will be smaller going around the curve), in order to “tweak” the stitch direction so that your stitches are working in the direction you want them to go (which is toward the tip of the swash). Remember that, as your space gets smaller, you use fewer stitches (just as you did with the triangles).
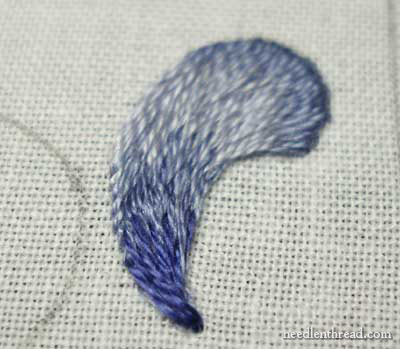
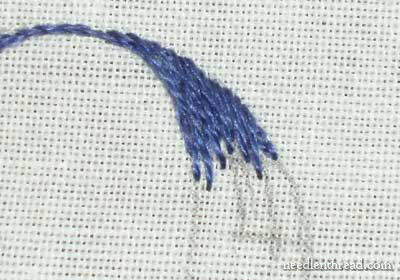
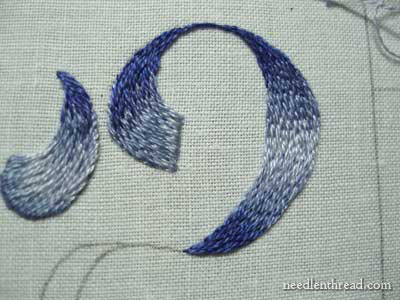
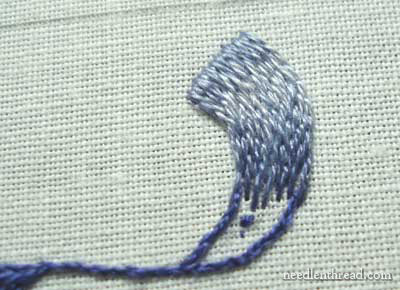
When you finish your swash, it should look something like this.
(Mine looks better from farther away!)
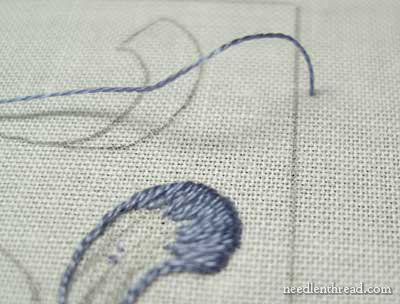
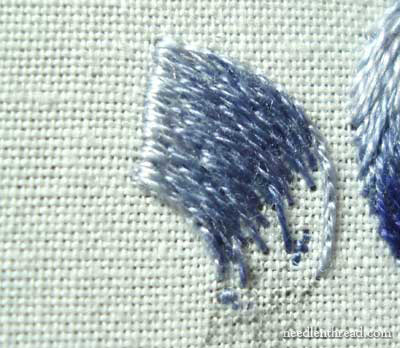
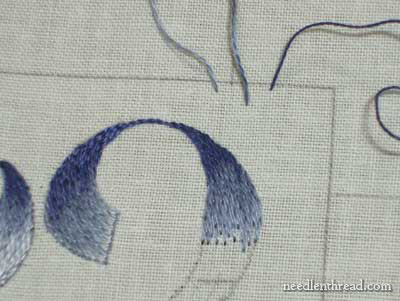
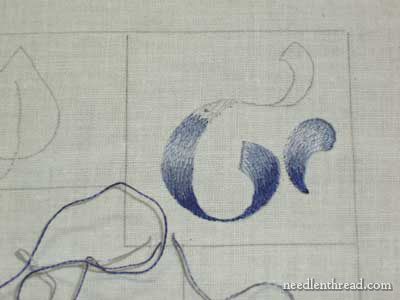
Once you’ve finished the small swash, you’re ready to move on to the large ribbon shape. Begin on the lower right tail of the ribbon. Outline in split stitch (159) as demonstrated in the photo above. You do not need to outline the whole shape – just the top edge of the ribbon and about half way down the sides.
Use a pencil to mark direction lines down the length of the ribbon tail, and color-change lines across the width of the ribbon tail, as shown in the photo above. You want four sections of the area “blocked off” to mark approximately where you will change shades.
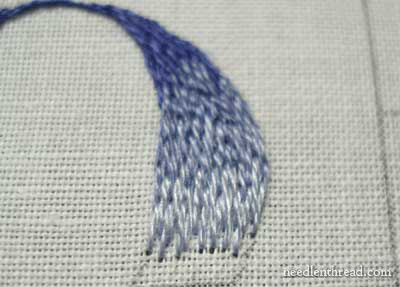
Working in light blue (159), work the long and short stitch over the split stitch line at the top end of the ribbon.
Begin the next row of long and short stitch in medium-light blue (160). Remember to take your new stitches deep into the first row of stitches.
Work the third row of stitches in medium-dark blue (161). Begin shifting your stitch direction more dramatically in order to accommodate the curve.
When it becomes necessary to cover the split stitch line, bring your needle up outside the line so that you can cover it. You’ll take the stitch back down inside the shape.
You’ll probably work at least two rows in medium-dark blue (161). These rows will require the most dramatic change in stitch direction. Try to follow the curve of the ribbon, using relatively short stitches and adjusting their direction as you work around the curve.

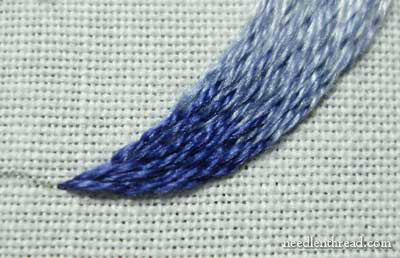
Finally, switch to the darkest blue (158), and continue working in short stitches, easing around the curve to the point of the ribbon curl, and decreasing the number of stitches in order to fit the design area.

Continue to add subsequent rows of dark blue (158) until you reach the tip, as shown below:
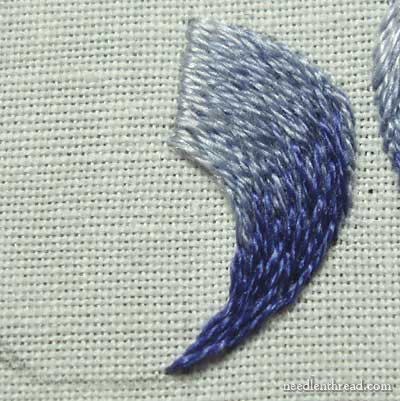
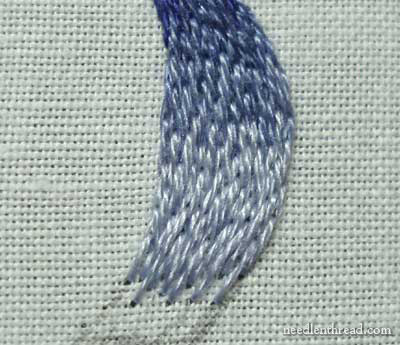
This is the finished first ribbon tail.
At this point, you can mark in your stitch direction lines and your color lines on the main section of the ribbon. Divide the ribbon across its width as indicated above. In the widest part of the ribbon here, the center will be light, and it will gradually get darker towards the tips. The stitch direction will work around the curve of the ribbon.
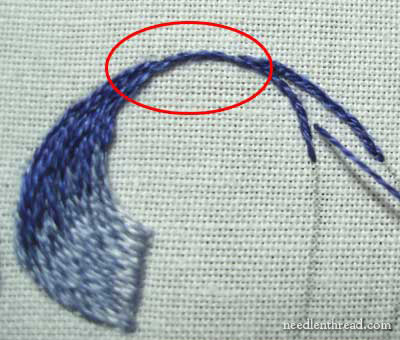
Now that you’ve finished the lower tail of the ribbon and marked your stitch direction, turn your work over so that the element is upside-down. The next section of the ribbon is easier to work upside-down. First, using 158 (dark blue), stem stitch the thin line between the curl you just finished and the main section of the ribbon. (The area circled in red in the photo above). When your stem stitch reaches the point where the lines divdide to form the mid-section of the ribbon, you can switch to split stitch for outlining the area. Outline on a little way up into the main curve of the ribbon (also shown in the photo above).
Then, in the darkest blue (still 158), work long and short stitches to fill the tip of the ribbon, working from the narrow point to the wider center.
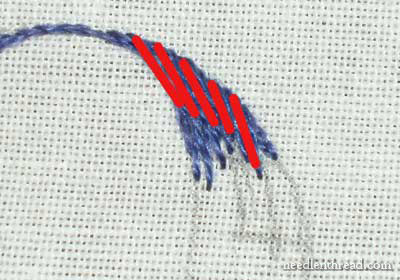
The red lines above indicate the stitch direction. Notice that I’m not starting in the tip of the ribbon, and fanning out. Rather, I’m starting on the side of the ribbon, and working almost vertically.
Switch to the medium-blue (161) and then medium blue (160) and continue to work long and short stitch to fill the riboon shape.
As you switch colors, anchor your working threads in the fabric above the design so that you can keep using them when you return to those colors on the rest of this section.
In the widest part of the ribbon (center), switch to light blue (159), and stitch two or three rows (depending on the size of your stitches). Alter the direction of your stitches to gradually move them towards the tip where the lines of the design converge.
Keep adjusting your stitches as you round the curve, and then switch back to medium blue (160).
After stitching a row of medium blue, switch to medium dark (161) and continue towards the tip of the ribbon.
If you turn your work right-side-up at this point, it should basically look like this. You can outline the tip in split stitch, using dark blue (158) if you wish. I did not outline at this point – I just continued filling to the tip where the lines of the design converge.
Working upside-down again, continue filling with the darkest blue, to the tip of the large ribbon curve, easing your stitches around the curve by changing their direction little by little.
The tip should look like this.
Continuing with the dark blue (158), stem stitch the line between the main part of the ribbon and the top curl. Again, where the lines separate to form the top curl of the ribbon, switch to split stitch and outline the lower third of the curl.
Mark in your stitch direction lines and the lines to indicate changes in shade, if you wish. Split stitch the very edge of the ribbon (hidden here by long and short stitch) in medium-light blue (160), and then work one row of medium-light (160) in long and short stitch. If it is easier for you, turn your work upside down again.
Following the same sequence as in the lower curl on the ribbon, work a row or two of light blue (159) in long and short stitch, tweaking your stitch direction as you work around the curve. Then switch to medium-light blue (160), then medium-dark blue (161) – one row of each – then to dark blue (158), which will fill the tip.
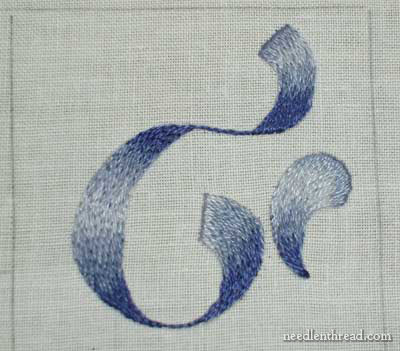
Congratulations! You have finished the fourth element in the Long and Short Stitch Shading Sampler – the most difficult element so far! If you’re still with me, you’ll find the next element (the center leaf on the top of the sampler) a breeze! See you in Lesson Six!
Here’s a PDF download of this lesson:
Lesson Five: Long and Short Stitch Shading on Curves
For previous lessons, visit this Index of Lessons in Long and Short Stitch Shading.
eres genial Mary C no puedo traducir….pero veo el bordado
es muy bueno facil de seguir
Que pena lo del traductor
para saber en que material trabajas??
gracias Mary
un abrazo
lidia
Chile
Hello, Lidia –
Well, in this project I am stitching on cotton fabric and using cotton (DMC) embroidery floss.
I hope that helps!
Best regards,
Mary
Mary,
Oooh, I am envisioning a set of monogrammed napkins for my daughter done like this—another project added to my list. Alas, the academic year is starting for me too, and I won't have much free time.
By the way, I have nearly everything I need to make the Indian dancing girl project I told you about a few months ago, thanks to Joady at Hedgehog Handiworks. Just need the two shades of red velvet!
Mary, thanks so much for this particular tutorial ! ! My biggest challenge (at least at this novice state for me) is shading long and short. I've purchased a book or two on the subject that you recommended, but I find that your step by step "show me" is the best help I have yet to find ! Again, thanks so much…..Judy in Pittsburgh
Dear Mary and fellow stitchers: The most important thing I have gained since finding your web site is the constant inspiration to "finish" the many projects that I have begun.
Whenever I feel bogged down, I read the posts from you and your many admirers as a gentle reminder that others are working to teach themselves the many techniques of surface embroidery.
Thank you…Jana
I am getting frustrated with my work: the end result just isn't right. I think that my long stitches are too short. So I know this sounds kind of picky, but how long are your long stitches and how short are your short ones? May be that way I can get some presective on my work. Thanks so much.
signed, Thinning fabric 'cause I've picked out my stitches too many times!
Dear Frustrated,
Well, for the long stitches, I think about 3/16ths of an inch (just short of a quarter) is good, and the short stitches would be about 1/8th of an inch. You can go longer – to 1/4" on the long and 3/16th on the shorter, but when you start working around curves, that might seem a bit long.
There are some instances when my stitches would be a bit longer – as long as 3/8" – for example, on the squares, in some parts.
Please don't stress out over making each element "absolutely" perfect. I'd just work through each element, getting used to the technique. The finished product might not be absolutely perfect, but as you stitch each element, you'll definitely see an improvement, I think! (that's my 2-cents' worth!)
Best regards,
Mary
Gorgeous…
Hi Mary !
Thansk again for these wonderful lessons. I finished the ribbon. I could not achieve it without your tips. I am so happy !!!
Could you have a look and tell me what you think of it ?
Thanks a lot.
You can see my work here :
http://elena33.canalblog.com
Cheers
Hi Mary,
I thought I'd share a little "oops" that happened when I was working on the small swash the other night during the baseball game. I only mention the game because I was a wreck and started to stitch to take my mind off the game. Probably not the best time to be learning a new technique…My thread got tangled right after I began so I tried pulling it out but some didn't come loose so I took my scissors and tried snipping the rest of the threads. Well…I ended up with a lovely hole in the fabric. At first I thought I wouldn't be able to complete the swatch. But I decided not to panic and continued stitching. And, it worked. You're right. The Long and Short stitch is a very forgiving stitch! By the time I completed the swatch you couldn't tell the fabric had a hole in it. Pretty neat!
Votre site est une merveille
Mary, I have just finished copying all the lessons (9) Long & Short Stitch Shading & all the lessons on Lettering & Text.
All I can say is the biggest THANK YOU I can & that I will learn all I can from these pages you have produced. You have written TWO BOOKS & given all of us an incredible base from which to go forward. I cannot believe all the work you put into these projects. I cannot believe it is all FREE – You are an excellent teacher. These pages are for my use only & for me to learn from with you as my teacher. I will keep you in my prayers – how else can I repay you for this wonderful gift of knowledge! Thank you & God Bless you!
Thanks, Pauline! I’m glad you like the lessons! Have fun stitching! — MC
Boa Tarde
Gosto muito do seu trabalho, realmente é maravilhoso
Love the clear explanations.
Thank you
Isabel
I know this is a decade old but in the hopes that you’ll still see it… I’m getting really bad fabric puckering in the areas where the stitching changes direction, particularly the two ends of the ribbon. I’m keeping it as tight as I can, though I’m using a q-snap frame instead of a hoop or stretcher bars. I’m trying not to pull the stitches too tight but the fabric is dipping badly in the inside of the concave curves.
I am having terrible trouble trying to do an Aloe Vera Plant, it’s got shading and little domes a nightmare! Your lesson has helped on curves, but it’s still a nightmare..l am only amateur.
You rock ! I’ve learned SO much fro you Mary! Thank you!