


Variegated embroidery floss. It had to happen.
When I began teaching my Needle Arts class this year to high school students, my intention was originally to keep the embroidery floss selection pretty simple. Since the goal for the first semester was to work a spot sampler with a variety of stitches, I planned on giving the students a rather narrow selection of floss – all regular stranded DMC cotton – in a particular range of colors and shades.
Well, I figured out right away that the color limitation wasn’t going to work. The students had their own ideas about color – what they like, what they don’t like – and I suppose if I had left my floss box at home, we would all have the same color schemes developing on our samplers, despite their likes and dislikes.
I’m glad I took the box in. It’s fun to see the variety of colors the students chose for their own samplers. But hidden in the floss box, unbeknownst to me, were quite a few skeins of variegated embroidery floss. Today, I’ll show you how we dealt with variegated floss, and other ways we discussed controlling color.
This is what I’ve noticed: there are some students who love variegated floss. There are some students who hate it. (I mean, they really have an aversion to it!). Right away, the Variegated Floss Lovers honed in on the variegated floss. And I didn’t mind their using it, though I hadn’t really planned on talking a whole lot about color control during the first semester.
Still, since some students really wanted to use variegated floss, we went over how to control the look of an embroidered motif if using variegated floss.
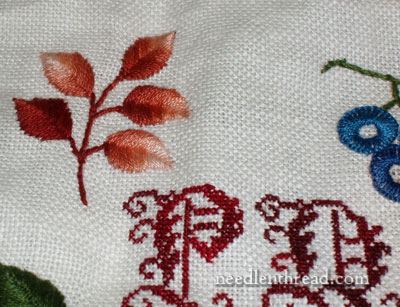
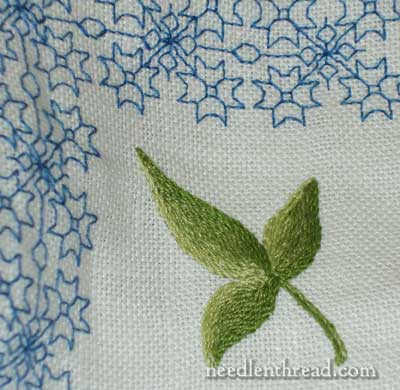
For example, in the leaves above, worked in fishbone stitch, the student used variegated floss. Now, if she had stitched straight with the floss as it came off the skein, without considering where the colors landed on the leaves, she would’ve ended up with striped leaves. Pointing out that you can control the color layout of the variegated floss saved her from the striped effect that can come from using variegated threads. It’s all a matter of cutting the floss right, and threading the right end into the needle. This student picked up on the concept quite well, and did a nice job producing a shaded effect on the leaves, without the stripes that could have resulted from using variegated threads.
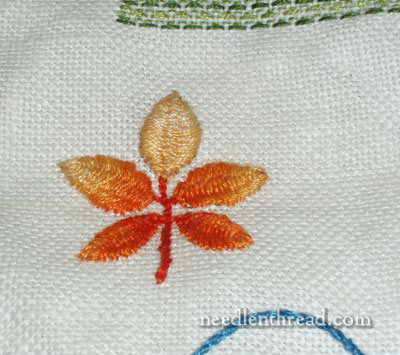
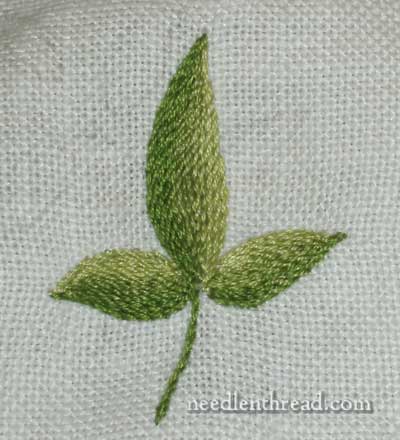
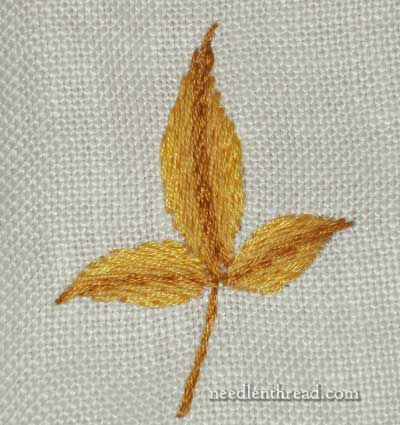
Here’s another example of leaves worked with variegated floss, with the color placement controlled. These are worked in cretan stitch, closed.
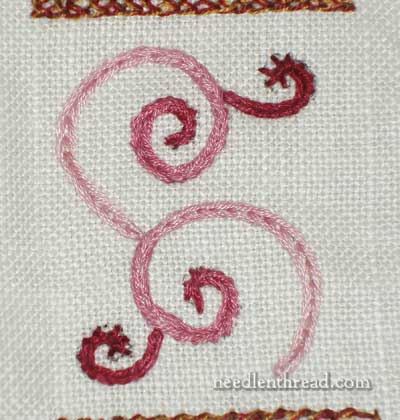
This student, working in heavy chain stitch, worked from light to dark on the scrolls, using variegated floss, keeping the small off-shoots dark.
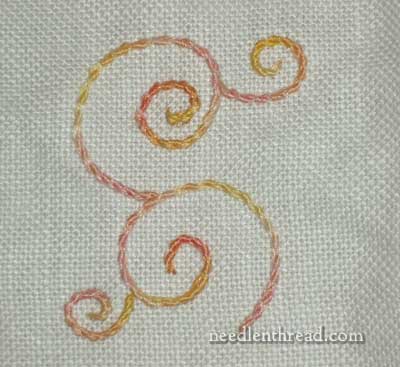
We discussed deciding the look you want before you stitch. This student liked the stripes of color from the variegation on the floss so she worked the Portuguese knotted stem stitch with the floss as it came off the skein. Still, she had to consider the placement of color on the side scrolls, and cut and threaded her floss accordingly.
Besides controlling the color when using variegated embroidery floss, we approached the subject of “shading” a little bit, too, using stem stitch as a filling and blending the shades to avoid obvious stripes. Even though you can see a definite shade change in the leaf above, the student did control the shade changes a little bit, so that the shade changes wouldn’t result in drastic stripes.
We were working with three strands of floss in the needle. We began with the darkest shade of green, and worked a couple rows on the leaves in the darkest shade. Then, we switched out one strand of dark for a strand of medium and stitched a row or so, and then we switched out two strands of dark for two strands of medium and stitched a row or so, and then used all medium for a row, and then began working in the light in the same way – one strand of medium replaced by one strand of light, then two strands of medium replaced by two strands of light, then all light.
If you wrote out a formula, it would look sort of like this: D3 / D2 + M1 / D1 + M2 / M3 / M2 + L1 / M1 +L2 / L3 (D=Darkest Shade; M=Medium Shade; L=Lightest Shade, and the numbers = strands of floss). You can vary the amount of rows stitched in any given shade combination, depending on how much room you have.
This helped blend the shades a bit better, rather than ending up with a striped effect.
Even though you can still definitely see the change of shade in the leave above, it isn’t drastic. The blending of threads kept the color change a bit smoother.
In the leaf above, the student didn’t blend as gradually.
And in the same shaped leaf above, the student didn’t blend at all, on purpose.
And then, of course, Autumn had to show up here and there. Some students really didn’t want green leaves, and that was fine, too.

Some students figured out pretty early in the game that they could combine colors if they wanted, for interesting effects. One student stitched this Quaker motif in a red, but wanted a darker border around it. The boarder is worked in herringbone stitch with one strand of dark blue and one strand of dark red. I like it!
An overall update on the class:
Most teachers take time to assess not only the daily lesson and how it worked, but also the whole unit, and again, the whole semester, or the whole year. I’m not quite ready to assess the whole semester – we still have a couple weeks left! – but overall, so far, I think the class has gone pretty well. Goal-wise, we didn’t do everything I planned, but I knew that I was over-planning, so that’s ok. Some general goals that have been met: the students, many of whom had never picked up needle and thread before, are at ease with stitching and confident in figuring things out, trying different things, experimenting, and so forth. They aren’t scared of the thread, scared of the needles, sacred of the fabric, scared of the scissors – they use their tools with ease and are no longer “awkward” with them. They can figure out stitches from diagrams. Most of the time, they troubleshoot their own mistakes, unless something Really Big pops up. And I’m not threading needles or removing knots for them anymore! (And that’s a Huge Accomplishment!)
One small problem to overcome, though: their samplers are not very full. But that’s a Whole Nuther Story!
You can find more about this whole needlework class experience by visiting the Developing a Spot Sampler Index. All the articles relating to it are grouped there.
From the photos of the student work contained in this “lesson”, they are doing FANtastic work!! From never handling a needle to shading in a few mere months (they probably don’t seem that “mere” to you!!), I think you have presented them with the gift of embroidery for a lifetime! Very exciting!
It is exciting, isn’t it??! Thanks for your comment, Bobbi! I’m really looking forward to next semester, when we actually do projects! Fun! ~MC
Thank you. A while ago, I bought a variegated green floss but quickly ran into the “solid stripe” problem and put it aside. In the meantime I’m learning a lot more about different stitches and needle control.
Once I’ve finished making supper (just “quickly” looked at facebook before cooking I should so know better) I will be reading this page very carefully.
Thank you again!
Thanks for your comments, everyone! I’ll try to answer a few points:
Thanks, Elisabeth, for the spelling correction! I fixed it. And thanks to all the others who e-mailed me about it (there were several! LOL!)
Tessa…. yes, I know what you mean. Supper often burns while I burn time online. *Sigh*
Meri, Celia, Linda, MzMary, Corvus, Sharon – Glad you like the class updates. I’ll try to work up something later on about controlling color placement with variegated threads. It’s slightly different from working with overdyed, because variegated are more regular in the color changes.
Vivian – the blue design around the green leaf is blackwork (well, in blue) – it’s Holbein stitch (or reverse running stitch) following a gridded pattern.
Linda – I’ll put you on my list as the first book buyer, if I ever write one! I don’t know if that’s quite in my future. I admire the folks who do it and do it well, but I can’t imagine the amount of time it must take. Maybe when I retire?!
Hi Mary
It´s not only your students who are learning – I am too! Although I love variegated threads and realized their effect, I never controlled them as you mentioned. Thank you for that info – will now try it out.
Wonderful work, Mary! Congratulations!
And thank you again for this great post about variegated embroidery floss. I don’t like them too much because the stripping effect and I have only very few skeins untouched… Now with your lesson I would use them for sure – Thank you
Mary what a wonderful exhbit of techniques that the students are learning from you, and thank you so much for the thread advise in transition.
I love working with overdyed and verigated threads and the leaves are gorgeous.
Please write a book someday, or put all of the lessons on your site in condensed form and it would be a best seller, then you could stitch all day.
You are a very talented and sharing lady.
This is wonderful! And intriguing! Does one simply tie off and start up with ‘new’ thread when a desired color change occurs? I’ve always wondered about this – seems like a lot of ends to deal with.
-m
Mary your students have done very well. I really am impressed with their work and love the fact that some insist on experimenting and doing their own thing. Very creative.
Hmmm. If only I had had the opportunity to have taken a class like that many years ago!! I really am jealous.
As always, thanks for sharing.
You wouldn’t happen to have room in this class for a 25-year-old Microbiologist, would you? 😛 I’m sure I’d blend in, and I’d learn lots!
In all seriousness, these kids are so lucky to have such an opportunity.
Oh the joy of color! It’s what got me hooked on needlework to begin with – the delicious rainbow of possibilities. I still have to have that conversation with myself when I go to the craft store and see all the colors in the bins not to buy one each of all of it – to limit the palette to a reasonable range of things that compliment one another. And what a beautiful lesson about the variegated thread – how to use it right for great effects. I wish there had been a class like this when I was in high school. It took a long time for me to discover that embroidery was more than my grandmother’s tea towel.
Mary , your love of embroidery has most assuredly been mentored to your students. They are doing beautiful work.
One of my daughters loves variegated floss and combining two or three different single threads. She is going to benefit from this post.
Could you elaborate a bit more on the how? i suppose you could use the same idea for the new ‘variations’ floss?
“It’s all a matter of cutting the floss right, and threading the right end into the needle. ”
Blessings, ST
As a teacher myself, I can only offer humble congratulations on your semester, as well as a big thank you for letting us sit in the back of class and admire. I’m hoping to start a small Sunday Class for some local students who have expressed an interest in embroidery.=; so you are my inspiration!
However, once upon a blog, you gave us free scolding rights for any linguistic accidents that somehow crept onto the page – Hmmmm – How do I say this? Didn’t you really mean ‘border’ when you described the surround of the Quaker motif; Or has someone taken up residence in your hoop? ;D
oops…I made a few typos myself!lol
Your students do wonderful work. You must be proud of their accomplishments so far. I think that the varigated floss would be fun – I’ve never tried it before. I’m going to have to go and find some. The photo with the green leaves has an interesting blue border around it. What type of stitching is used in that? It’s very pretty.
Mary,
Mary, the work done by these students is amazing, it is a credit both to them and to you as their teacher. I would really love to see some more of their work, possibly some completed projects. Would it be possible to post a few pictures some time?
Cherilynne
Mary I love your website! I just found it over Thanksgiving because I was trying to figure out how to do a french knot for the one pillowcase I was working on. The videos are such a great help!
But on the same pillowcase, I used some varigated thread for one the small flowers and I didn’t even think about controlling the color for it, luckily they were small enough that it didn’t matter too much, but I was quite proud of how they turned out. I can send you a picture if you like!
Sarah
ps- I’ve been slowly reading through your blogs so I can learn as much as I can!
I’d love to read more information on controlling colour using variegated threads (and using variegated vs overdyed threads) as well.
Mary, hats off to the students and teacher!!! From what you have shown us, the samplers look beautiful. Wish you would show ALL of them when finished?
Please rely my congrats to all the students.
Marva
Thanks, all, for your continued comments and kind remarks!
I was just looking over some notes on using variegated floss, so I’ll try to compose those into a decent post in the upcoming days (weeks. months. years…..!)
Sarah, you’re welcome to send a photo – I’d love to see the pillowcase! You can reach me at mary (at) needlenthread (dot) com
I’ll definitely post photos of the more “complete” samplers later on. We’re using this week and next to finish off all the assigned elements. Over the Christmas break, they’ll be able to add more to their samplers to personalize them a bit. First thing next semester, I’ll be teaching them how to rinse and block their work. After that, I’ll take “whole” pictures!
Thanks again, everyone! It’s always a nice shot in the arm, midday, to read your comments. Just the right boost to face the rest of the work day!
~MC
Hi Mary,
It was interesting to see how your students are using variegated thread. I too, am also irresistibly drawn to them. It never occurred to me to control striping by differential cutting. Usually I’m going for a fairly subtle effect, so once I strip the floss I’ll pair the strands in opposite orientations. I also often use one strand of variegated floss with one or more solid coloured floss strands in a closely related colour. It adds depth to the colour without being too obtrusive- kind of like using hand-dyed floss, but more readily available for purchase.
Oh dear…I fear I am jealous of how lovely and creative the students are. The technique and skill they have after such a short amount of time brings out the green eyed monster in me. Thank you for introducing the children to the gentle art of needlework. For me it provides a sanctuary from the hustle and bustle of every day life.
Oh, how awesome!!! Your students are doing such a great job…. and only in a few months… well of course, they have you !!! 🙂
The formula you gave on color control makes much sense… this is my 1st time reading about it… very interesting indeed.
Like some of the other ladies here I too which I had a similar opportunity they are having with you as a teacher. They are truly having fun, despite having a curriculum for the class you have aloud a measure of freedom which is always good and fun.
I also look forward to seeing more of their work ! Thumbs up to your students !
Mary,
Your work with these students is so inspiring! I wish there was a packaged course that could be shared across the United States…hint, hint! Wouldn’t it be great to have all the high schools teaching needlearts again!
You rock girl!
Kathy
Hi, Mary
Amazing work by your students. You have inspired them and they will surely carry this gift lifelong. You must be so thrilled with the way the semester has shaped up.
I finished my embroidery classes for the year today and the sense of accomplishment with which my little girls showed off their work to their parents is something that I will always cherish.
Hello there.
This a wonderful blog, thank you very much. I thought I would post this link to you and also ask you whether you knew the technique used here to create the red bit of this piece…
Kindly
Stephanie
Hi, Stephanie – It looks like seed stitching to me. Just randomly worked small stitches, to fill the area, worked in greater density in some areas and less density in others. Hope that helps! ~MC
Hola Mary, es interesante el hecho de enseñar a otros lo que uno sabe. En la mayoría de colegios de mi paìs, las artes prácticas se limita a dibujo. Serìa bueno, diversificar. A través de tu página no sólo aprenden tus alumnos sino que nosotras (os) tambien. Me gusta tu precisión y pulcritud al bordar. Gracias por compartir con todos tu hermoso don.