


When you first learn to embroider, chances are, you’ll start with a basic embroidery stitch worked along a line.
And as you progress in your embroidery pursuits, you’ll discover that, whether you’re embroidering something complex or something very simple, chances are, at least one basic line stitch is going to show up in the design.
Here’s a collection of six basic line stitches used in hand embroidery, with helpful tutorials so you can stitch them with confidence. Some of these stitches, you’ll use frequently; others, you might dabble with occasionally. All of them are worth knowing!
Running Stitch
The running stitch is the most basic embroidery stitch.
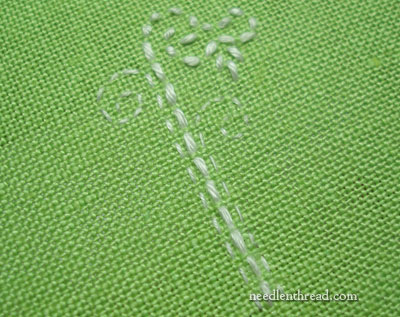
Even though it is a very simple stitch, it can be used in complex ways. When working it in a straight line, you can vary the look of the running stitch by adjusting the length of the stitches. But you can do so much more with running stitch, too!
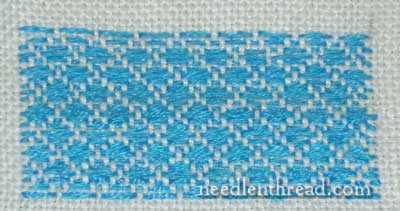
You can use it to make filling patterns like the one above, in a technique called “pattern darning.”
You can also use it as the foundation for other more complex line stitches, like those shown in the photo above.
This video tutorial for running stitch explores the basic stitch and variations.
Backstitch
Backstitch is another easy line stitch that can be used to good effect on delicate or heavy lines. While often used in counted cross stitch and other counted embroidery techniques, backstitch can also be used creatively in free-style surface embroidery.
The key to a nice looking backstitch is even stitches. With practice, you’ll find it easier and easier to stitch a line of backstitches that are even.
Like running stitch, backstitch is often used as a foundation for other embroidery stitches, too.
This video tutorial for backstitch will help you learn the stitch worked in two different ways.
Whipped Backstitch
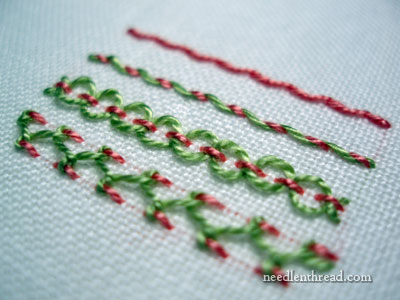
Whipped backstitch worked on a foundation of backstitch, by whipping the thread from one direction around each backstitch in the line.
Whipped backstitch creates a solid, slightly raised, rope-like line, perfect for outlining boldly or delicately.
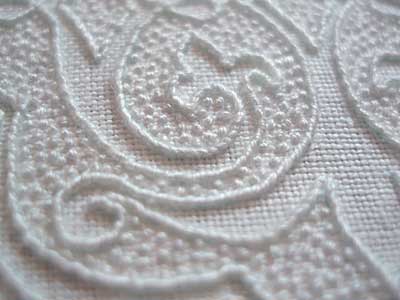
In the photo above, all the lines are created with whipped backstitch. It’s a handy stitch to know, because it gives you great results with a super easy stitch!
This tutorial for whipped backstitch will show you everything you need to know to create a consistent, beautiful whipped backstitch!
Outline Stitch
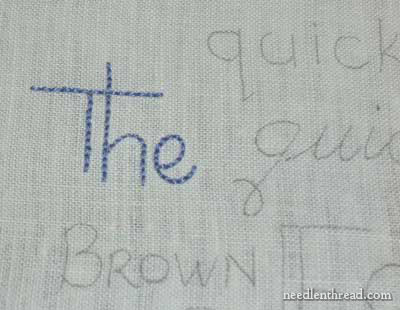
Outline stitch creates a smooth line of stitches that are somewhat twisted together, so that the individual stitches are not really noticeable.
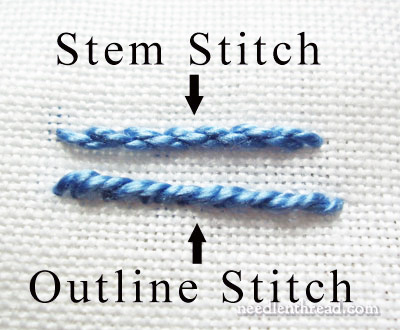
Often confused with stem stitch, it is not the same stitch at all. In the photo above, you can see how outline stitch differs from stem stitch in the finished look.
This tutorial for outline stitch will teach you everything you need to know to work an outline stitch successfully.
Stem Stitch
Stem stitch is such a versatile stitch! It can be used as a beautiful line stitch, creating a rope-like line that is always attractive.
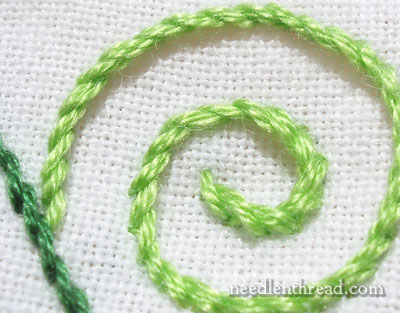
Stem stitch can also be effectively used as a filling stitch. You’ll find plenty of tutorials, hints, and tips for using stem stitch in a variety of ways right here.
You can find a thorough video tutorial for stem stitch here. It will show you how to work the stitch from all directions and how to keep the thread in the correct place in relation to the needle, to always achieve a perfect stem stitch.
Couching
Couching is a two-thread embroidery stitch, with one thread laid on the top of the fabric while the second thread stitches over it to hold it in place.
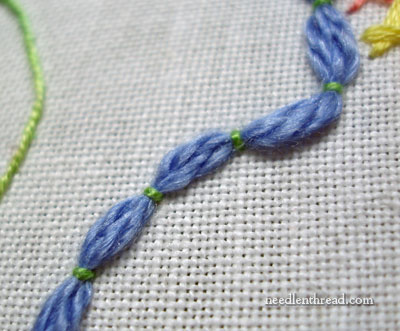
Couching can be decorative or very simple. It’s an easy technique that can be employed in very complex ways. It’s used often in goldwork embroidery and is the basis for Or Nué, which is shaded goldwork.
You can explore different ways couching can be used in this tutorial on couching in hand embroidery.
Try Them!
Try all the line stitches above to see which ones are your favorites!
Remember, even through they are super easy stitches, they can all be used in more complex ways to really dress up your hand embroidery!
You can find lots of tutorials for hand embroidery stitches here on Needle ‘n Thread. Feel free to explore my page of How-To Videos for Hand Embroidery, as well as Stitch Fun!, where you’ll find heaps of photo tutorials for exciting and fun stitches and stitch combinations!
Thanks so much for the help. Your site was the only one that actually made sense (for me anyway). Could not have done the outline/stem stiches without you.
Thanks again,
Kathy
Hi, Kathy! Thanks for the comment. I’m glad the stitch instructions came in handy! (Sometimes I think I go overboard on the text…)
I’ll have the rest of the basic stitches (filling and detached) up this week.
I love you for breaking them down into categories for us.. ….now I know what certain ones have in common..
Eve
I’ve not done much “needlework” since my early 20’s preferring knitting needles instead. But I’m now involved in The Mother’s Day Project and needed to know how to stitch my soldier’s name well and proudly. Thank you for your help.
I understand the stitches and everything, but I don’t know how to actually start (on an actual piece). How do I switch colors? How do I end my section?
thanks,
-L
I recently purchased Lace edge pillowcases
MARE & COLT. I have not emboidered for years and the directions aren’t specific re: what type of stitch t use to bring out the beauty of the Mare & Colt. Any suggestions?
Hi, L –
If you check out this video tutorial, there’s a little blurb on ending threads:
Running stitch & Finishing Threads
When you start your threads, you can start with a waste knot, which I describe here:
Want knot?Waste knot!
Hope that’s helpful!
Mary, I’m doing a pattern that requires a stitch for writing a phrase. http://www.trinityquilts.com/item.php?item_id=2753&category;_id=470
I’m not sure you can see the part I’m doing on this link. Which stitch is best for this? I’m currently doing what looks like the running stitch. I’m not liking the pointyness (if that is even a word) of some of the stitches on my letters, it doesn’t look smooth. I wished I could post a pic so you could see what I’m talking about. Can you help?
Mandy
Hi, Mandy –
If you want to e-mail me a photo at mary [at] needlenthread.com, I’d be happy to look at it.
I think the whipped backstitch is great for thin-lined text. You might want to try that one. I used it on some of the text on my pillow cases – the first photo, on the “Shhhh” on the top left side of the pillow case.
MC
Thanks Mary, I did email you.
Mandy
heay mary,
thanks more making hand embroidery easy. i wanted to know if there are any particular type of threads that u recomment so that my works look good on tops & dresses.are silk threads worth working …
It depends – if you will be washing them in the regular laundry, I think I’d stick with cotton. But silks are really beautiful – they just take special care.
hello 🙂 I just wanted to say thanks for the stitching instructions…I’m teaching myself how to embroider and your directions are the easiest to follow! Thank you!
Mary,
Thank you so much. Your article has been of great help. I’m a novice trying to make a pillow case. I’m going to try out a few stitches from above. I come to the conclusion that even if the design is basic, the stitch makes all the difference….
Take care,
G
THANK YOU YOUR SITE IS GREAT, THE INSTRUCTIONS ARE EASY TO FOLLOW
I have not embroidered for 40 years and have taken on doing some tea towels. Since on a tea towel the back of your work shows – what do you do to keep it neat and hide start and stop knots?
Thanks so much for your instructions! I’ve taken up an embroidery project, and your website has been incredibly helpful.
Thanks so much for your instructions! I’ve taken up an embroidery project, and your website has been incredibly helpful.
Hi Mary,
This site is so wonderful! I have taken up embroidery after many many years …. thanks to my first expected grandbaby ….. your site has helped me so mmuch with vintage patterns and embroidery stitches and tips ….. I also fell in love with the beautiful monogramme lettering with which you have taken so much time and effort to clean and put up on your site …. the letters were just begging me to stitch them …. so I’ve already done the letter ‘K’ on a pillowcase for my daughter Kiran ….. planning on doing more in the near future …. thank you so so much!!!!
Thank you for the clarity of directions. I am able to do the stitches!!!
Thanks for the great info on a skill I have always wanted to learn, but you have made it really easy to understand….thanks for taking the time to explain the stitches and show the diagrams!
Thank you so much. I tried to find the name for a stitch and I found it because of you. thank you
Thank you for your great instructions as well as your illustrations. Just what I needed!!
Realy use full basic design to teach of all my embroidery students
Thanks again
Smrati
love your gallery
how do I print a poem on to a fabric to enable me to stitch it
thanx a lot, Miss Corbet. this is the only site from which i learnt something for my crafts class.
Just a suggestion – you could add ‘Kantha’ stitch
to your site. it is a very easy type of Indian embroidery my mother taught me, and it is very useful for all beginners.
Thank you very much for your detailed explanations of all the stitches. It is very useful for beginners like me. God bless your effort and give you more ideas.
With regards,
Tina
I am a quilter and am now sewing a pillow with flowers and leaves. I would like to embroider the veins on my leaves but am unfamiliar with embroidery stitches. Can you suggest a few stitches I might try. I will then go back onto your website and learn how to do them.
Thank you for your help.
Hi, Joanne! Definitely the stem stitch! It’s perfect for vines, stems, lines, you name it! I have a video under the how-to videos linked in the top menu. It’s definitely one of the easier stitches, and is beautiful to boot!
I have made a baby blanket with a cartoon figure on the front. I want to go around the figure with embroidery floss. The edges of the figure are outlined in black, so I am doing a black basic running stitch around the edge. It really does nothing for it.
Should I be using the same color as the edge or a different stitch? I am using 3 strands of floss. Thanks.
Hi Mary- I just love your site!!! You make everything so nice and fun. I do have a question, though. In today’s mail 6/9/14, one of the respondents talks about a scallop stitch. It is just what I need for my bird, but in exploring your site could not find directions. Can you help me find it? Thanks so much, Roxane
Hi, Roxane – she’s taking about this: https://needlenthread.wpengine.com/2010/01/rooster-breast-and-scallops-crewel.html it’s buttonhole stitch, worked as a scallop.
I always spend at least a half hour on your site and sometimes much longer! There is so much clear precise information and videos here I come back again and again! Love it!
thanks for the information
Hello,
I’m looking to replace backstitching for outlining (and there is a lot on this project) to couching? Same color floss for couching.
What is your opinion on this?
Looking forward to your answer.
Thanks!
Couching makes an excellent outline. Historically, it’s done on a lot of embroidery that way, especially goldwork and ecclesiastical stuff.
I am working on a piece that has the large portion of the picture covered in backstitch rather then sarin stitch which would be my first choice. The Sample looks quite nice done with the back stitch but I have no idea how it was accomplished. Can you give me some hints