


A good way to learn basic embroidery stitches is to work a sampler. When I think of samplers, I think of historical needlework usually done with cross stitches and such, with a “rustic” sort of look. I like that look. But with my beginners, I decided to “catch their interest” with color and a variety of stitches, so I drummed up a sampler for them. I thought I’d share a sample of one of their samplers.
You’ll have to click on the image below for a full-sized view.
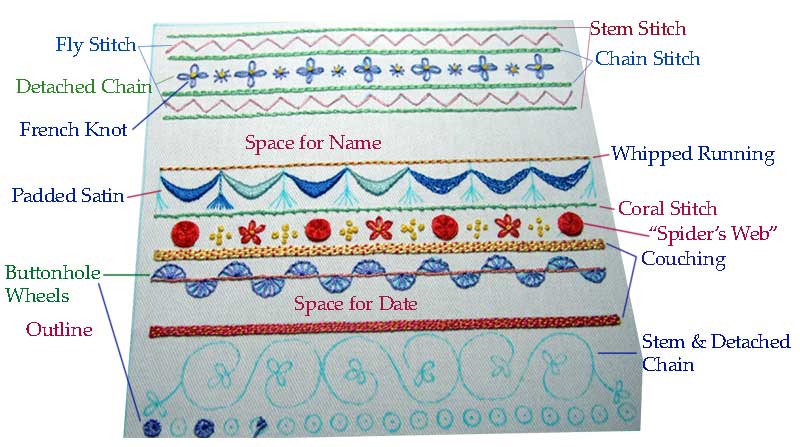
I wanted my students to be able to work a whole variety of basic stitches, with a few interesting ones thrown in, so that they could get the “feel” of combining stitches. At the same time, I left the color choices up to them. In our classroom, we have about five thread cabinets that they can take colors from. Most of the sampler is stitched in two strands of DMC, although the couching is #5 cotton perle as the laid thread, which is then couched with a contrasting color of DMC.
On the scallop-looking section, you can see that the padded satin stitches are not yet complete, with the padding visible in the last couple of scallops. I think this stitcher padded with two strands of DMC, but satin-stitched over it with one strand. Between the scallops are “tassles” – these aren’t indicated in the names of the stitches. They are simply a whipped backstitch for the “rope” and straight stitches for the tassle.
In designing the sampler, I just drew it out on graph paper. I transferred the design to fabric using a light table and a transfer pen that will wash out later. The kids are stitching on 100% cotton, and I think this particular piece is a twill. The nice thing is, the ribs (more apparent in the larger image) provide the beginning stitcher with a way to gauge the length of the stitches.
Like traditional samplers, there’s room for some text – in this case, a name and date. Some of my adult students are planning to put their daughter’s name and birthdate in those spaces, and hang the completed sampler in the baby’s room.
A sampler, then, is a great way to learn basic stitches. This particular sampler gives enough practice to get the stitch right, without becoming bored working a single stitch. The variety of color maintains interest and provides a pretty effect when finished.
You can design your own sampler easily – sit down with graph paper, draw some lines, shapes, and curves, leave some space for your name and date, trace your pattern onto your fabric, sit down with some instructions, and stitch away!
What age group is using this sampler? Is it difficult for children? I have trouble making even satinstitches. But I noticed you use padded satinstitches, I thought those would be harder for kids. I like the look of the sampler, but it looks harder than just basic embroidery.
Well, that’s a good question. I use the sampler for both adults and for kids, ages 10 – 14. The difference is that the adults can pretty much start out on it. For good results with the kids, though, they learn the stitches first, using thicker thread (#5 cotton perle) and then, when they are ready to stitch with floss, they work the sampler with the stitches they have learned. Satin stitch can be a difficult stitch, but a good way to keep your edges even is to stitch an outline of back stitches or split stitches around the shape you are satin stitching, and then work your satin stitches over your outline. It really helps!
Mary, I love you idea of this sampler. I would like to use the same thing with my 9yo DD. Did you draw all the lines ahead of time with the blue washaway marker? What a wonderful idea!
Hi, Mandy – yep, we traced the pattern with the blue marker. If you’re using cotton twill, you can print the pattern, tape it on a sunny window, tape your fabric over it, and trace it! It’s really easy. You might want to use a ruler or straight edge for the lines…
Good luck! I hope your daughter likes stitching!!
I love the look of this sampler. Does anyone know where I might purchase a sampler that does not involve any counting or charts?
Those seems to be the only ones that I can find. I’m looking for something that is already stamped or transfered onto a piece of fabric with stitch suggestions for each design. A sampler that had at least 5 diffrent stitches would be great! I think that a sampler like that would be really helpful for me since it’s hard envision the patterns when you don’t have a good working knowledge of stitches. Thanks in advance! I hope someone can point me in the right direction.
Hi,
I would like to order the Basics Empbroidery Stitches sampler on this NeedleNThread website but didn’t find an order form. Please let me know how to order. Thank you.
I love thiss…. my teacher tauhgt me how to do the “lazy daisy” .. it was so much fun
I am looking for an embroidery design for Deuteronomy 28. Do you have any ideas or resources? Thanks so much!
Donna Field
Hi Mary,
I have subscribed Needle N Thread website. I really liked the way you are explaining embroidery. Could you please share some Bead works on fabric ? I m very much interested to work with beads.
Ashwini – India
Thank you so much for posting these. I have a 4-H sewing project with kids ranging from 9-15 and this is the perfect project to help them really learn how to embroider. I have been looking for a while with out much luck, so really appreciate your website.
Approximately how many hours long did it take 10-14 year olds to complete the sampler?