


Even if you’re a beginner, you can never know toooo many outline stitches. They come in handy for all kinds of embroidery projects, whether you’re embellishing clothes, kitchen towels, paper cards, quilts, or wall-hangings. It’s always great to have an expanding repertoire of stitches. To help you along the way, here’s a photo tutorial of one of three more outline stitches, the coral stitch.
Coming soon: scroll stitch and Portuguese knotted stem stitch.
The three outline stitches that I’ll cover this week are similar: they create a kind of knotted outline – a little ropey looking and rather solid. They’re nice when you’re looking for something a little more distinctive than simple lines. They can all be worked around curves easily. Here’s the first one.
This stitch has lots of alternate names. Whatever the name, it’s basically a line stitch with a tiny, one-loop knot that’s formed at the end of each stitch.
The coral stitch can be used for outlines, and it can also be used (as most line stitches) as a filler. If you’re going to fill with it, I think the best thing would be to alternate the position of the knots in each row, in a kind of bricking pattern.
The direction of the red arrow indicates the direction of the needle’s tip. Although I pretty much work everything in a frame or hoop, this stitch doesn’t necessarily need a hoop. If you’re fabric’s in a hoop, it doesn’t have to be super tight.
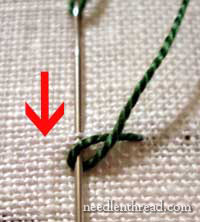
Coral stitch is worked from right to left. (Left-handed stitchers: from left to right.) Begin by coming up through your fabric where you want to start your line. Take your needle down at the point where you want your stitch to end (indicating the length of the stitch), picking up just a bit of the fabric, as shown, and coming right back up (in a “sewing” method). Your needle will be pointing down towards you, or, for a different look, you can angle it to the left or to the right – whichever way you angle your needle will alter the look of the knot slightly, so experiment to see what you like.
Loop your working thread over the needle in the direction of the line, then back around in the opposite direction under the needle. Pull the needle through. It may help to hold the working thread loosely with your thumb while working the stitch.
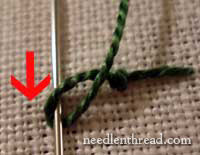
Here it is again, on the second stitch. Take your needle along the line, the desired length of the stitch, pick up a little bit of fabric, loop the working thread over then under, then pull your needle through.
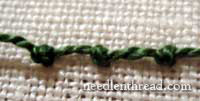
Three knots in a row…
You can vary the look of it by relaxing your tension a bit and allowing the line part of the stitch to “scallop” loosely.
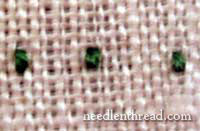
And this is what the back should look like – three short, parallel stitches.
It’s really a simple stitch! If you’d like some more help with it, feel free to check out my video tutorial for coral stitch.
Have fun with it!
wow this was usefull thanks
All these tutorials are so clear and useful! Really great, thanks!