


Whether you’re a beginner or an experienced stitcher, you will, at some point, muse over just how to get that “perfect pattern” transferred onto the “perfect fabric” to embroider it. Transferring embroidery patterns is probably my least favorite part of the embroidery process, but a water-soluble stabilizer like Solvy can make the process a lot easier.
I’m not quite convinced that Solvy is the absolute answer for embroidery transfer, but it definitely has its uses. To experiment a bit, I decided to try it with cotton velveteen and see how the process worked.
You can find the first steps in the process of using Solvy here.
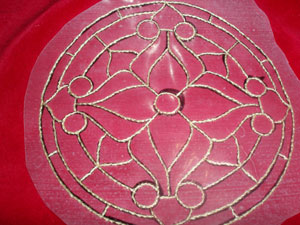
After I finished stitching the piece, I took it out of the hoop and cut away the excess Solvy. This happens to be “Ultra-Solvy,” which is extra-thick – in retrospect, I should have used regular Solvy. Here’s the trim job:
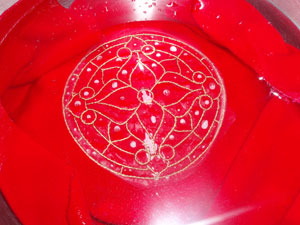
After trimming it, I plunged the whole thing into a bowl of lukewarm water and let it sit for just a few minutes:
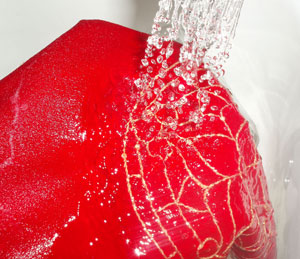
As it soaked, I got a little nervous, since the black from the Sharpie permanent marker seemed to be clinging to the threads. The next time I do this, I won’t use such a heavy line! That’s what I get for rushing! The thread was darkened a bit by the ink, I think. It’s not super-noticeable to anyone but me, but still….
Once the work soaked for a while, I decided to use a mild soap, very lightly working it around the surface, even of the stitches. Normally, I wouldn’t do this, and I don’t recommend it, as the movement tends to separate the fibers of the thread. By the way, I stitched this using one strand of soie d’alger silk by Au Ver a Soie. After very lightly working the soap over the darkened areas (they were pretty noticeable before I did this), I rinsed the whole work in running water:
And, lastly, I laid out the piece on a towel to dry:

You can see the “fuzziness” of the stitches – normally, it should NOT be this way, but this was due to lightly “scrubbing” over them with mild soap, using my fingers. Usually, I get a very smooth result with the soie d’alger, which I find perfect for satin stitching (see here for an example).
Overall, I was pleased with the experiment, and I learned a lot about using a water soluble stabilizer for transferring an embroidery pattern. Some definite do nots:
- Don’t use ultra solvy – use regular.
- Don’t use a heavy line permanent marker, like a regular Sharpie. Use a fine-lined pen, like the macro pens found in the art section of a hobby store.
- Don’t scrub over your stitches, even gently, with your fingers and soap – in fact, this is more or less a hard & fast rule when cleaning anything you’ve embroidered. Only in the most extreme cases of necessity (say, you spilled something directly on the threads and it’s a toss-up between light scrubbing and scrapping the whole work) should you “scrub” the threads.
Will I use Solvy again?? YOU BET!
If you have any tips on how you use Solvy or on how you transfer your designs for embroidery, let the rest of us know!! Thanks!
I’m in the process of conducting my own experiments with using Solvy, so I’ve been very grateful to see the results of yours. Maybe what I’m doing will be helpful to somebody, even though I’m not entirely done.
My focus has been narrow: finding an easy way to transfer patterns onto dark-colored T-shirts and stabilize the fabric at the same time.
So far I’ve found that using just a white colored pencil, from a drawing set (mine is Prismacolor), works fine. For whatever reason, my hand is surer when I trace with a pencil instead of a felt-tip pen.
After tracing the pattern onto a single layer of Solvy, I fuse on a second layer of Solvy. This is accomplished by laying the second layer on top of the first sheet of Solvy, putting a protective sheet of ordinary paper over that, and pressing with an iron for two-three seconds. You might have to peel the paper off the Solvy.
The two layers of Solvy are enough to stabilize the T-shirt fabric and do not stymy your needle, and the pencil shows up perfectly on dark fabric. I also found the fused layers easier to work with than the single layer.
I haven’t had any problems with removing Solvy or with pencil marks transferring onto the fabric or the threads –which in my case have only been DMC cotton floss. THe Solvy with the pencil marks has dissolved on contact with water. The Solvy instructions also suggest removing by ironing between two damp paper towels, and that has worked well for me too.
There’s another type of Solvy I’m going to try, coming in the mail. I hope it isn’t the Ultra! I’ll let you know how that turns out.
Once again, Mary, thank you for your wonderful work. Your writing is so clear and encouraging.
thanks so much, this really helps : )
Not sure if this will work with the threads or material but it might be worth a test on yours before starting a project. For most ink spots I use a plain cheap hairspray to make it just go away.I spray until the material is soaked. If it is goning to work you can see the ink disappear right before your eyes. Then rinse the material to remove the spray. No scrubbing or soap needed. Good Luck.
Quick question. Would you prefer Solvy or Transfer-Eze? I am currently testing the Transfer-Eze and am finding it a bit difficult getting the needle through it. What size needle did you use when you tried it?
Thank you
Hi, Sharron – I think Solvy is easier to come by, but either worked fine – pretty much the same, actually. I used a #7 crewel needle, I think. I was stitching with several strands of regular floss. My guess is that larger needles would be more difficult to use, but I’m not sure, as I haven’t used anything larger than a 7. ~MC
Mary,
I have used Solvy quite a bit, but mainly for machine stitching. One tip i would give would be to use a small pair of embroidery scissors and clip it away quite close to the stitching. I would do it all over in between each of the lines of stitching. That just makes it easier and quicker to disolve what is left.
Hi Mary; I have recently discovered your wonderful site, and since then have spent many hours browsing through all the information, with great joy. If i may, I would like to tell you of a couple of ideas of mine, which help…perhaps not directly with transferring patterns, but with keeping my work clean while i work on it.
I will use a piece of a product called “press’n’seal”by the Glad company. This product is actually a product used in food storage; it is somewhat similar to cling wrap, but has a different texture, and one side of the product has a very light adhesive quality..After i have transferred my design to the fabric, i will completely cover the fabric (one side only) with the press’n’seal. I will then mount the fabric and pressnseal into my hoop/frame as per usual. Then, depending on the size of the article, i will either trim a window away to expose the whole project, or just a portion of it. I can then proceed with my stitching as usual. If required i will enlarge the working window as my stitching progresses. At times i have re-covered the stitched portions of the project with new, small pieces of the press n seal as i go (just laying them down, & pressing to seal the new piece down)
Using this product has helped to keep my background fabrics nice and clean; there is no residue from the adhesive. I have also used it in a way similar to the solvy (actually the press n seal feels very much like solvy in texture); tracing my design onto the press n seal, then using a back/split/running stitch to transfer my pattern to the background fabric, then cutting away the press n seal from the outlined area, but leaving enough covering it to still protect the fabric.
The other thing i do is using an inexpensive shower cap (i buy them in packs of 10 from the dollar store)to cover a ‘work in progress’ when i am not working on it. This helps to keep dust, grimy kids fingers, dog hair, etc. from the surface. (granted this only works on projects less than about 12” in diameter, but, it does help.
Thanks for the wonderful site, all your work that you do…and also for listening to my humble ideas….Amanda
I just tried marking my solvy with my disappearing ink pen and it dissolved and wiped off on my fingers before I could finish my project. But, Solvy is supposed to dissolve a little easier with a drop or two in water in a spray bottle. Try gently ripping it away from the outside of your design, then squirting the rest.
** A drop or two of fabric softener IN the water. I left out the most important part.
I use this method all the time except I cut the solvy to 8.5x 11 and use spray tacky glue to a piece of paper and run it through the printer. I like to make my own designs on the computer.This method allows you to have sharp lines and the ink wont stick to your embroidery.Hope this helps.
I have also used the stuff that is printer ready and it sticks to the fabric . But it was guey on the neadle and hard to disolve.
1. I have a black and white hard copy pattern.
2. I have some shiny dark cranberry material.
3. I want embroider the pattern on the fabric.
I did try using white carbon paper, but it seems to rub off the shiny material. I like the idea of the colored markers to trace the pattern and then iron on the fabric, however, as the material is dark there does not appear to be any white/light colored markers. Also, if there is a light/white markers, I need a very fine point to trace the pattern. Do you have any suggestions? If not I will just have to retrace as I go. In short I want to take a pattern and put it on fabric, so it looks like the fabric is pre-stamped. Does any of this make any sense? Thank you for your time and assistance.
Lori Abraham
Have you tried the dressmaker’s carbon that’s kind of waxy (but not really wax), in white or yellow? I know you said white carbon paper, but sometimes, certain carbon papers are chalky. Another option is a light gray quilter’s pencil that can be sharpened. You can actually draw on the backside of your design with the gray pencil, then turn the design over onto the fabric and trace hard over it with something like a ball point pen and in that way, transfer the gray lines. Worth a try!
Hi Mary. As a new subscriber I am so enjoying your newsletters and website content, thank you! Recently, on the Sulky website I ran across one of their products called Printable Sticky Fabri-Solvy and ordered some for a redwork embroidery project. You get 12 medium weight 8-1/2 by 11 sheets that are printer friendly. Once your design template is printed (or traced), you peel the backing off and place sticky side down onto the right side of your fabric (you can also reposition it, if needed). When done stitching, simply soak in warm water and it readily dissolves. It worked great for my first of four redwork stitcheries. I just thought you might be interested after reading these two posts. Take care and happy stitching!
Hi, Susan – Yes, I’ve written about the printable fabri-solvy – and its forerunner, Transfer-Eze – here on Needle ‘n Thread a few times. It works! But it’s not a preferred method for me. It tends to gum my needles, and it can’t be used for every type of embroidery out there. But for redwork and similar, it’s great! Don’t forget to pre-test your red embroidery floss for bleeding. Some reds tend to bleed, and soaking in warm water can exacerbate the problem!
Love your mastery and generosity
Wendi Gratz at ShinyHappyWorld.com is a wealth of knowledge on sticky Fabri- solvy. She is my go-to for this product!
Also I love wrenbirdarts.com
Erin Eggenburg — author of The Mending Directory — she creates and sells washable transfer sheets for mending and patching and embroidery.
She also has a monthly mending stitch along which is lots of fun.
Thank you Mary —
When using my fabric stabilizer I found that it was making my needle gummy. To solve this problem I would periodically wipe my needle with an alcohol pad. Anyone else with this problem? Is there a stabilizer that does not make the needle sticky?
This is one (of many) reasons I’m not very fond of using stabilizers (especially adhesive ones) when doing hand embroidery. You’ll always struggle with the stickiness of the adhesive on the needle, to some degree. Alcohol can also eventually wear down the needle’s coating that helps it glide smoothly through fabric.