


The checkered chain stitch has a whole slew of alternate names for it: alternating chain stitch, magic chain stitch, two-colored chain stitch. Whatever name you give it, this stitch is a simple chain stitch, but it’s worked in two colors, so that the color alternates with each stitch.
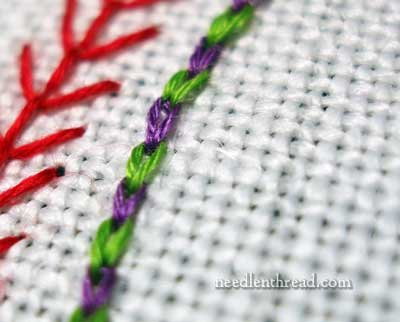
In the photo above, you can see a chain stitch line, but what makes it different from regular chain stitch is that it is somehow mysteriously worked in two colors of thread, with the stitches still interlocking as they do in chain stitch.
Really, it’s not mysterious at all – this is a very simple stitch. It just requires that you have two threads in your needle at one time. And this is where things get tricky. If you’re using stranded floss, the checkered chain stitch can get somewhat messy if you can’t keep your strands separate, so the stitch actually works better with a non-divisible thread, like a fine (#12 or #8) perle cotton or cotton floche, which is what I use in the video below.
This is fun stitch – you can play around with it and alternate your colors differently. For example, you can work two chains in the first color, one chain in the second color, two in the first color, one in the second, down the line. You can also create a checkered filling with the stitch by working rows of checkered chain stitch next to each other, starting every other row with the same color, so that the colors off-set each other in adjacent rows.
Hope you enjoy the video!
Looking for other embroidery stitches? You can find over 70 hand embroidery stitch videos right here on Needle ‘n Thread.
Looking for inspiration & information on hand embroidery?
There are all kinds of reasons to sign up for the Needle ‘n Thread daily newsletter! Check them out and sign up today!
If you like what you see on Needle ’n Thread, if you want to be a part of keeping the website thriving (and free of annoying network advertising), why not become a patron on Patreon? Check out my Patreon page here, where I’ll occasionally add special needlework bonuses for patrons.
If you shop on Amazon, you can support Needle ’n Thread without any extra expense to you by visiting my Amazon Recommendations page here, where you’ll find books and sundries for the needleworker available on Amazon.
This is a cool stitch I didn’t know about. I’m going to be doing a Christmas ornament tonight and will try this one. Thanks!
You’ll have to let the rest of us know how your Christmas ornament turns out! I’m happy you found a stitch you didn’t know about – this one is fun! Enjoy it!
A couple of months ago, someone posted on Craftster about “magic chain stitch,” which seems to be this stitch, but she didn’t give directions. I’ve been curious about it ever since, although I had the impression that it was a very complicated process involving two needles . What a marvelous surprise to see it here, and so do-able. Thank you for another wonderful tutorial!
This is such a beautiful stitch. I really liked it. Do you think it could be used to fill a tree branch with light and brown floss? Or would you recommend satin stitch?
It depends on what you want your tree trunk to look like… If you’re going for a “stylized” look (not a natural look) for a tree trunk, I think it would be ok to use this stitch in shades of brown, alternating where the stitches are falling. Typically, though, for a stylized tree trunk, you’d use something more like a stem stitch filling, working the rows in shades of brown. But if you want a natural look, I’d go with a long and short stitch.
Glad you like the checkered chain – nope, it’s not complicated at all, Elizabeth – it’s fun to work, and will work up a lot faster than the video shows it!
Hi, I am looking for a verbal/ video tutorial of checkered chain band, while searching for it I came across your cool site & the nice descriptive videos that you have. DO you know how to do this stitch if yes I would love to learn how to do it. I have a photo but no description & the photo isnt clear at all. I would appreciate any help as I am about to start a piece that uses this stitch. Thanks so much. Akanksha
Hi, Akanksha –
Actually, this is the same stitch! It’s a checkered chain band, alternating chain stitch, checkered chain stitch, etc.
Hope that’s helpful! Good luck on your project!
Hi Mary,
Thanks so much.
Akanksha
This is another great thing to try 🙂 thank you! I wonder though, how the back of the work looks… :} And the length of each of 2 threads must change with each stitch…
have you heard of the feathered change stitch to go around a hear.
need to learn feathered change stitch to go around a heart
This is ingenious! I was puzzled how is this made. It is so simple! Thank you for explaining it
Merci pour toutes ces explications claires et précises.
Cordialement
Sylvie D. Breton
http://www.idtextile.fr
Sensacional esta página. Felicitaciones.
Gracias por sus enseñanzas. es maravillosa. Gracias
Happy Monday Mary,
1st, as always, thank you for these lovely tutorials. I really believe they are the best instructional stitchery videos available.
2nd, my latest stitchery crisis. I, by choice due to my current skill level, am a stab as opposed to sewing type stitcher. Is it possible to complete this specific stitch utilizing the stab method? It may be a dumb question, but as I’m still a novice I wanted to ensure it was not on the table of options.
I’m utilizing the cotton floche, as per your recommendation, and as it is more expensive than, say, the .33 cent DMC embroidery floss, I want to practice wisely. I am using a sharp/crewel needle, with 2 separate colored strands of the DMC floche/cotton a broder, on a practice fabric scrap of 20 count Lugana. I think the needle may be somewhere between a 6 and 8, as it came out of a mixed sharp pack of 5-10 DMC.
If possible I would prefer to stick with the stab method as I’m much more comfortable and adept with the method, but recognize it may not be suitable with this stitch. I hope I’ve included enough info to supplement my question. Please let me know if any of my material/equipment choices are or will, make the stitch harder than it need be. Thank you as ever for your embroidertise!
V/r,
Tracie
Hi, Tracie – oh yes, I always stab stitch rather than sew because I’m usually working on very taut fabric in a hoop or on a frame. If you check out the chain stitch video, you’ll see how to stab with the chain stitch, and then just apply the principle to this stitch.
Mary,
So when I stab my needle up through the loop, that is where I will separate my color strands? Alternating red on first stab up…pull down gently, next go round needle goes through blue loop etc?
Thank you for the rapid reply as well.
V/r,
Tracie
That’s right! When you come up through the fabric,pick one color loop to go through or the other….
I’m fairly certain you were using only one needle with two color thread to run the the chain stitches you demonstrated, am I right? You definitely made it look very easy none the less. Thanks for sharing. (((HUGS)))
That’s correct!
This is such a beautiful stitch….