


The outline stitch is a basic stitch used in hand embroidery for lines and filling.
It’s an easy embroidery stitch and works up quickly, with a nice rhythm. You can work the stitch in a “sewing method” (in hand embroidery, this means “scooping” the fabric up with the needle to make the stitch) or a “stabbing method, which means taking the needle and thread all the way to the back of the work, and then bringing it back to the front of the embroidery, with each stitch.
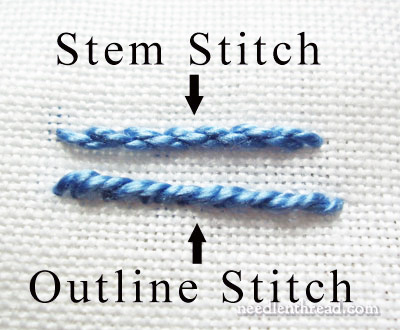
The outline stitch is a lot like the stem stitch – only the position of the working thread is above the needle as you stitch – or, if you’re stitching up the design, away from yourself, it’s to the left of the needle.
The noticeable difference between the outline stitch and the stem stitch is that the outline stitch forms a closer twist in the look of your line, so that you don’t see the separation in the stitches as clearly as you do in stem stitch.
To learn more about the stitch, check out this article on outline stitch vs. stem stitch. Reading about the difference between s-twisted and z-twisted threads will also help you embroider a better outline stitch.
This article showing stem stitch and outline stitch with different threads will also be helpful to clarify the difference between the two stitches, depending on the thread you’re using.
Here’s the video:
Do you want more inspiration & information on hand embroidery?
There are all kinds of reasons to sign up for the Needle ‘n Thread daily newsletter! Check them out and sign up today!
You can find over 75 embroidery stitch how-to videos here on Needle ‘n Thread, to help you breeze through all your hand embroidery projects!
If you like what you see on Needle ’n Thread, if you want to be a part of keeping the website thriving (and free of annoying network advertising), why not become a patron on Patreon? Check out my Patreon page here, where I’ll occasionally add special needlework bonuses for patrons.
If you shop on Amazon, you can support Needle ’n Thread without any extra expense to you by visiting my Amazon Recommendations page here, where you’ll find books and sundries for the needleworker available on Amazon.
I’ve never embroidered before but your videos are so helpful and I’m really excited to try it. Thank you!
This is exactly what I need to get started embroidering, I’m hoping to get my 5yr old daughter into it as well! Thanks so much for taking the time to do these great videos! Emily
Thanks for the video, it was a great help 🙂
Would you say that this stitch is a backwards backstitch? What is the distinct difference?
Hi, the tutorial video is very helpful for a beginner like me, thank you so much.
Your videos are awesome!!! Thank you for sharing!
Oh my Goodness, this was so helpful! I had read and read all these things, but Im such a visual learner that your video was perfect. Thank you thank you!
Thank you so much!!! This was so helpful! I was having a lot of trouble and this helped a lot!
I have not embroidered for 25 years. This is THE MOST USEFUL website on stitching on the internet.
The videos are visually clear. And, the Audio instructions very precise.
Thank you. Thank you. Thank you.
Thank you so much for posting these wonderful videos! I’ve wanted to delve back into embroidery, after years of really not doing it properly. I desperately needed a refresher course on basic stitches..Now, I can’t wait to start on some Redwork projects.
Your videos are a great help. I now learned 2 more stiches, just by watching your videos. Thank you so much for taking the time to demonstrate these stiches. Thank You!!!
Your video was exactly what I needed. I’m working on my first Bucilla felt stocking (first ever sewing project) and couldn’t quite grasp how to do the stitch before finding your video. Bookmarking for sure! Thank you.
I have been wondering if the stem stitch becomes an outline stitch if the twist of the thread is a z-twist instead of an s-twist? Is the stitch defined by the tightness exclusively or by the position of the needle relative to the thread only? I know this is being petty, but I think it is a good philosophical discussion topic,… or am I just too into my stitching?
Hi, Heidi – you’re right. If you’re using z-twisted thread, the stem stitch becomes an outline stitch – or at least, it comes out looking just the same. No, the tension shouldn’t make that much of a difference. It’s the position of the thread in relation to the needle, and depending on the twist on the thread!
It’s a good question! If you’re wanting the look of stem stitch, after all, then it’s good to know how to do it with the correct thread.
So, in summary:
If you’re using an S-twisted thread:
1. Stem stitch is worked from left to right (for right-handed stitchers) with the working thread below the needle.
2. Outline stitch is worked from left to right (for right handed stitchers) with the working thread above the needle.
For Z-twisted thread:
1. Stem stitch is worked from left to right with the working thread above the needle.
2. Outline stitch is worked from left to right with the working thread below the needle.
For left handers, this changes:
With S-twisted:
1. stem: right to left, with the working thread above the needle.
2. outline: right to left, with the working thread below the needle.
With Z-twisted:
1. stem: right to left, with working thread below the needle.
2. outline: right to left, with working thread above the needle.
I had justed learning a few stitches when I came across this site. Your site is fantastic. Thanks so much for this. Ashwini, India
Thank you so much for posting these wonderful, easy to follow, free videos for embroidery stitches! I've been wanting to learn and my mom, an avid crafter and my would-be teacher, died a few months ago and I am so glad that I am able to learn still through your helpful videos. Thanks for giving me a little ray of hope!
What do you do if the pattern you are stitching requires you to turn a sharp corner in outline stitch? I'm working on a redwork project and having a hard time getting clean edges since the nature of the stitch creates a slight curve at the corners.
To make a sharp corner, you need to stop the line in one direction and then start a new line in the next direction.
You can check out my lettering tutorial with stem stitch – the last letter (K) requires a newly started direction in order to get a sharp corner. The tutorial is here:
Stem Stitch Lettering Tutorial
Hope that helps!
Thank you! That was exactly what I needed. 🙂 You're so helpful and this site is an amazing resource.
Thank you, I am making a stocking for my niece and it said to use an outline stitch and I never mastered it before because the instructions with the stocking kits never made it clear that the thread had to be above the needle, before I just used back stitch the best I could because I never understood how to do this stitch, thanks again very helpful and alot easier than I thought!
I've just discovered your website through a friend (Frummie Sommers) and I'm so delighted!! At last I can learn how to embroider properly. I've watched 3 videos and they are so easy to understand. Brillant tutorials. I didn't realize there was an 'outline stitch' which is a different stitch to 'stem stitch' and now realize I've been mixing the two :)) and wondering why my lines have always been messy. Thank you so much for enlightening me 😀 I have a piece of applique that needs a stem stitch so I will practice doing it properly today. I LOVE YOU SITE!! Elly
Ah, thanks, Elly! I'm glad you like my little online endeavor here! And I'm glad you've been able to pick up some helpful hints! Welcome aboard, and feel free to browse!
Best regards,
Mary
Thank you so much for your videos and clear instructions! As a mom of 3, I don't have time to go outside my home and take classes or sit beside someone who knows how to do it for a period of time. Your quick tutorials are perfect!!
I'm a beginner and just learned how to do the French Knot. I'm having problems with the outline stitch and that one is supposed to be easy! I can do the outline if I'm stitching on material and not a design. The minute I start on a design, like a leaf I don't know where to start, on the bottom of the leaf or at the top. One side always looks different than the other side of the leaf.
Are you right handed or left handed?
If right handed, turn your design so that you starting point – doesn't matter if it's the top or bottom of the leaf, wherever you want to start – is on the left side, so that you will be stitching from left to right. If you always turn your design so that you're stitching from left to right and keep your working thread ABOVE the needle, you'll always be doing the outline stitch and it will always look right.
If you're left handed, you would work from right to left, and keep your working thread BELOW the needle.
Your website is perfect for beginner or expert! Thank you, Mary, for the wonderful video's!
Um… just wanted to say, thank you very much for such a comprehensive set of tutorials and tips. Friends and I doing hand-embroidery for the first time for a costume, and this site has made the process easy and painless (other than the actual embroidery itself).
I will have photos in October of the pieces we did, hopefully it will prove just how good your tutorials are for newbies to needlecrafts.
This is fantastic. I was looking for a sample of outline stitch to embroider line drawings, and came across your site. Your work is clear and easy to follow, and your explanations are just enough to clarify the finer points. You’re a great teacher, Mary. I’m going to look through this entire site when I have the time.
Thank you for the videos! It really helps especially for beginners like me.
so grr… grr..
I just discovered your blog through the Country Bumpkin e-newsletter. What a fantastic resource! Thank you so much for your generous posts, videos & tutorials. I am feeling inspired to get back to my own embroidery again
Why is outline stitch necessary? Also, I use the full 6 strands of floss because the finished product looks so much better; any reason why I shouldn’t.
Hi, Juanita – Outline stitch and stem stitch are both pretty much the same stitches, but they actually look slightly different when worked. If you check out the stem stitch video, you’ll see a comparison between the finished look of the two. Because of the twist created by the stitch, the outline stitch creates a smoother looking line, without the “rope-like” look of stem stitch. With stem stitch, it’s very easy to see the individual stitches, but with outline stitch, it isn’t as easy.
As for using the 6 strands of floss, that’s up to you – it depends on how thick you want your finished embroidery to be. If you’re going for a lighter look, you can use fewer strands. If you’re going for a heavier, bolder line, you can use more strands. It just depends on what you want.
Hope that helps!
~MC
I am a learner and this was sooooooo helpful!THANKS ALOT!!!!!!! I also hate reading so many thing to help me but this VISUAL DEMONSTRATION helped me alot.GOD BLESS YOU!!!!11
I loved this page!… Thank you for sharing 🙂
Thanks so much for all the videos! 🙂 I feel like I advanced a lot in my learning how to embroider. :}
thank you for this video.. i can now do my outline stitch.. this is helpful 🙂
What kind of fabric are you working with. I am using a piece of robert kaufman white kona cotton and it is soo hard to get through.
I LOVE YOUR VIDEOS. I am new and these are wonderful!!!! THANK YOU!
Thank you so, so much! That was very helpful. I’m doing Mother Goose crib cover for my cousin and was beginning to think I got in over my head with this one (No one taught me how to cross stitch). I almost gave up on this project, but after watching your tutorials I don’t have to!
Bonsoir.qui pourrai m’ expliquer le point quadrillé.Merci pour vos leçons,et se site superbe
I was looking on the needleneeds website and followed your link. It is very nice to find videos demonstrating how to do new stitches etc.
I hope that this will encourage me to try new things in the future.
I am making a felt x-mas stocking from a kit, and I have a question. When the directions say use two strands of tread am I then threading the needle with the two strands and knotting them to have a total of four? Or, am I just threading the two strands and knotting 2 strands together? I am doing an outline stitch for the name across the top of the stocking.
Hi, Toni – Usually when they say two strands, they mean just the two, unless they’ve given some kind of instructions for always doubling the thread. If it’s for the name on the stocking, and it’s the only stitch used, and the letters aren’t filled (and the stocking is the standard large size), you might find that two strands aren’t quite thick enough. I’d test two, three, and four strands, to see which you like better – of course, depending on whether they’ve included enough thread in the kit to do that. Just a thought! -MC
Another question for you Mary, is there any way to outline letter directly onto the felt? The directions suggest taking tracing paper with the name on it and pinning it to the fabric and then sewing with an outline stitch over the paper. I have better results with the stitches without the paper but don’t know how I could trace letter onto the felt without seeing marker lines or something like that. Help, thanks
Yep, felt is a bit tricky, when it comes to transfers. If I need lines when I’m stitching on felt (most of the stuff I do on felt is “free style”), I generally use a pencil and make sure I cover the lines. Some folks use the Sulky transfer pens (iron-on transfer), but the lines they leave are So Very Thick that it’s hard to cover them. Other than that, the safest bet is tissue paper. Instead of stitching the whole design over the paper, you could just use a sewing thread and running stitches to mark out the design, then remove the tissue paper, and then embroidery either over the running stitches, or remove them as you approach them. Hope that helps a bit! ~MC
I was trying to figure out how to make turns – thanks for the tutorial!
Awesome stitches shown in simple and easy ways.. Thanks a Lot.. really very very helpful!!
Love your teaching videos. Can’t find the answer to this question… how many strands of thread are used,if your directions don’t specify ,when outlining?
I’m working on my first embroidery project. So far I have tried out three different stitches, and it’s looking great, thanks to your help! But my outline stitch is looking exactly like my stem stitch. Am I doing something wrong?
Hi, Brittany –
When working the outline stitch, the working thread is above the needle and the line of stitching, when working from left to right. With stem stitch, when working from left to right, the working thread is below the needle and the line of stitching as you take each stitch.
Watching and listening to the stem stitch video and the outline stitch video may help a bit, too.
Hope that helps!
MC
Hi Mary, I had seen your cross stitch video and then I discovered more about your videos. And even I like embroidery and am also 10 it is the same age you started embroidery. And I am also making my videos with my own technique.
Awesome!
i love it
I just wanted to take the time and say thank you for your website! It has been a lifesaver for me! I have been making Christmas stockings for my family and without your how to videos I would be lost! They are amazing! Thank you again!
Brittney
ich suche verschiedene stickstiche
Love your website and videos. What material are you using? It looks like cross stitch, but must be a very high count. Suggestions?
Hi, Judy – it’s linen – a hand embroidery linen, so yes, a high count.
Hi Mary.
I am just about to start a new project, which is a kit of The Coronation of Harold from the Bayeaux Tapestry. It was supposed to come with an instruction leaflet but didn’t so I have been digging around online trying to find how to do the Bayeux stitch. I found a few sites plus It turns out the a book I ordered, The Bayeux Tapestry Embroiderers’ Story by Jan Messant, has good instructions. But still, I thought it might be a stitch you might want to include in your library of how-to videos. Just an idea.
Sarah
I have a counted crosstitch piece I have finished. I need to stitch the bride and grooms name on it. It says long stitch but I can’t find what they mean by that. Would you use an outline stitch for that. It used one strand of embroidery floss.
I think they just mean straight stitches, JoAnn – just long straight stitches. You could definitely use an outline stitch for that, though, if you wanted to go with a surface embroidery stitch. But usually on counted cross stitch, the stitches are backstitch, straight stitch, cross stitch, and occasionally, you’ll see surface stitches like French knots. But my guess is that they mean a regular straight stitch. Hope that helps!
wow…thank you so much! I can’t believe how difficult such an easy thing can be.
Hi again Mary! I’ve been embroidering for a long time and my grandaughter asked me to teach her to embroider. So I taught her your method of doing the outline stitch and she is a natural! I took a picture of her doing her very first lines! I can’t wait to do more with her and show her your wonderful videos! Thanks again for all that you do!
Glad to hear it, Karen!!
I’m so glad I found your site! I’ve been embroidering off and on since I was, uh, gosh- I think eight, and I thought I knew a lot, but I’ve learned so much just on a couple of pages. I was trying to find out the difference in embroidery thread sizes and learned a lot more than I was looking for- thanks so much!!
Paula
I appreciate the distinction shown in the two stitches. Thanks,
Love your site! Could you add some guidance for stem stitch on a winding vine that changes direction?
Hi, Barbara – you might want to try watching the stem stitch video, here: https://needlenthread.wpengine.com/2006/10/embroidery-stitch-video-tutorial-stem.html
I find the easiest way to keep stem stitch consistent is to always think in terms of stitching from left to right, even if I’m not stitching from left to right. In my head, I “turn” the line so that I’m imagining it going from left to right, keeping the thread below the needle. I know it sounds weird, but if you try imagining your line from left to right – no matter what actually direction you’re stitching in – and then place the working thread accordingly, the stem stitch will remain consistent.
You might also look up “stem stitch tips” in the search feature in the main menu here on Needle ‘n Thread. I’ve got quite a few articles that discuss different tips when working with stem stitch.
Also, if you’re working with a hoop in your hand, you should be able to turn the hoop to keep your stitched line going left to right, in case imagining it doesn’t do it for you.
Hope that helps!
Mary, I’ve been watching the video for the running stitch. I have a question regarding where the thread should be when I’m going up on the right side and when I’m going down in the left side? When I’m going from right to left on the top of an object, should the thread be to the top, like it is on the bottom row? Thank you so much…your videos are very helpful.
Hi, Susan – I think you ar confusing three different videos with your question. First of all, you say “running stitch” but you are on the video tutorial for outline stitch. Then, you talk about the “bottom row” but there is no bottom row of anything in the outline stitch video. So I’m really not sure what you’re question is. If you are asking where the needle should be in relation to the working thread with outline stitch, when working from right to left, the needle should be above the working thread when working right to left, unlike when working left to right, when the needle comes up below the working thread. I hope that answers your question, but I’m not really sure what the question is, so if it doesn’t, please feel free to try again.
I have just bought an embroidery starter kit, and cannot understand what it means by the phrasing ” following the j’s for placement” in the kit there is some Ivory coloured thread for this task on the diagram I can’t see where it is, can you please advise me.
Many Thanks
Jeremy Soan
Hi, Jeremy – I’m afraid you’ll probably have to contact the kit’s designer to answer that question. I can’t really understand the problem, without seeing what you’re talking about. Sorry about that! Find out who designed the kit, or what company it comes from, and then Google that person or company and see if you can find contact info, a blog, or something like that.
With an outline stitch do you do it before or after you have filled out the other portion of the section, so like I am outlining a satin stitch? Your videos have blown my mind and have really really improved my stitching! Thank you!
I don’t normally outline satin stitch on the outside of the stitching. That’s up to you, though! If that’s the look you want, do the satin stitch first, and then work an outline around it – that way, you can correct any jiggles in your satin stitch edges. Glad you like the videos! Thanks!
What stitch is generally used in Red Work?
I started a huge project years ago and interested in trying to finish.
Than you, Kit
Usually line stitches, like running stitch, stem stitch, chain, backstitch. And some daisy stitch and French knots.