


The whipped backstitch creates a rope-like line in a very simple way. The foundation of this stitch is a backstitched line. If you need to see how the backstitch is worked, visit the backstitch video.
You can see the whipped backstitch in this photo below – it’s the lower line, in yellow and blue:
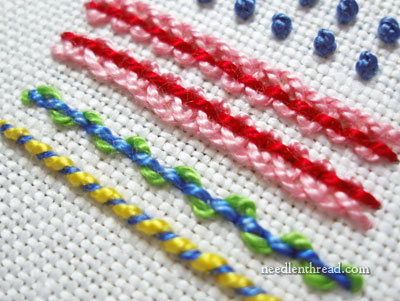
You can use the whipped backstitch for any solid line that you want to create on your embroidery projects. The whipped backstitch can be worked in contrasting colors for a vivid, colorful, and fun effect, or you can work it in the same color as the backstitch foundation, to create a solid colored, rope-like line.
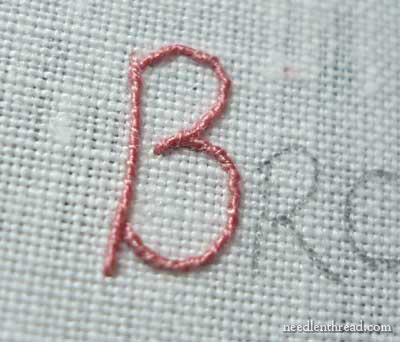
In the photo above, I’m using the whipped backstitch to embroider a small word. If you use one strand of cotton embroidery floss for your backstitch and one strand of floss to whip the backstitch, you can create a very delicate line with it, which works great for small lettering.
In the video below, I’m using perle cotton #5 on linen. I’m stitching with a tapestry needle that has a long eye and a blunt tip. The blunt tips makes it easier to pass under each of the backstitches without snagging the stitch.
Here’s the video:
Do you want more inspiration & information on hand embroidery?
There are all kinds of reasons to sign up for the Needle ‘n Thread daily newsletter! Check them out and sign up today!
If you’re looking for more embroidery stitch inspiration, check out my collection of hand embroidery how-to videos here on Needle ‘n Thread!
If you like what you see on Needle ’n Thread, if you want to be a part of keeping the website thriving (and free of annoying network advertising), why not become a patron on Patreon? Check out my Patreon page here, where I’ll occasionally add special needlework bonuses for patrons.
If you shop on Amazon, you can support Needle ’n Thread without any extra expense to you by visiting my Amazon Recommendations page here, where you’ll find books and sundries for the needleworker available on Amazon.
Thank you soo much for this and the backstitch. I could NOT understand the picture they showed me.
Hi!! Thank you SO much for the video!! I can do so many stitches!! Could you make some more videos of maybe conching or something??
Thanks
On this Whipped Backstitch, do you end this stitch by running the needle underneath the line stitches there without going puncturing fabric, as was shown in other earlier stitch instructions? Thank-you. Love the videos!
Pam F.
Hi, Pam –
You take the thread to the back at the end of your line, and run it under the back of the stitches.
Hope that helps!
MC
These are so wonderful. Thank you!
your videos are fabulous, i am learning so much & can't thank you enough for sharing your wonderful knowledge & expertise. You're all i need to fuel my motivation, isn't that awesome! 😀
ВЕЛИКОЛЕПНО!!!!!!!!!! УМНИЦА!!!!!!!!!Сразу виден хороший преподаватель.А методика преподавания- высший пилотаж.
Que bueno lo tuyo! dan ganas de comenzar a bordar YAAAA!!!! gracias!y gracias por compartir tu “saber””don”….
Hi,
Thank you so much for your videos.
Its really helpful.
I am making advent calendars for my grandchildren. I want to write words on felt using embroidery stitches. Do you have any suggestions to put a pattern on the felt as pens or marking pencils don’t work on the felt. Also, which stitch would work the best for free-hand writing?
Thank you! Your videos have helped me as a novice wanting to create something special for my grandkids!
Great tuturial! Thanks
Ohhh Thanks a lot,, it so easy,, but could not understand how to make,, now i learnde it from your video. Thanks a loooooooooot..
It can to do my project thank you very much.
Hello Mary, Since the subject is writing your name in embroidery. How small of a letter do you think you can possibly do in the padded satin stitch? By the way I really like your new monogram book I am buying it,with my husbands next paycheck.
Thank you,
Sandra
Hi, Sandra – padded satin stitch…. I think it depends on the weight of the thread and the shape of the letters. I wouldn’t necessarily use padded satin stitch if I were trying to do really small letters. I’d probably use overcast or trailing, with a very fine thread. That would probably work better!
Hi Mary, got your email much appreciated. Did not understand what overcast or trailing was. Looked through your videos but could not find them. Do you mind to explain further or direct to some link on your blog. Thank you,
Sandra
Tracy Franklin has a good explanation and tutorial here: http://tracyafranklin.blogspot.com/2014/12/crathorne-bug-trailing.html
Just learning to embroider and am left handed. Any suggestions on “how to” resources the lefties?
Really enjoy your website!
Thanks!
Yvette Stanton’s book for Left Handed stitchers is great. Here’s a link to my review: https://needlenthread.wpengine.com/2009/12/left-handed-embroiderers-companion-by.html
Great, clear explanations!!!
Thank you!
Jen
Thank you so much for this tutorial. Very clear and easy to understand. I’m a complete novice at embroidery but have always wanted to learn how. I’m excited to give this a go!