


I planned to have this embroidered notebook cover finished by the time I went to bed on Sunday, but sometimes things just don’t work out the way we plan them! The first kids’ embroidery class was Monday morning, and I wanted to show this to them as a sample. Although I didn’t finish, I did make progress, so I thought I’d share some photos…
The kids love the thing, by the way, and are excited to make their own. They learned three stitches on Monday: the running stitch (we always start with that one!), the whipped running stitch, and the chain stitch. I jump straight into the chain stitch because it’s just a short step to the detached chain (lazy daisy), which is always received enthusiastically because they can make flowers with it.
We also talked a little about needles and scissors, keeping track of supplies, clean hands, and such. They learned how to hoop up their fabric (we use white cotton twill for practicing). Then they picked out two colors of cotton perle, we learned the stitches, and then they picked out the felt for their embroidered notebook cover (four different colors were available) and three pre-cut strands of three different colors of cotton perle, which they rolled up and put in their sewing boxes. I showed them where to stitch the running stitches to mark the sides of the notebook cover, and they practiced their stitches, and that was the whole two hours! Fortunately, I have two gals from our guild helping with each class – so in this class, which had 17 children in it, each of the adults were able to give some one-on-one help with each stitch.
It was fun! The next group meets on Wednesday afternoon.
So this is the notebook cover so far, which I have every intention of finishing today, depending on how long I have to be at work!
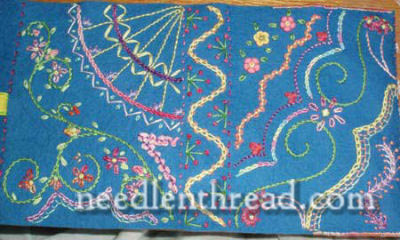
The spine is marked by the wavy line in the center, although the spine doesn’t really have to be marked at all – the design could continue across the whole space. I realized it doesn’t really matter which side is which, either – on this, either side of the spine could be the front cover!
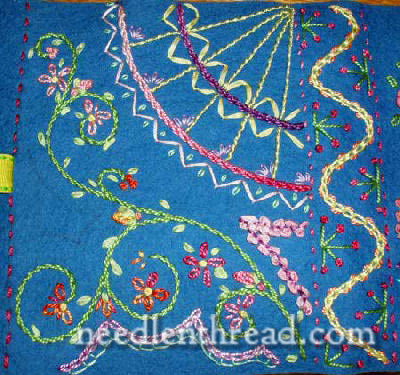
This is what I accomplished on Sunday. The wavy line in yellow down the spine is a laced chain stitch. The stitching on the inside of the waves is a variation on Algerian eye, with French knots at the tips. The fan in the top right corner is worked in whipped back stitch (the ribs), and the two bold lines defining the arch are Portuguese knotted stem. The yellow between the ribs is fly stitch in yellow ribbon. The edge on the outside is fly stitch worked in three strands of DMC stranded cotton, with a little green detached chain between the peaks of the fly stitch.
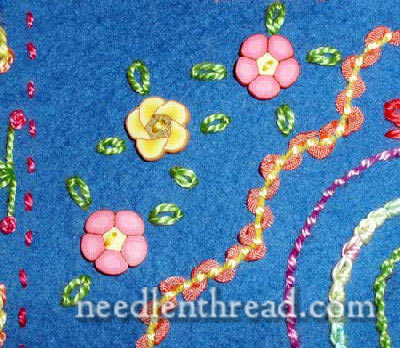
I added these little hand-painted buttons to the part that I had already finished before Sunday.
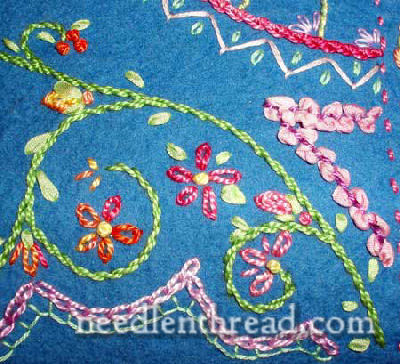
The vine here is worked in stem stitch, dotted with little ribbon leaves. The flowers are daisy stitches and French knots, for the most part.
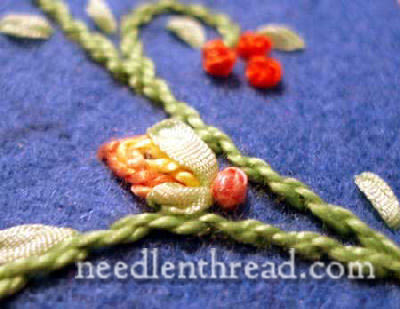
The buds that rest in the vine intersections are actually oyster stitch, covered a little by some ribbon.
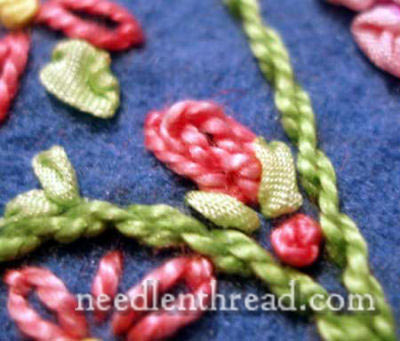
There’s a little French knot at the base of each bud.
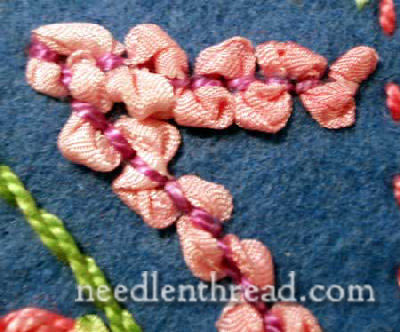
This is backstitch laced with a wide and loose silk ribbon. It’s a scrap of ribbon that came from an orts bag from Yodamo silk. These are little $4 and $6 bags of miscellaneous ends of silk ribbon which are great for scraps and such.
You can find pretty much all the stitches used above in my Video Library of Stitches.
I plan on posting exact instructions for making the cover – it’s not complicated at all, and it’s a great and relaxing project for any kid – no matter how old!
Your book cover is lovely. I think it’s great that you are teaching children embroidery. Your project would also be great for adults. Do you ever teach any adult classes?
Hi, Ginger – Thanks! I’m glad you like the book cover. It’s a great project for adults, too. Yep, I teach adults as well. This summer, I have a silk shading class underway. It’s going really well so far, and as we progress on our project, I plan to post pictures. Right now, we’ve gotten through framing up a project and transferring the design using the prick and pounce method and watercolor paints. That took a while, but now we’re ready to stitch! We meet once a week for two hours. It’s really fun!
Mary, That does sounds like a lot of fun. If I lived near you, I would sign up for a class. But I think driving from NC would be a little far. LOL To my knowledge there are no needle arts (only knitting) classes near me. All our embroidery shops are long closed. 🙁
i like this very much. i am very happy to see this
This is lovely! I have been wanting to start to teach children at the school I work at during their lunch or recess breaks. Seeing your examples and descriptions are extremely helpful and inspiring. Maybe after reading your ideas I can get something put together and started. I had intended on them using regular floss with muslin and hoops but the felt may be better. Any other suggestions I would GREATLY appreciate it. These children are from 8 to 12 years old.
You said you were planning on putting up further instruction but I can’t find it. Is there a pattern available?
Hello Mary,
Would you be interested in visiting Australia and teaching me this kind of art?
It’s awesome 😀