


Do you have a particular embroidery stitch that eludes all your attempts to master it? I do. It’s the plaited braid stitch. I’m sure there are embroiderers out there who may read this and say, “WHAT? She can’t do the plaited braid stitch? And she calls herself an embroiderer!?” That may be a bit of an exaggeration, but – still – it is a stitch that I have a heck of a time trying to get “right.” So I’m exploring it, searching for resources, help, information, tips, and whatever anyone wants to add to my explorations…
The plaited braid stitch shouldn’t be confused with the braid stitch – although they are similar in their beginnings. The braid stitch is rather simple, though, and relatively easy to stitch. The braid stitch looks like this:
The plaited braid stitch is a stitch that was used in 17th and early 18th century to provide heavier scrolling patterns on textiles. It was worked in metal-wrapped silk thread (much like Japanese gold) or stiffer cord-like thread. Unlike the stitch above, which is completed in two steps for the first stitch and one step on the repeats, the plaited braid stitch takes five steps to execute the first stitch, and then the repeats require two steps if you use a “sewing” method of stitching, and three steps if stabbing. So far, I’ve found stabbing to work better, especially with metal threads.
What piqued my curiosity about plaited braid stitch recently is the awesome project going on at The Embroiderers’ Story. This is a blog devoted to the re-creation of a 17th century lady’s embroidered jacket at Plimoth Plantation. I’ve poured over the whole blog and read with delight about their work in recreating this beautiful piece of clothing. Their process of finding thread, their progress on the embroidery – all of this really thrills me! I’m anticipating the information on how they are going to recreate the scroll pattern in the jacket, and what thread they are going to use. Are they going to use the plaited braid stitch (which, after looking closely at their model jacket, seems to be the stitch used for the scroll), and, if so, what kind of thread are they going to use to work the stitch? I’m sure they’ve got this all figured out, but I can’t help thinking that, if they have found the embroidery time consuming so far, how much more time consuming will it be with the plaited braid stitch? It seems to me that all the other stitches used on the jacket work up relatively quickly – detached buttonhole and trellis stitch can go pretty fast once you establish a rhythm. But plaited braid – wow! It’s slow, and that’s a lot of scroll work!
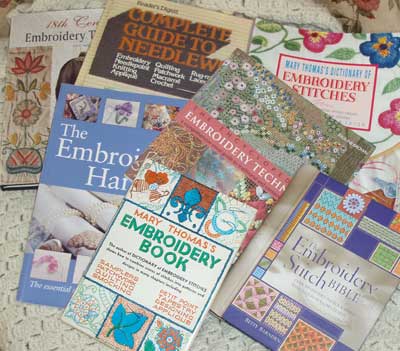
This is the thing: clear directions for the plaited braid stitch are really (Really!) hard to come by! If you want to find it in a current embroidery book, you’ll be hard-pressed. The only book I’ve found it diagrammed in so far is Mary Thomas’s Dictionary of Embroidery Stitches. True, I don’t have every book on the market, but I pulled out my collection of standards, and Mary Thomas is the only one who covers it.
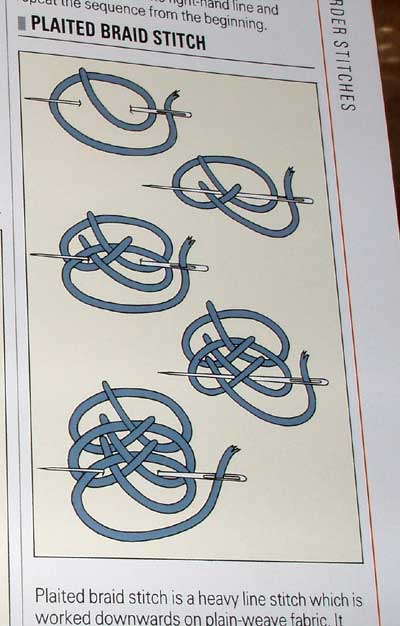
Online, there are a couple sites that have the same type diagram for the stitch. The diagram looks like this:

It’s the same diagram that’s found in Mary Thomas’s book, shown here:
On some websites, I’ve noticed that some alternate names are given to the stitch, such as “plaited stitch” (nope – it’s not), “braid stitch” (no, it isn’t!), and “rosette chain stitch” (nope, not that either).
I also ran across a website with step-by-step photos of something entitled “plaited braid stitch.” But it isn’t “the” plaited braid stitch here – it’s missing a step, and the braid, if worked following the directions given, looks heavier on one side than on the other. That’s because one of the plaiting steps is missing.
The site is Victoria Clayton’s Hand-Dyed Fibers, a good site for some interesting and useful information for stitchers (she has a good articles on finishing a needlebook, for example).
It’s her fourth and fifth step that pose the problem with her version of the plaited braid:
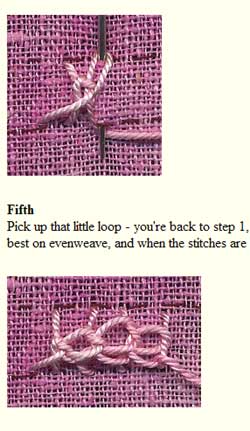
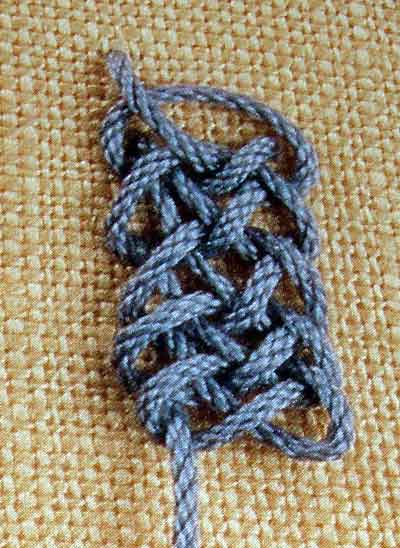
If your work up her stitch a little more carefully, this is more or less what you end up with (working with perle cotton):
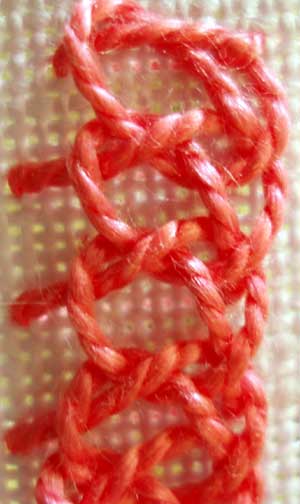
It certainly works up faster, but it isn’t the right look – notice that one side (in the photo above, the right side) has a plaited look to it, but the other side is just the loop that you find in the regular braid stitch.
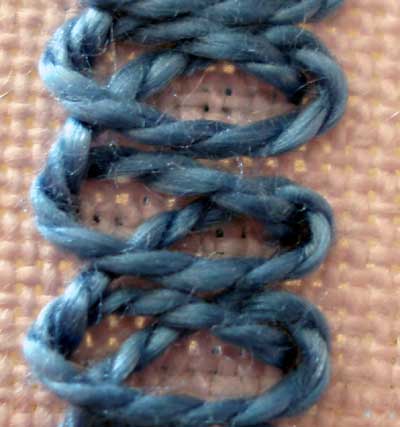
In the “real” plaited braid stitch, the sides are even – there’s a “plaited look” to both sides of the stitched band. Here’s a close up of the blaited braid stitch worked on an antique:
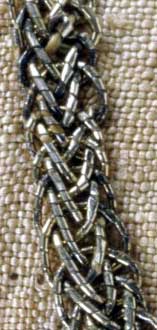
Notice how comfortably the threads fit together – they look almost supple in their twists and turns. Of course, the piece is old and the threads have been there for a while. But still – the stitch is tight and neat and even, and the threads look comfortable with their situation!
Here’s a close up of one of my attempts at the plaited braid stitch, following the diagram above for the stitch, and using a size 5 imitation Japanese gold and a really big needle:

You can see the strain on the gold already, even though it was passing through a large needle hole. The gold also looks stiff and uncomfortable. The stitch doesn’t close up on itself very well, either – although perhaps that’s part of the nature of the stitch when worked with stiff threads.
There are some noticeable differences between my sample and the older work above – for one thing, in the thread I used, the gold strip wrapped around the core thread is a lot wider than the strip on the older piece. I think this has a lot to do with the stitches in the top photo looking more supple.
My stitches look decidedly stiffer and “rounder” than the those in the top photo. Notice the obvious downward direction of the stitch line in the top photo – the interior stitches (the “plait” part of the stitch) – angle downward in the stitch direction (especially the ones on the left). In my sample, every part of the stitch seems to keep a rounded, stiff look. In the older piece, these stitches are closer together, too.
Here’s a shot of the plaited braid worked with cord, from Mary Thomas’s book:
In playing with the stitch, I’ve learned that once you get the hang of the order of the steps for the plaited braid stitch, it isn’t that hard to follow the steps. The tricky part of the stitch is to keep it even and to get into a working rhythm so that you can make progress on your stitching. As mentioned above, when working with a wrapped metal thread (like Japanese gold), I found it easier to use a stab method (that is, taking the needle all the way to the back, pulling the thread through – at least to the point of creating the next loop, and then bringing the needle back to the front).
Now, what I’d like to know from all the embroiderers out there who are familiar with the plaited braid stitch is this:
What kind of gold or metal thread works best for this stitch? What size needle works best – and what kind (sharp or blunt?) – and are there any tips or tricks you’ve learned while working the stitch that you can share?
If readers have any information on the stitch, or can direct me to further resources, I’d love to hear from you!
I found your post very interesting and decided to try. So if you don’t mind an advice from a complete unadept I have some tips – for the metal embroidery. If you want it to look like at the picture, to avoid your round look, mark the points you prick the needle in. I suppose they are “wide rectangles” (if you take four points). Draw “tall rectangles” and try to stick to them to see if it could work:-) See here. The other think is that the metal plaited braid is a bit different to the Mary’s one. When threading under the cross on the right you can notice they went under three threads – the cross and the one they were working with. Here you can see as I tried the Mary’s and this way. Excuse my stitches, I’ve done this for the first time today 😀
Mary,
Readers Digest Complete Book of Embroidery includes the Plaited Braid Stitch. It looks the same as you pictured from Mary Thomas’s book. In addition it also says, “This stitch requires practice bt is very effective as a decorative border. Work from the top down and use a heavy thread. Pinning the loops will help you to practice.”
Excellent! thank you! Pricking the holes first is a really good idea!
Your stitches look fantastic. I’ll give it a try later today when I get home from work!
Thank you, thank you, thank you!
Hi, Kathy – Aack. Do they call it the same thing? I couldn’t find it in there for the life of me, and I just went and looked again.
I’ll go page-by-page to see….
Thanks!
Mary –
Fine Lines magazine (the publication of the now defunct Historic Needlework Guild) published an article in two installments titled “A Treatise on the Plaited Braid Stitch” by Leon Conrad of the U.K.
The issues in which these articles appeared are Vol 8 No 1 and Vol 8 No 2 (Summer 2003 and Fall 2003 respectively).
To give you some perspective, this is a very difficult stitch to master. I know of at least one needlewoman, who has had the opportunity to study antique embroideries in various collections in the U.K., who has not deciphered it to her satisfaction. She has even questioned Leon Conrad’s treatise.
J
also a couple of pages on it at
http://www.bayrose.org/AandS/handouts/Plaited.pdf
Ah – Thank you both for the additional resources. I’d like to find those issues of Fine Lines magazine. I’ve been searching around for them, but haven’t had much luck, except one UK site that has a few back issues available. I’ll keep looking!
Megan!! I can’t seem to access that link right now – looks like a server problem. But I’ll check it out as soon as it will come up for me!
Thanks again!
New Information!!
Here’s Leon Conrad’s piece on the plaited braid stitch:
Leon Contrad on Plaited Braid Stitch
Yippee!
Mary, I am sorry I didn’t see your question before now. Nothing like being a year late. You probably don’t need the information any longer, but just in case it was page 97.
Rather late, so I don’t know if this will help anyone, but the method used on the Plimoth jacket is completely different from those instructions, and actually pretty fast and easy to do. The step-by-step instructions at the Thistle Threads blog are good.
The only part I’m having trouble with is spacing/tensioning so the stitch looks symmetrical instead of one side being slightly more compact than the other.
Jacqui Carey’s new sweet bags book may be helpful, too.
Thank you for this! It’s my personal Achilles heel as well, and I do a lot of historic (16th & 17thc patterns) and I am hopeless at this stitch…I can do just about anything else, reverse work, of all type, including reverse cross stitch, and counted satin stitch…but not this!
I’m going to study these pictures intently!!!
I found these instructions by Tatiana Popova, a Ukrainian embroiderer, to be very clear https://owl-crafts.com/en/plaited_braid_stitch/
I practiced using string on a 10 count canvas until I “sort of” got the hang of it, then tried with pearl on the canvas to get a tighter braid. When I got into a rhythm it was relatively straightforward but if I stopped and then tried to continue it messed up 🙁
It helped me to recite “under two on the left under three on the right” to get the rhythm.