


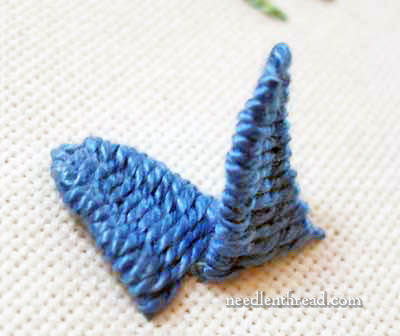
The Woven Picot is a dimensional hand embroidery stitch, created by weaving over three threads that are anchored behind a pin.
This is a great little stitch – it can be left loose so that it stands up from the fabric in a rather dramatic way, or it can be anchored at the top and held down onto the fabric with a tiny stitch.
The woven picot makes excellent petals, but it can also be worked as other embroidered elements. Anywhere you want a dimensional stitch that can be short and squat or long and slender, the woven picot will work.
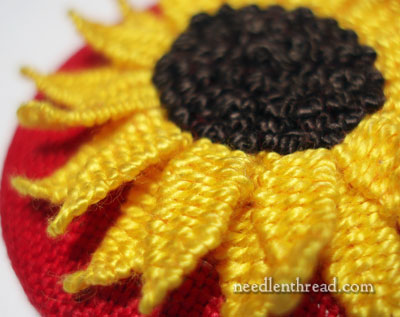
The woven picot makes up the petals on the sunflower in the photo above. The picots are worked in #8 perle cotton on red linen. To work this type of flower, two layers of picots are worked around the center circle. The background layer is always worked first, with the foreground layer worked on top of it. The center of the flower was worked with French knots.
The woven picot can be worked in any type of thread, but I think it looks best when worked in a thread that has a good bit of twist to it, like a perle cotton or a buttonhole silk. Worked in floss and similar threads, the picot will have less definition. If you want a smoother surface to your picot, choose floss, stranded silk, floche, or a similar thread with a looser twist.
Here’s the video for the woven picot:
If you’d like to learn some other hand embroidery stitches, feel free to visit my collection of embroidery how-to videos here on Needle ‘n Thread.
If you like what you see on Needle ’n Thread, if you want to be a part of keeping the website thriving (and free of annoying network advertising), why not become a patron on Patreon? Check out my Patreon page here, where I’ll occasionally add special needlework bonuses for patrons.
If you shop on Amazon, you can support Needle ’n Thread without any extra expense to you by visiting my Amazon Recommendations page here, where you’ll find books and sundries for the needleworker available on Amazon.
Well, that’s just… COOL! 😉 Thank you very much.
Brillant! Thank you very much!
I have been wondering how this is done, now I know. Thank you so very much for all the video stitches it really helps. I applicate the time and effort you have gone to for all of us.
Thank you so much for the video tutorials, today I have done the picot stitch wondered how you did that for a long time, I really do appreciate your time and effort as I am sure many others do.
This is sOoo cool! Your videos are very helpful and makes it easier for a beginner like me to learn. Thanks!
Wow, this is so beautiful!
Its realllly verrry nice. Easy too…. Thank you so much. Im interested in hand work embroidery and so i gone through few book but i didnt get most of the stitches. But these video tutorials are really very nice. Now im more confident that i can do better.
Love this stitch, it”s fun to do and i like the effect, thanks for your help!
I loved this stitch and after trying it a couple of times I tried to experiment with it and managed a three lobed leaf (like a maple) and it works.I have had so much fun with your video tutorials.
I so love this and will make a wonderful flower petal…thanks for the video.
Het is mij niet gelukt om de video te starten. De reden hiervan is mij niet bekend.In de linkerbovenhoek staat een blokje met kleurvlakjes. Riet
Thanks for all the superb videos! I can imagine using this stitch for fish fins or airplane wings or bee hives…so much versatility.
You are genius,Mary. Thank you for the wonderful embriodery lessons. I am very fond of this kind of beautiful art.
excellent tutorial thanks for sharing
I’d never be able to do the stitches that I can without the videos that you have on your website. Thank you, thank you and thank you.
Gail
Loved the simplicity yet elegance of this stitch and now I am percolating with ideas for adding flowers to several new baby things since I am about to have a first grand daughter.
Thank you what fun and I think it looks fairly quick as well. I am off to my stash and ohhhhh.I just love your ease with teaching these techniques and I appreciate it so much.
fantastic! thank you 🙂
can send me ” how-to-video” of woven picot other then on youtube? i dont have youtube here in Pakistan.
thanx
wow…so beautifull. i like it. Thank’s …this is very usefull for me.
hey mary! thanks so much for all your how to videos!! embroidery was a part of my supw at school and i embroidered a beautiful garden full of stitches from your site! this was my favorite!!
thanks again!
Thank you for the woven picot video. Very clear.
I clicked on a link for the free pattern “Crimson Chat” 3 times and everytime I am brought to this page. Am I missing something? Loved the video! Can’t wait to try this out on my next needlework project!
Maravilhoso, muito obrigada, pela esplicação,
qualquer, pessoa que tenha noção de bordado pode fazer e criar, varios modelos, um bjo no coração
de abradecimento.
Isabel.
Dear Marie,
Beautiful stitch and very precisely explained. Thanks a lot.
Regards,
Bharti Tripathi
Thanks so much for all of your tutorials! You are so clear. I really appreciate it
superb, ilearn i’ll try
Dear,
I am new to your news letter. I have been wondering how this is done. Now I know . Thank you so very much for all the video stitches.it really helpful and makes it easer for a big inner like me to learn Thank you, Thank you.
Muito bom…amei,obrigada!
Bjo,Nena
awesome. Just awesome. Thank you for sharing!
Thank you! Such a useful, beautiful stitch for floral embroidery.
Thanks for sharing videos. It is really helpful for beginners like me.
can you make a video how to stitch above sunflower…its very useful to us…..
Gracias, que bonito, muy bien explicado……….
I would like to make my own Mexican Oaxaca Style Blouse. It seems to be similar to Blackwork. Are you aware of any patterns available?
Me gusta muchísimo. Gracias
Thank you so much for this post, I finally got to do my first picot!!
I didn´t know how much I love to embroider until now!
Greetings from Argentina
Thanks again!
Your technique makes me do it right. Thank you.
I have only one email address, but have tried twice unsuccessfully to sign up for your newsletter since it won’t accept my email address. Now what? I’ve saved every video tutorial of yours that I could find, but I’d really like to get your newsletter.
Hi, Barb – I just added you from this end. Please check your inbox (or your spam filter) for the confirmation email. Thanks!
THANK YOU! Your tutorials are so clear and precise, they really helped me relearn old stitches and perfect new ones!
C’est vraiment top!! Thanks a lot. Just what I need. Slow enough and very precise!
Thank you for the information. That is a lovely stitch.
I loved learning this stitch! I used an away knot to get started. How did you secure your thread before beginning the stitch?
I use a trusty-rusty, handy-dandy knot. Shocking, isn’t it? It works best for this!
how do you figure how high and wide you want it and also how do you figure it out so each one touches each other and there is pr0per number to go around.. I like this stitch and would like to work it into some of my cross stitch and embroidery but not sure how to get right number
Love your tutorial. Fantastic! Thank you.
Thanks so much for showing the simplicity of this brilliant little stitch! I came across it after purchasing a small kit from Temu and of course the description of this stitch and how to do it was puzzling to say the least! But now I have mastered it, and I only had to remove three before I found my groove.
Thanks for sharing your knowledge for all of us that adore stitching but still have lots to learn!