


Following up on my first article about hand embroidering a monogram on a linen guest towel, where you’ll get details of supplies and technique, I thought I’d show you progress on the monogram and discuss the importance of precision in the outline.
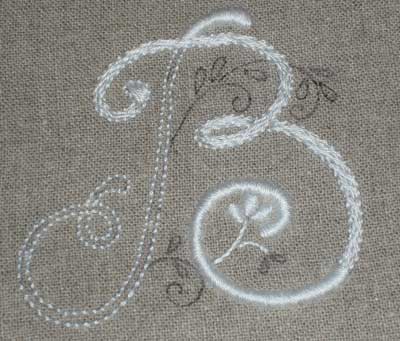
After I finished the tip of the B, I continued backstitching the outline of the letter.
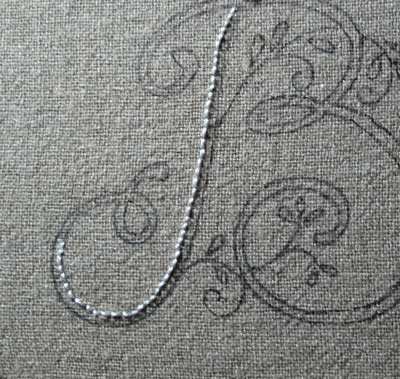
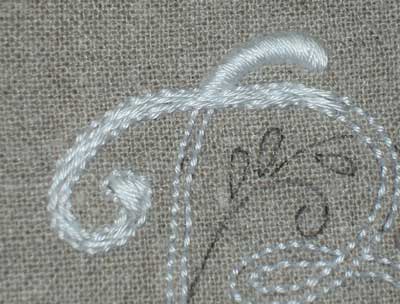
Now, this is the thing: when you’re stitching your outline, it is best, on the long stretches, to work with relatively longer stitches, so that you get a smooth, flowing line. As you work into the curves, your outlining stitches can shorten up a bit, in order to take the curves well.
My stitches here could have been a little longer. The difficulty is that, with shorter stitches, you tend to focus more on the fabric than on the smooth flow of stitches. And when you’re focusing closely on the fabric, you end up naturally wanting to stitck your needle into the holes corresponding with the threads in the fabric, rather than sticking faithfully to the sweep of the line. So the result can end up a bit bumpy.
In the long run, you’ll be much happier if you take your time with the outlining steps – make sure that your lines are nice and smooth, because you’ll be using them to hold the edge of your satin stitch. A messy satin stitch on a monogram is never desirable, so take good care while you’re outling – it will save you frustration later!
When you look up close at the backstitching, you can see where the line jiggles in and out a bit. In the long run, the slight variation in the line didn’t bother me too much, but I kept an eye out for it and compensated with my satin stitches.
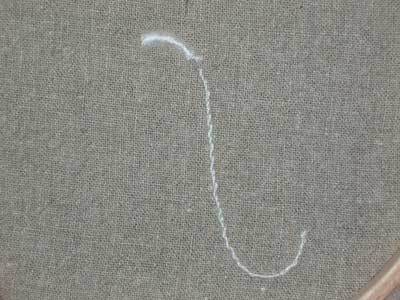
The white little blob inside the lines of the letter (upper left of stitching) is where I ended my threads. Since that area is going to be covered anyway, I began my stitching by taking about three tiny little stitches into each other, inside the lines of the letter.
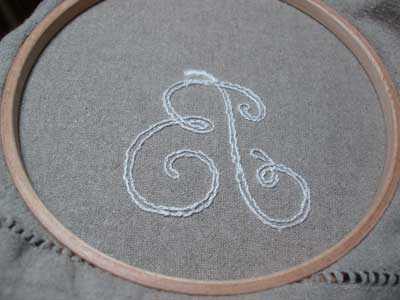
And here you see the back of the stitching so far.
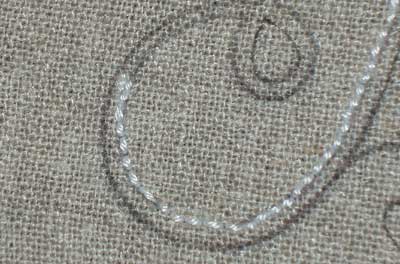
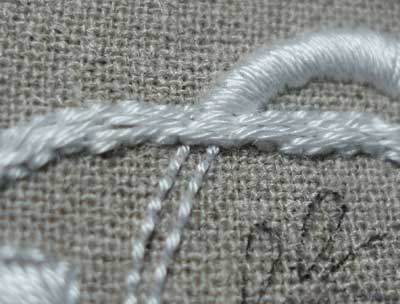
When you see even more of the backstitching, you can see the jiggling of the line. Tsk tsk!

And, the back of that – a combination of stem stitch and split stitch show up on the back. These stitches on the back will be mostly covered up by the satin stitching, although often you’ll get a little border of half-stitches along the satin stitch line on the back, because the stitches tend to be split as you pass your needle to the back.

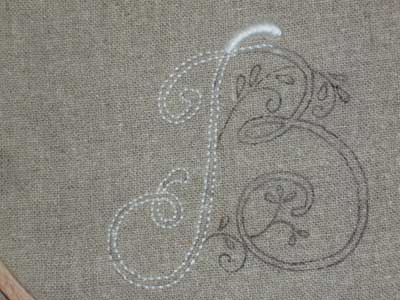
The purpose of this photo is two-fold: 1. you can see the height on the embroidery; and 2. to show you again how I’m ending my threads – you can see the white marks inside the letter lines again. These are just little tiny stitches taken into each other; they serve to anchor the thread very well. As long as you’re covering up the area with other stitches, this is a great way to begin or end your threads.
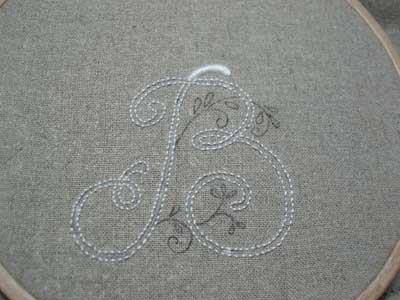
The outlining on the whole “B” is almost finished!

Ah, I like this! See the thread ring? Those are great for hitching up your whitework threads. Coton a broder, when left in the skein form, doesn’t operate like regular stranded floss – it doesn’t “pull” out of the skein. To make it easy to take a length of thread, I precut the skein in two pieces, to make about 14″ – 15″ lengths of thread, which I hitch up on a large thread ring. (This is a mother of pearl thread ring, large size, from Kelmscott Design). Then you can just pull your thread straight from the front cross over on the ring, without untying the bunch (the same way I did with the kids’ threads and the craft foam mentioned yesterday).
And, the back of the “B.”
With the complete outline finished, it’s time to put the padding stitches in!
Here’s a close-up on the padding stitching – long stitches filling in the centers of the letter lines.
And, finally, satin stitching over the padding, from the base of the B up. I also added some of the vine and flowers, so I could see what it would look like when finished. Notice that when you outline your satin stitch area and pad it, then satin stitch it, you end up with a slightly larger sized design. The little petals on that inside flower sure didn’t look that big before they were stitched. Still, I like them.
So there’s the progress on the monogram – what think you so far?? You’ll hopefully see the grand finale on this one before the week’s up! Holy cow! I better be finished by then!
This project was written up in four articles, including this one. You can view the progress on the whole project through the following links:
Part I – setting up, transferring design, discussion of materials, beginning stitching
Part II – (that’s this one)
Part III – taking the curves with satin stitch – stitch direction and working around tight curves with satin stitch.
Part IV – the finished project!
It is looking just *lovely*
I monogrammed 3 handkerchiefs for a friend a couple of years ago – I so wish that I’d had this then!
I had terrible problems with the size changing as I stitched the outline, then padded then did the top. They somehow ended up much smaller than I planned.
The oatmeal and white combo’ is so smart looking! I just love it.
I sure wish I could improve upon my Long and Short stitch. The stitch dictionary that I have doesn’t offer very good instruction on it at all. The sense of any sort of repeated pattern to follow is quickly lost for me and it all turns into some sort of helter skelter, just filling it in as best I can sort of mess. Aargh! – Jeannine
Olá!
Beautiful work. I’ve finished my first monogram some days ago – I’ll be happy if you take a look.
I’ve found you only some days ago!
I’m reading slowly your blog.
Actually i love to embroider,but I’m not so perfect as you.:)
I also love to work with linen, but my greater difficulty with this kind of linen is the design transfer … Yesterday I’ve already read your posts about tranfers and now i’m waiting for a special pencil…
(sorry my English)
Thanks for all this information!!!
Wow! What a great lesson and beautiful monogram. I am loving your blog.
Mary, nice post (and work), as always.
I have a question about the outlining. Is there a reason you used backstitch instead of split stitch? It seems to me that split stitch would give you a more even ‘surface’ (not the word I’m looking for, but I am half asleep 🙂 to stitch over. Backstitch has ‘ups and downs’.
Margaret, you’re right. And normally, especially if I were not padding the satin stitch, I’d use split stitch.
You’re right about the surface of the stitch. Backstitch sort of makes hills and valleys with the stitches, while split stitch is “flatter.”
Under padded satin stitch, though, I’ve not found much of a difference between the two. The padding is higher than the outline stitching, so the “bumps” in the backstitches become a kind of moot point.
Since this is for a beginner’s class, I figured backstitch is the quicker option, and on padded work, it works fine. It takes beginners a while to pick up the split stitch with ease. They tend to agonize over the perfect split!
Once they’re comfortable with stitching in general, we’ll use the split stitch under an edge to mark the smooth edge.
I should’ve mentioned the difference between the two stitches in the post – good thinking, Margaret!
Hi Jeannine,
It happens that I’ve reviewed some Long and Short stitch books for beginners at http://elmsleyrose.blogspot.com/2008/02/learning-silk-shadinglong-and-short.html
– that might help you a bit. A couple of other embroiderers commented, so we had a bit of discussion.
And also don’t forget to search through here, because Mary does a video on long and short stitch as well – and also mentions it quite a lot on this site! Do a search “NeedlenThread long stitch” and that should bring it all up 🙂
Thank you so much, Elmsley! I’ll head over and take a look right now.
Hmm…I do see the Long and Short stitch included in Mary’s video list of stitches, but there is no actual working link leading to a video that I can find. Am I crazy? You don’t have a video of that stitch yet, do you Mary?
Mary, you’ll just have to stop all that lollygaging and dillydallying! I’m totally kidding! *hugs* – Jeannine
Hi, Jeannine – no, no video on Long and Short Stitch yet. It’s on my list.
I’ve also got a pretty thorough review of Clare Hanham’s book, Beginner’s Guide to Silk Shading, if you want to look at both reviews.
In fact, on my book review page, you can other long-and-short stitch books already reviewed. Another good one on that list is Ruth Chamberline’s goldwork book. Even though it concentrates primarily on gold work, it gets into silk shading, and her diagrams and explanations are good.
Now, if I could only find — somewhere — some recording time, I’d finish up that video tutorial and splice it together! Alas…!
Cool beans, Mary, thanks! I just left a comment over on Elmsley Rose that I’ve popped Hanham’s book into my Amazon cart. I have to wait until July to snag it though. I’m still feeling sufficiently guilty over my June Amazon purchases, but this too shall pass! 🙂 – Jeannine
Sorry – I’m mad.
I thought you’d already done a vid on L&S; stitch, Mary
I also forgot that you’d done a review of Clare Hanham yourself and so pointed Jeannine to my blog.
Bad Megan! Sorry – I hafs no brain!
No problem, Megan!
I haven’t finished the long and short stitch video – it’s a bit of a bear, and I need to do more filming….
thank you! now i know how finish my work with pulled thread! BYE PIERA
Hi! I came across this post while searching for some monogram stitching ideas! and I absolutely love it! Thank you 😀
lindos manogramas
Hi Mary,
I love your website and in particular the tutorial for the monogrammed guest towel.
I see there is a link for the blank towel but could you suggest a good website in England for embroidery fabrics and blank guest towels like these?
I have looked for fabric sites but never know what to actually put in the search engine as I am a cross stitcher and we use different fabrics for that.
Kind regards
Lynn B
Hi,Lynn – over here, they’re just called “embroidery blanks,” and they are sold for machine embroidery primarily (that’s where the biggest market is). Perhaps searching for “embroidery blanks” and “machine embroidery” will deliver some results that would be helpful? I’ll ask around a little bit, too, to see if I can come up with anything.
This article has been very helpful! I would like to hear more comment about the slant of thread for satin stitching a monogram….and am never sure what angle to try and keep. I see it changes while going around a curve, but then appears to take off on an angle on the straight areas. Is there a certain angle, or slant, I should be aiming for? Thanks in advance for your help!
Hi,Linda – I usually slant them in a way that makes sense when it comes to working the curves. See what way the curves will work best in satin stitch – what angle will go easiest into the curve – and stick with that.
I’m working on an embroidered name for a Christmas stocking cuff. The name has thin and thick lines. I have outlined the letters in the back stitch, following the letters that I printed onto an adhesive sheet (Printable Sticky Fabri-Solvy). This product dissolves in water after stitching is completed, leaving only the worked design.
For the thicker areas I plan on using the satin stitch. How many strands of embroidery floss should I use? The outline is stitched with 2 strands. I won’t be padding the satin-stitched areas.
My fabric is a soft cotton so hope it will stand up well. The cuff will be padded with fairly puffy fibrefill This piece will be the cuff of a Christmas stocking.
I’ve finished the outline and am ready to begin the satin stitching. Just need to know how many strands will work best. Any other tips you have for me will be greatly appreciated!
Thank you!