


A while ago, I started a random embroidery project on a piece of felt. My original plan was to use it as some kind of book cover, or needle book, or … something. But the truth is, initially, it was a spontaneous project that I grabbed just to have something to work on while on a short road trip. The piece developed, and then sat neglected for a long time. I’ve finally done something with it.
I didn’t know exactly what I wanted to do with this bit of embroidery. Really, I couldn’t picture it as any certain thing! When I wrote about the piece a few weeks ago, I got a lot of excellent suggestions for how it could be used. I ended up going with a large-ish needle case / tool holder.
The reason I dug the piece out recently to finish is that I had some threads and needles to test. If you read my posts on the Spiral Eye Needles and on Soy Luster thread, you saw parts of the finish work for the piece.
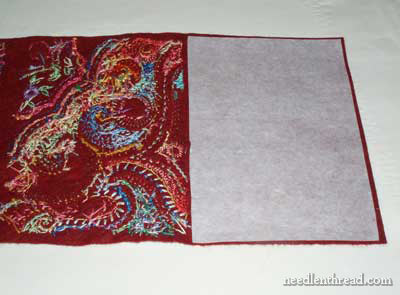
The first thing I did was determine how I wanted to make a cover. Fortunately, when I cut the felt, I left long sides that would turn in to back the two finished panels. This worked out well. After trimming, I folded the felt to the back of the embroidered panels and fused them closed.
And yes, the back is MESSY!!!!
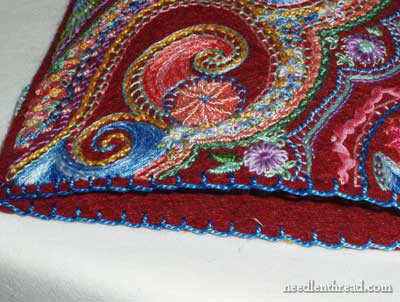
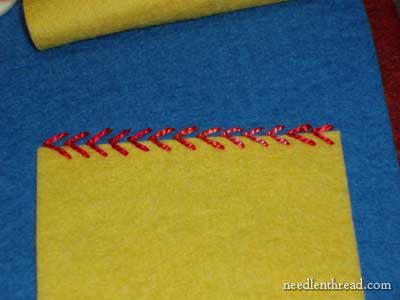
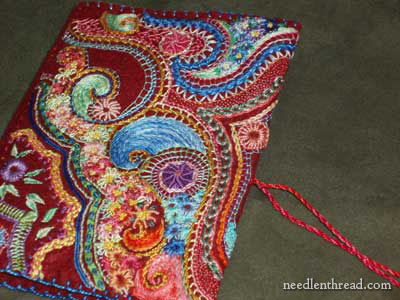
I trimmed a little more, then buttonholed the edge of the cover all the way around.
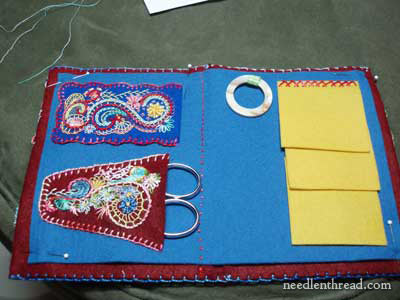
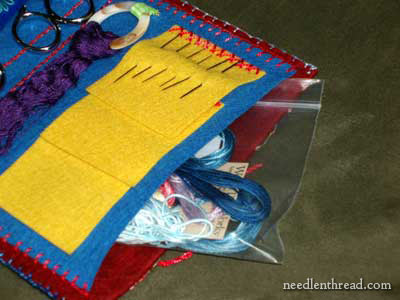
Then, I had to think out how I would finish the inside. I cut out a piece of left-over blue wool felt to cover the inside, and then started laying tools on the piece to find out how I could arrange things.

I noticed that, with scissor or tool slots, I would have to either put a loop or a flap on them to hold the tools in, should the book be turned upside-down. So instead, I decided to face the tool openings towards the inside fold of the book.
I made two tool holders – one for scissors and the other for either another pair of scissors, or tweezers and a laying tool (I haven’t really decided what, exactly). I figured I could put three flaps for needles on the other side, using some other scraps of felt. The whole inside of the book, in fact, is done in felt scraps. I had to rummage a bit to find pieces that would work.
There was still a bit of room between the needle flaps and the center fold, so I decided to attach a large thread ring there. The mother-of-pearl thread ring doesn’t really match the “rustic” look of the book, but it’ll do.
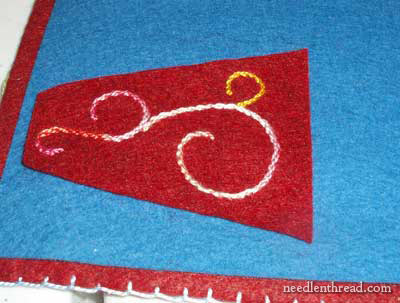
I cut out the shapes of the tool holders – a V-ish shape for scissor (in the sheath) and a rectangle for tweezers and laying tool. Incidentally, the rectangle was a scrap from this past summer’s bookmark project in my kids’ embroidery classes, and it worked out just fine.
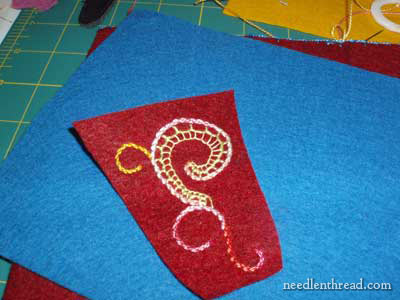
Then, I began embellishing the tool holders.
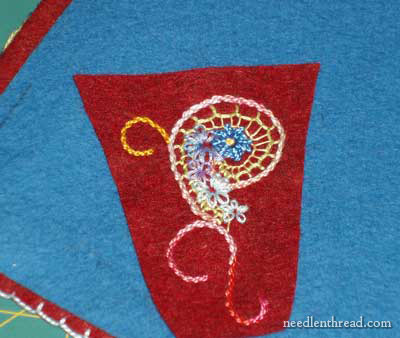
I stitched free-hand, whatever occurred to me as I went.
I used a combination of threads – perle cottons, DMC stranded, Soy Luster, floche, and silk. Most were taken straight from a tub of stashed threads that are somewhat disorganized, with the exception of the Soy Luster and Baroque Silk, which were both new and which I was trying for the first time.

I had fun embroidering these little things. Because they are small, I wasn’t stuck doing any one thing for very long, and because they were completely free-handed, I could do whatever came to mind.
I liked working with the variety of stitches and threads.

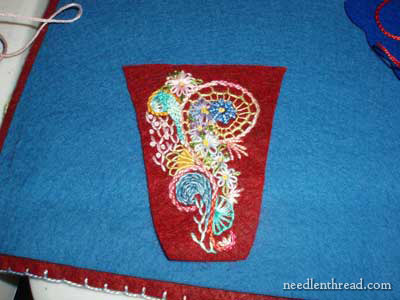
After finishing the tool holders, I attached them to the blue felt using buttonhole stitch all around, facing the openings (as previously mentioned) towards the inside fold to keep the tools from falling out.
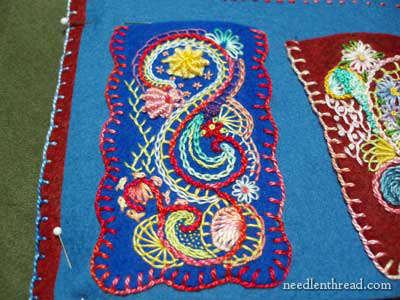
Then I embroidered on the needle flaps, using a few different stitches to secure the flaps – herringbone stitch is on the top flap, chain stitch on the middle flap….
And fly stitch is used to attach the last flap.
I attached the thread ring using a tiny scrap of ribbon I just happened upon in my floss box.
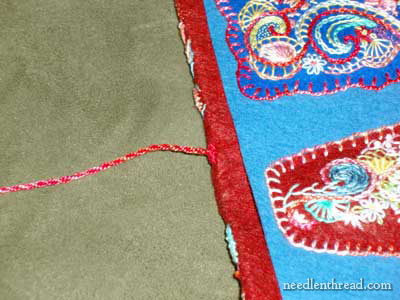
Once I had everything attached to the blue felt that would serve as the background to the inside of the needlecase, I attached the blue felt to the book cover using buttonhole stitch all the way around. I found that the blue felt needed to be attached to the cover in the middle of the case as well, to help it fold better, so I ran two lines of running stitch down the center. I worked these through all the layers of wool felt (three, total), so that they are visible on the outside cover as well, just at the border of the embroidered panels.
Unfortunately, I didn’t draw the lines and measure things out before I started stitching, so the lines are actually not quite parallel. They run away from each other towards the bottom! After working the running stitches, I whipped them to give the line a more finished look. Anyway, with the stitched lines in the middle and the and the top and bottom edges secured with the buttonhole stitching, I was left with an unstitched edge on the outside of the blue felt, which created the perfect opening for pockets that can hold extra thread or other flattish things:
In fact, it’s nice having these two pockets on both sides of the case.
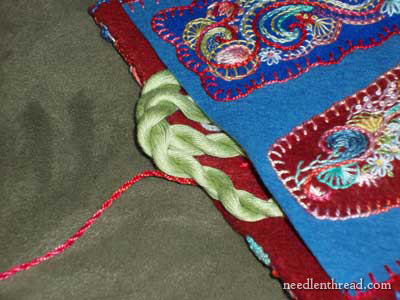
Then, once all was done, I had to have a way to close the case. I was
out of ribbon, so using two strands of a coordinating perle cotton #5, I twisted the threads until they were suitable for a cord, and then made little ties out of them, which I attached at the edge of each cover.
In retrospect, if I were doing something like this again, I would not make a needlebook or tool case that closes in this manner – I’d make a flap that can button over the whole thing. The one thread in the middle seems somewhat chintzy, but, still, it ties the thing closed, and for this project, that will do.
Overally, I had a lot of fun working on this little project, though after a while, my fingers were killing me from working through multiple layers of wool felt and a layer of fusible interfacing.
I actually don’t know if I’ll ever USE the case. I’m thinking about giving it to one of my embroidering nieces for Christmas.
It was a fun project, so I’m not opposed to making another modified version with a different closure and a different layout on the inside. We shall see, we shall see! What think you about it? Any suggestions for a better way to close the thing up? I’m all for pointers, so point away!
It would make a lovely gift, the embroidery is gorgeous and gives so much to look at and admire
How about beautiful buttons or toggles with loops? You could integrate the buttons into the embroidery on the cover and make snug little loops to hold it all together. In fact you could add buttons and loops on all sides to make sure the book stayed closed and all the precious tools were held tight.
And, as for making more of these, please do – they are so inspiring and are a beautiful example of your needlework.
This is so beautifully done and well-thought out. I love it when function and form are so exquisite together!
Beautiful!!
Anything you touch turns into gold.
It looks just the way I had imagined when you wrote about it some time back.
It’s just lovely. It was so much fun to read about each step of the project and your rationale for making the decisions you made. I love blogs with lots of photos!
Oh boy oh boy, is that ever beautiful! Here’s an idea of what to do with it….have a giveaway and PICK ME! Although I am certain one of your embroidery minded relatives would love it just as much!
MGM
This turned out beautifully! I really want to try a freeform embroidery project like this.
I think you’re onto something with having a flap over. If you used a slightly longer piece of felt next time, you could fold it into thirds instead of halves to get the flap. Wouldn’t even need to be thirds really, just enough that you’d have a nice overlap and you could close it with a pretty button.
This is just what I had been pondering about the need I had for a needle book and studying how to go about making one. Your post comes in the nick of time. You have given me some ideal as to where to start. Yours is such a lovely a piece of art. It is real appealing to the eyes. LOVELY!
Dear Mary
I think this is lovely as it is and your family member who receives it is sure to prize it as a future family heirloom. I wish my family had the forethought to keep my Grandmothers stitched treasures.You discussed closeures and I would love to see you show ‘the fans’ some Dorset type buttons please.
Robyn Kirk
New Zealand
Your embroidery is just beautiful and anyone would be lucky indeed to have such a treasure. I love it just the way it is..don’t change a thing..xx
This is such a beautifil project – So rich and vibrant. And I love the fact that the embroidery grew as you went along – that’s how I tend to do most of my work – though I haven’t yet done anything as successful as this!
Mary – I really like this – the embroidery and the construction. i agree that the flap closure would be better. I am thinking of how to make a needle case/ sewing kit for our young daughter. I think you have solved my dilemma! thanks
What a beautifully elegant needle case.So inspiring. The colors and pattern are just amazing!
How I like your embroidery on this case, beautiful!
Just checking up on the blogs and had to tell you how much I love the embroidery on this project!! Happy, wild and wonderful!!
Your work never ceases to amaze me!!!!
Annie (Michigan)
Your needle book is fantastic. Enjoy using it!
Oooh, so pretty! I love the finished product. As I was reading I was wondering what you were going to do with it. Your niece is sure to be pleased and honored to receive such a exquisite gift.
Thanks, Everyone, for your enthusiastic compliments on this piece! It’s really very funny – it was just one of those “killing time” pieces that I wasn’t really serious about, but I have to admit, it was probably the most fun project I’ve ever done!
I think I’m going to adapt the concept to a case for crochet hooks for my mom for Christmas. But don’t tell her! nd if my sister is reading this, it was My Idea First!
I’ll certainly let you know how that goes!
Thanks again!
That is just gorgeous! I think I might make an adaptation of this, with a flap to close the scissors in. I love the idea of pockets on the side and the ring. You are very inspiring!
That is sooo beautiful! I love the paisley pattern. I am sure your niece will love it.
My hat s off at you! You are a very talented artist!!! Love what you did. I will be doing a needlebook for an exchange, hope it looks half as beautiful as yours!
Thanks heaps, Sandra! It was a really fun project, and I wouldn’t mind doing something mildly similar in the future….!
Best,
Mary
I just love the needlebook. I was wondering about the size. Could you please do a post on dimensions of the piece. I would love to try and make one for myself but I need an idea of the size to start with.
You are amazingly talented! That is so beautiful! Wow!
I discovered this project a couple of months ago and decided to make one for myself. I’ve just started, I have the first “scrolly” design done on the front panel. I will be scrutinizing all your photos for inspiration. Thanks for your blog – I read it regularly. Sometimes when I’m in a funk, just reading about someone else’s embroidery gets me going again.
Thank you!
Wo nellie but that is a gorgeous piece of work. I’m just blown away. I saw your BlackFish Zentangle needlework piece and became an instant FAN of your work. thanks for the tremendous pleasure of seeing such fine handwork.
Best,
Ruby
Your work is just beautiful. Thank you for sharing!
So, what did you do with it? Did you give it away, yet? I bet anyone you have ever met or talked to, or emailed with, would love it. hint hint,
Yep, I gave it away, Kathy – to my niece! One of these days, I’d like to recreate something similar! It was a fun project! ~MC
Wheee, so much fun! I am totally making some of these as lil gifts for the ladies at the quilt group I go to – I’ve been wanting to try a bit of surface embroidery recently (instead of just vicariously enjoying yours!) and these look like the perfect opportunity. 🙂
Awww nuts – wrong post! I meant to post this on the bottle-cap pincushion post! D’oh!
TRÈS JOLI! It reminds me of eastern european embrodery. I also love your beading project. I do both for my grand daugthers on my sewing and my knitting.
Merci, for your beauifull work and tutorial.
Mary te felicito ese bordado esta precioso,gracias por compartirlo
MARY,haven’t been onto your website for very long but just had to say a couple of things about your this needle holder. First, so beautiful and your back looks as good as your front! That was how my Mom taught me to embroider many, many years ago at the age of 8; if the back looks as good as the front, you can on the way to becoming a great stitcher! And, one more thing, your emails are so very interesting and have yet to not read them to the end and also the additional high-ligthed items.Just wish I had time to do all the things I would love to do. Thank you for the wonderful site you have created and I too would never have said I WOULD BE DOING ALL THIS COMPUTER CRAFT STUFF!
Great idea for car trip work, etc.
Thank you for your creativity!
You could try those magnetic purse closures. That would work as a needle minder too.
Do you use 100% wool felt when making a needle book? I have trouble finding all wool felt in the stores, most of it is 100% polyester or a blend.
Hi, Mary – I normally do, just because it stands up to stitching better than craft (acrylic) felt. It’s sturdier. And it finishes better! I have to order mine online, unless I accidentally come across a wool felt blend in a fabric store. Doesn’t happen often! There are lots of suppliers of beautiful wool felt on Etsy. You can also order wool felt from The Wooly Thread online. Hope that helps!