


Ok, that’s a dumb and punny title. Still, I was on the ball – I actually completely something! One of the best parts of creating anything is actually completing it and enjoying that sense of accomplishment. I don’t always complete everything I begin, needlework-wise. (Have you noticed that? Think: whitework sampler, silk shading sampler, Long Dog sampler… the list could go on!) My excuse list, by the way, is just as long! However, Temari balls are small enough to finish in just a couple sittings, and this makes embroidering these spheres extra fun.
The beginning of my first attempt at Temari went pretty quickly. After selecting the right threads and a pattern, all told, I think I worked for a bit less than an hour.
The next chance I got, I went back out to the studio to finish up the Temari ball, and this took about two hours, with a few interruptions in there.
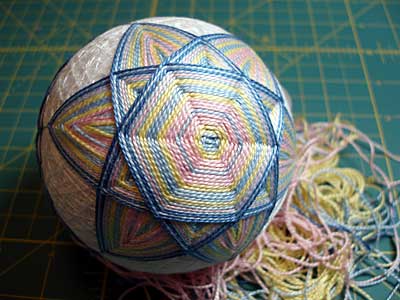
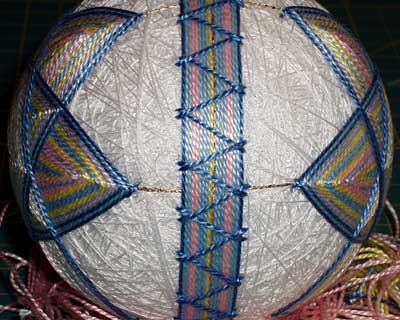
I worked the other side of the ball exactly like the first, although I tried to loosen up my tension a bit and not crowd the tips so much. That’s going to take a little more practice, methinks. I wanted both sides to come out even, as far as the spacing from the tips of the “star” to the middle band, or obi. I added to both sides one more row of light blue and one more row of dark blue, to try to bring out the pattern a bit more.
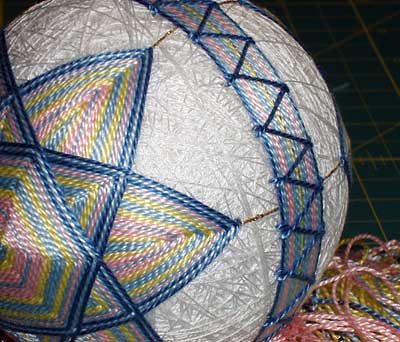
The obi, or band across the middle, is worked in the same threads. I had plenty more yellow and pink, but I don’t like the yellow, so it ended up being mostly blue with a little bit of pink and only one row of yellow in the center I think double herringbone stitch would normally be worked over the top of the obi, but I only had two strands of dark blue left.
The pattern called for gold braid for the herringbone, but since I didn’t use gold anywhere else (except the original marking threads on the ball, which I tried to cover up as much as possible), I figured the blue would be fine. I’ve got the impression that, pretty much, you can do whatever you want to with colors.
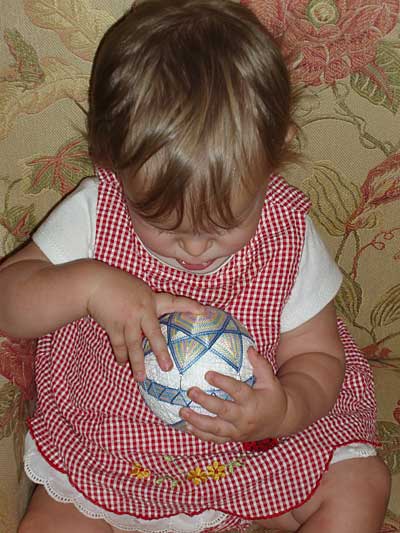
The final test of whether or not I got the process right was passing the ball off to Adele, who inspected it for me. I figure if Temari were originally presented as baby gifts, I might as well see how a baby liked this one. She approved, though I had the impression she would have liked it better if it had a bell or something inside. Next time, I may just have to make my own core and add a bell!
So that was my first experience with Temari, and I found that I did like making it (a lot), and will probably delve into the craft again. Hm… they’d make good Christmas gifts, baby gifts, housewarming gifts, and even just regular decoration. I like the idea of a decorative bowl filled with different sizes – a good conversation piece, if nothing else.
For books, I like Barb Suess’s Japanese Temari: A Colorful Spin on an Ancient Craft best for beginners. The instructions were really clear.
If you take a look at any Temari book and feel intimidated by the angles and markings on the ball, start with Barb’s book, and once you get through the first ball, your intimidation will vanish, even if you’re working with the pre-made and pre-marked cores. Actually working with the marked ball helps dissolve that befuddlement of looking at all those angle diagrams in the books – you’ll suddenly “get it” without too much effort!
If you’re looking for pre-made and pre-marked cores, you can find them available in three colors (red, white, and black) at Nordic Needle, for $10.99 each. (Lacis charges $14.95 for the same thing, and theirs only come in black or white.)
Working on a pre-made and pre-marked core has its advantages, but it also has its disadvantages. For example, the pre-marked balls are divided into a simple 6 division, which limits your pattern choices to 6 or 12 division patterns. Most of the patterns that catch my eye are 8 or 16 division patterns. So there’s a bit of a limitation there. BUT – on the other hand – if you want to try Temari, and you are intimidated by the idea of making your own core, or you simply don’t want to put the time, effort, and expense into making the core until you know if you like the craft, then starting with a pre-marked 6-division ball is a good idea.
I’d love to hear your Temari adventures. If you want to link to your photo page, blog, etc., that features your Temari, leave a comment with a link below. If you know of good resources to share, feel free!
I think this really turned out nicely. I had no idea that a first try would look this good or take so little time! I agree that these would make fantastic gifts for family and friends!
I am very eager to try this but will probably have to wait about a month or so, as we are moving.
Thanks for sharing your experience with us!
I like the result. I keep looking to see if I can figure out how you did it, like unraveling a puzzle, without looking at the directions. Nope. And does the white core usually show? Or is there more work to be done? Maybe I should check out one of the books. I hope the library carries a few.
Be careful about the books, Barbara Seuss or Diane Vanderhoort seem to be the best. Instructions are not always easy to understand.
This is wonderful! I am so inspired to try on my own. There are no videos anywhere on the internet to teach how this is done. Will you be making one? Pretty pretty please?
Beautiful, I love the obi too! and the picture with your daughter, simply adorable!
You will find that working on a 2½ to 3" ball is most comfortable in the hand. Wraping a styrofoam ball, first with baby or fingering weight yarn, then thread in the color desired is a very relaxing process. Doing the dividing isn't as hard as it may seem. Once you try, you'll be hooked.
Loretta
I also cover my ball with quilt batting before I start wrapping the baby yarn.
I have been making Temari Balls for about 6 months. I make my ball totally from scratch. I often spend 10-12 hours from beginning to end. They are fun and I just finished teaching a class to 6 ladies. I limited it to 6 because of the individual attention each person needed. They all enjoyed it and at least 4 of them are addicted as am I!
Enjoyed reading your tips .Specifically I was looking searching for how to make a 16 division on a Temari ball.I agree it is a very fascinating art and I enjoy it very much.
allo!
comment on fait pour lire les patrons de temari
y a t il un livre ou un site qui peut m apprendre merci!