


Continuing with some basic embroidery tips here, today we’re going to look at taking a sharp corner with stem stitch. While the technique applies to stem stitch specifically, you can look beyond stem stitch and apply the idea to many stitches.
In the photos, I’m stitching scallops, but this tip applies to any sharp change in line direction where an angle is involved (so, squared corners, tips of stars, and so forth).
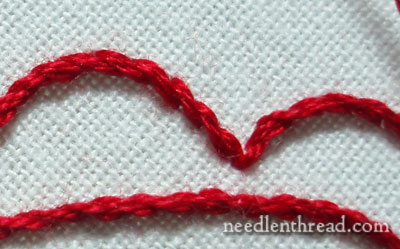
In the photo above, you can see that the scallops join with a whole new stem stitch line. The difficulty is that you obviously don’t want to change threads, and you can’t go up in the same hole you just took your needle down in, because the stitch will come undone. The solution is simple, and if you’ve worked a bit with stem stitch, chances are, you’ve already figured this one out a while ago! Still, for beginners, it helps to see how the join is done. So here we go…
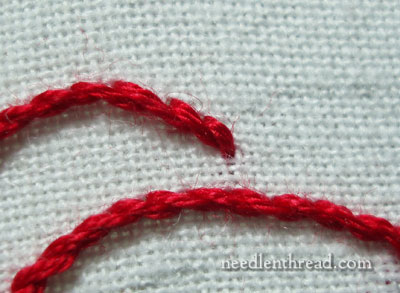
This is the end of one scallop, and we’re ready to stitch the next one.
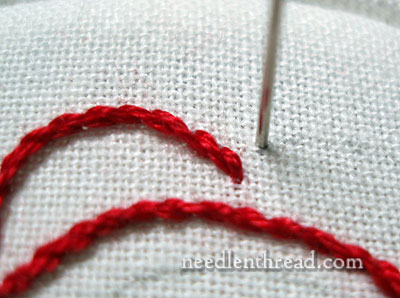
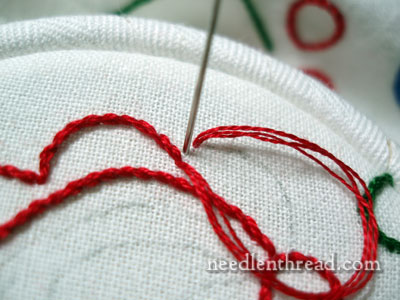
Normally, if you were continuing along a line or curve, you’d take your needle back to the end of the previous stitch, above the working thread, and keep stitch. But we want a sharp corner where the scallops join, and if we just continued with regular stem stitch around the corner, we’d end up with a more or less wavy line. Instead, bring your needle up a stitch length away from the corner, on the line of the next scallop.
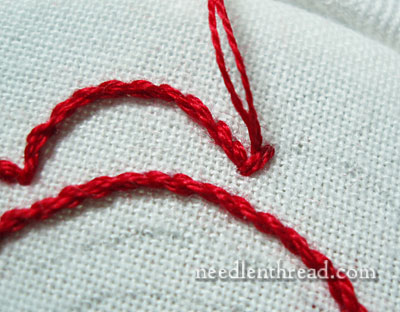
Then take your needle down into the same hole where the last scallop ended.
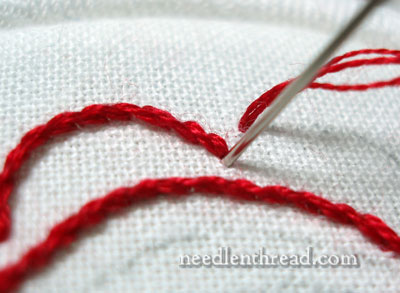
Keeping your working thread looped below the needle, just as you would when regularly stem stitching, bring your needle up on the line, in the middle of the stitch (which hasn’t been pulled all the way through yet).
Pull the working thread through, tightening up the stitch. You can see that the working thread is above the first stitch, which is pretty much where you’d be if you were starting a regular stem stitch.
Now you’re ready to go forward as usual with the stem stitch.
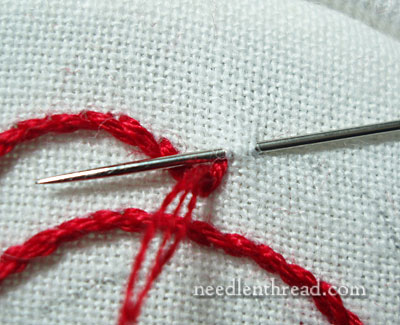
At this point, you can use a “stab” or a “sewing” method to continue with your stem stitch as usual.
The scallops meet up in a nice sharp corner, which keeps them distinctly scalloped-looking.
So there’s another stem stitch tip, which you will find indexed under Tips & Techniques and all listed on the stem stitch video page.
I love your tips, please keep them coming! Thanks!
Hi Mary,
I’ll be using this tip right away on a current project. Can you tell us how to continue a line of stem stitching when you must change threads in the middle of the line (this one has really given me a problem!) Thank you.
G’morning, Everyone! Thanks for your comments. Glad these tips are handy! I’ll answer a couple questions:
Sharon: Take your last stitch as you normally would, as if you were continuing to stem stitch. Finish off your thread on the back as you normally would (I just whip around some of the stitches on the back) and cut it. Then start your new thread how you normally would (whipping around some stitches on the back, or using small anchoring stitches on the line). To begin stitching, bring your needle up where your second-to-the-last stem stitch ended, manipulating the needle so that the last stitch you took is below the needle – don’t split the stitch, just nudge it aside. Then continue on stem stitching. Basically, you’re starting in the same spot you would, if you hadn’t run out of thread, but you need to nudge that last stitch aside so that you don’t end up splitting it.
Katy – ah. Shisha! It depends on the style of stitching you’re doing around the piece. Maybe that’s something I can demonstrate with a photo tutorial – I’ll give it a try!
Now why didn’t I think of that?
I love your tips and – while I know some of them already, a reminder is always good, and yours are so well illustrated.
And others – while so simple – are things that have stumped me for years. Sometimes we just can’t see the obvious until a kindly soul illuminates it for us.
Thanks for doing this!
I’m always checking out your Tips & Techniques and Video Stitch Library before starting a project. Thanks for the stem stitch tip….. Keep them coming 🙂
Good thing we’re never to old to learn something new! I always avoided scallops for that very reason – thanks Mary!!
These tips are really up to the mark….really very beneficial …Thanks for sharing your views with us….Keep posting..i enjoyed the reading….
I’m still working on the pall, almost finished. After the instructions on stem stitch points, I feel like picking out all the points. It is wonderful to learn these fine points that make such a difference in the finished product. Thank you so much.
Thank you so much for explaining this … the pictures are great and
for sharing and taking the time to give us much needed hand embroidery advise and tips !!! I wonder why books on the subject leave out these valuable knowledge… :-/… ;-).
I just found your site about a month or so ago and I love it!! I have started embroidering tea towels again and never knew how to turn the corners neatly with the stem stitch. Who would have known it would be so easy?!?! Thanks for the great informative site!
hi mary,
thanks for the tips and i like it…..because i always try but my sample project looks ugly..
I really appreciate your tutorials that focus on the finer points of a particular stitch. These things are not covered in stitch books and they make all the difference.
Any thoughts on a Pall design suitable for Easter?
Happy New Year
Hi, Linda! How about this cross – and – lilies pattern: https://needlenthread.wpengine.com/2010/07/hand-embroidery-pattern-cross-lilies.html ? Lilies are good for Easter…
~MC
I really enjoy your website. The tips are great,and the videos are so helpful. I thought I did a pretty good job until I saw the work of a couple of friends who did more embroidery work than I. So now I can consult my “embroidery fairy” for help for making beautiful stitches.
Thank you, Mary, for sharing your expertise.
Thank you for your help! I’m working on a project that uses 3 rows of stem stitch togeter and have seen much improvement in my work after reading your articles. Being left handed I had reversed direction, etc but failed to have the thread on top. Such a big difference doing it correctly. Thank you for all you do!
Grazie MAry, io spesso mi sono trovata a non saper risolvere la questione
Mary it is 1.30 am Thursday morning.
Of course I have to read emails before I go to bed.
One of most readable posts show.
My mind is at its busiest this time of day so, seeing your email and seeing a new embroidery book it came to mind , ‘why on earth should I buy embroidery books?’
One can get everything and I mean everything from you pages of wisdom.
I do though have a big tick for books, not just the information from them but the beautiful coloured pages.
Anyone that has a computer or tablet can learn to do anything to do with embroidery by just going to you site.
Right down to what fabric you get and use that is not $80 a half yard.
Well done as always Mary and a big thank you.
MMx
Your clear explanations and excellent photography make it easy to master quite complicated stitching. Thanks for all your hard work Mary.
🙂 Glad you like it, Helen!
Mary,
I am doing some embroidery Christmas tea towels and the item I am working on have numerous little U’s in them. Everything looks fine until I do the stitch at the bottom of the U. It doesn’t look smooth and looks bunched up. Is the solution the same as you described for the corners or is it different? Thank you in advance.
Brenda
What stitch are you using on the U, Brenda?
how clever, mary!
Just to say Thank you ❤❤❤
Thank you for the Holly and Evergreen pattern. I feel like you wrote the article just for me. You addressed many of the questions I had reading article up to this point. For instance the instructions on padded satin stitch and mixing thread colors in needle. I see you are sold out of towels with transfers . I will check ea day to see if more are added as they would make great gifts to my embroidery friends. I have a light pad and the towels you told us about so I can start mine now. Between your instructions , pattern and tips this should turn out well. Can’t wait to start. Santa just came.