


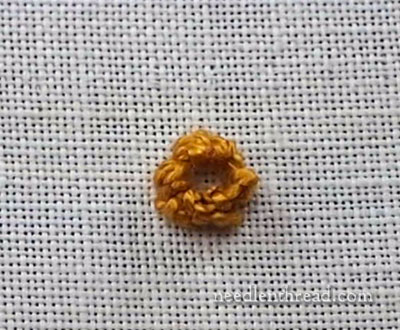
Time for another how-to video for hand embroidery! Today’s video is for the raised cup stitch, which is a dimensional embroidery stitch composed of a triangular foundation, upon which two layers of knots are worked. The result is a round cup that stands up off the fabric.
The raised cup stitch can be used in lots of different applications. If you combined it with the woven picot, for example, you could stitch some dimensional daffodils. Another example: you could use the raised cup stitch for a “setting” for a larger bead. It’s a great stitch for adding texture to your embroidery!
In the video, I’m working with a #5 perle cotton and a tapestry needle (#24, I think) on linen. The triangle is rather small (a little less than 1/2″ per side), but you can increase the size of your triangle and make a much larger cup by stitching more than two knots per side of the triangle.
I hope you enjoy the video and find it useful!
For those who receive the daily posts on Needle ‘n Thread in your e-mail, you’ll need to visit the website to view the video. Here’s the link: Raised Cup Stitch.
If you have difficulty viewing the video, check out the YouTube help center to troubleshoot your problem.
There are plenty more more how-to videos on hand embroidery here on Needle ‘n Thread, so if you’re stuck for a stitch, check them out!
If you have any ideas or suggestions on how to use the raised cup stitch, feel free to leave a comment below and let the rest of us know!
Enjoy the video!
If you like what you see on Needle ’n Thread, if you want to be a part of keeping the website thriving (and free of annoying network advertising), why not become a patron on Patreon? Check out my Patreon page here, where I’ll occasionally add special needlework bonuses for patrons.
If you shop on Amazon, you can support Needle ’n Thread without any extra expense to you by visiting my Amazon Recommendations page here, where you’ll find books and sundries for the needleworker available on Amazon.
Hi Mary,
Thanks for such a clear explanation – I’ve used the stitch before but struggled a bit with the second row (stitching into the bridges) so this has made it all make sense!
I used the stitch to make the bases of sea anemones in 3D coral garden embroidery.
Another great video, thanks for all you do.
Dear Marymentor:
Again, you’re reading my mind ! I watched this tutorial and it’s the perfect solution for making “stand-out” flowers on my pastoral “work-in-progress” ! Striving to incorporate lots of textures, stitches, stumpwork, etc for trees, flowers, treetrunks, grassy hillsides, rainbows in the distance, etc., this will be a lovely addition to my “flower gardens”. I’m thinking of putting a shiney bauble inside the center, and then, of course, the stems which, thanks to you, I can now do pretty well.
Happy Holiday and Wesolych Swiat ! 🙂
Judy in Pittsburgh
I am fascinated with this stitch, which seems like it had to come from some very playful time with needle and thread. I see it as a very useful stitch for canvas work, flower centers, clothing embellishment, rocks and landscapes. Perfect for under the sea scapes too like coral and barnacles. Thank you for more inspiration.
Mary, Thank you for this wonderful video! I’ve never seen this stitch before and it has inspired me. I’m wondering if making a 3rd row of knots in every other bridge would close it up enough to make dimensional “grapes” for a cluster on some ecclesiastical work I’m contemplating.
Your blog and tutorials are always an inspiration! Thank you!
Hi Mary, what a wonderful stitch……how can I adapt this stitch to needlepoint? Thank you so much for this wonderful and educational site!
Judie DePerry
que bonita y practica la puntada,mil gracias, me ayudan bastante. saludos y dios te bendiga hoy mañana y siempre
WOW MARY WHAT AN EXPERT HAND ON EMBROIDERY. COULD YOU PLEASE SHOW US SOME PICTURES OF RAISED CUP STITCH COMBINED WITH OTHER STITCHES????
SABA
I really like this stitch, and the suggestion by Nestor for the third row is certainly interesting. What would happen if you made the base a square or a pentagon for a much larger cup? I guess I’ll have to try it out sometime.
from Soggy Cynthia in Southern California
Thanks so much dear Mary!!!
I also wish you Merry Christmas and a Happy New Year to you and your family!!
Hugs and love
Maria del Valle
Thank you sooo very much 😉 for this video tutorial!!!
Nice tutorial. You make a complex stitch look easy and fun!
I really enjoyed this stich its new to me..Thankyou so much
As every one said, Your videos always an inspiration
very nice explanation,very clearly doing works.so correctly understanding how do it.thanks ,thaks alot,
i really enjoyed this stitch it was new to me. its always nice to watch your website. as every one said, yours videos always an inspiration. thanks alot
i really enjoyed this stitch it was new to me. its always nice to watch your website. as every one said, yours videos always an inspiration. thanks.
Thank you for the tutorial. I’m thinking of using it with the Boughs of Holly pattern you provided to raise the berries, then place a red bead inside the cup to give the pattern a bit of sparkle.***Elizabeth of Colorado
Hi Mary
I Love the video tutorial that you provided on each stitch, Please help me out with more advanced stitches also. I am very much interested to learn embroidery stitches and I am also a professional tailor.
Thank you so much.
this is the coolest stitch ever!
Thanks for the great lesson on the cup stitch. I’d like to know
what kind of thread was used in the demo. It doesn’t tangle and looks
perfect to practice with. LA
This stitch is great for attaching a found object, such as a seashell, to your canvas. Thank you, Mary.
Hi Mary,
Thank you so much for all these tutorials.my mom wanted to watch videos on embroidery but I couldn’t find a good website on these embroidering work. Yesterday I just watched the PORTUGUESE STEM STITCH. That was so clear my mom could understand. I am a Sri Lankan where these tutorials are so dense. Anyway,very thankful for these good instructions.
So glad they are helpful for you, Manissha!
It is very valuable vedio. Thank you of your kindness.
Screen is black- no video!
It might be your settings, Barbara – all is as it should be on this end. Perhaps try a different browser, or make sure your security and internet settings allow you to play video on this website. Flash should be enabled.