


Finally, at long last, the main parts of the pomegranate are embroidered! Keeping in mind that this means I’ve satin stitched only five little strips of color, it’s really not that impressive of an accomplishment. BUT – I think I’ve finally found my groove on this project. (Did I just say groove? My inner nerd is creeping out…)
But it’s true! Do you know what I mean? When you start on a project, and it just doesn’t grab you – you just don’t get into it? But with a little plodding and plugging away, often it clicks. And then the project is suddenly all-consuming. The click has clicked, and I find myself thinking Wool and Pomegranates all day long!
So I was happy to spend a good chunk of time yesterday afternoon getting in these short bits of satin stitch.

This is where I left off last time I gave you an update on this project. I’m working with three shades of red, using Fine D’Aubusson wool, working from the center with the lightest shade, to the edge with the darkest shade. Each strip on the pomegranate is first outlined in split stitch, and then padded with longer split stitches to fill the area in.
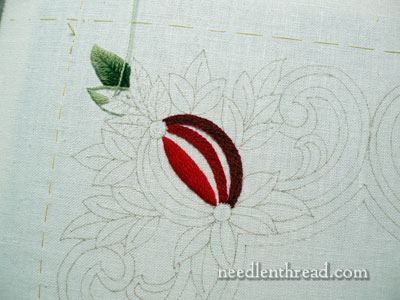
Here you can see the idea more clearly. The center section of the pomegranate is brighter red, then slightly darker, then even darker on the outer rim. The center section here is already satin stitched, but the two sides are only outlined and padded with split stitch.

I went ahead and worked all the outlining and padding before doing any more satin stitching. The order of stitching should probably logically be from the inside out, but since there’s no conflict between the parts (they don’t overlap), I don’t think it really matters which section of the pomegranate is stitched first.
Finally, the last section here is getting outlined and filled in the medium shade of red. Sometimes, I rue the decision to pad a satin stitch section, because it’s double the stitching, but in fact, the padding doesn’t take to long. With padding stitches, you don’t have to be meticulous. You just have to fill the area and keep thing relatively even.
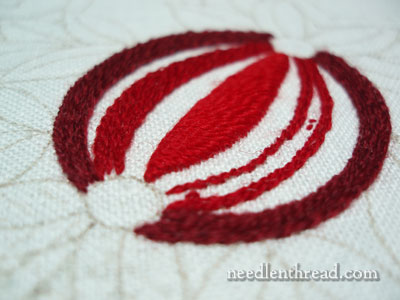
Ah! Finally. All the color in – so now you can see the effect of the three shades of red. You know, I kinda like the split stitch filling here! These areas don’t necessarily need satin stitching, do they? But ….
… I wanted to keep going with the satin stitch, since that was the original plan, and I think it’ll look pretty good with the in-between sections filled with seed stitch, which is my plan. You know… Pomegranates. Seeds. They just seem to go together!
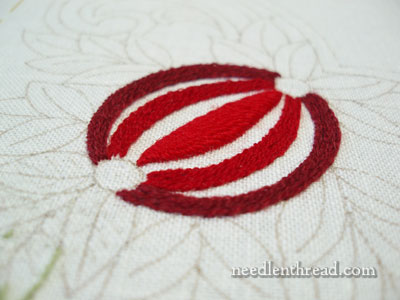
And now the satin stitching is moving to the outside section of the fruit.
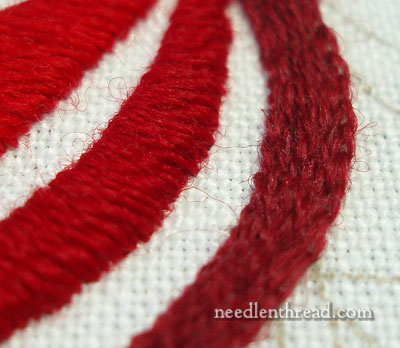
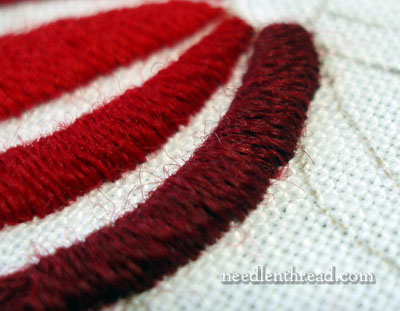
Oh, Look! An unsightly bulge!! Oh well! To dispel the idea that I’m a bit too persnickety – especially with the early leaf fiasco when this project started out – I’m leaving it! In fact, once the leaves are in, I don’t think it will be as noticeable. From this point, it’s not even “that” noticeable. But up close, it’s a little more obvious.
Bulges in satin stitch often materialize on my projects for one reason or another. It could be because I crowded the satin stitching, or it could be because the outline and padding were irregular. If you want to avoid similar bulges, double check your outlines and padding, and take care that you don’t crowd your satin stitches.
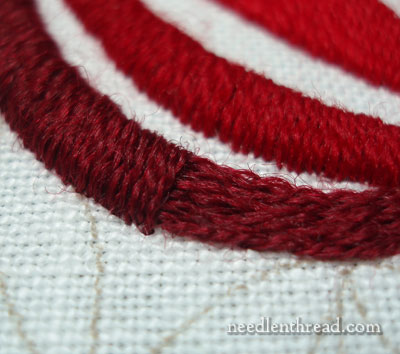
Satin stitches should lie right next to each other – not butting up against each other tightly, nor overlapping. They should just lie easily right next to each other.
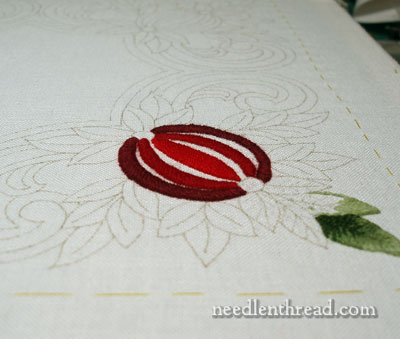
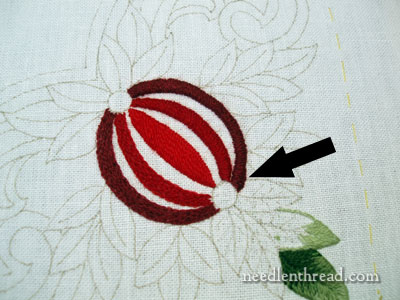
There it is, satin stitched.
The next step should be the leaves, but I might cheat and do the dots on each end of the pomegranate. Since those dots are situated over the leaves, the leaves really should be done first. I guess I could do some seed stitching between the stripes of the fruit. Or I might do the leaves after all! I suppose you’ll just have to wait and see!
For more articles on the progress of this project, feel free to visit this list of related articles on Wool Embroidery: Pomegranate Corners.
Have a jolly Thursday!
Question: Do you ever use beads as the seeds to your pomegranate? I would think the shine would make them look very close to the real thing.
Just wondering! Oh, and loving your work too!
Claudia
Hi, Claudia! Oh YES – and you’re right, beads are perfect for pomegranate seeds. Have you seen this project I finished quite some time ago? https://needlenthread.wpengine.com/2009/01/goldwork-silk-project-golden.html It was designed by Margaret Cobleigh and featured in Inspirations Magazine. I love the way she used the beads and gold spangles together for the seeds!
I notice I tend towards pomegranates in stitching. I think I need to broaden my horizons!!!
MC
Mary, Do you even realize how gifted God made you? Your work is so beautiful. Thank you for sharing your knowledge and skill with us.
Thanks, Heather! That’s very sweet!
I love watching your projects unfold. This is beautiful. Be-yooo-ti-ful!
You know, Mary, in Japanese embroidery you always stitch from foreground to background. After learning that, I’ve become more flexible in the order in which I stitch my projects.
Your work is amazing and I love to see them take shape from the beginning. I love the varying shades of red that you have used. Thanks for sharing.
I recently finished a pomegranate with garnet beads for seeds. They look good enough to eat!
Here in NM we call them granadas. I have four trees in my yard. The blossoms are gorgeous in the spring – bright red orange.
Also, I have noticed that God makes the fruit a bit bumpy sometimes so don’t worry about your satin stitch Mary. 🙂
Elaine in NM
Mary, your pomegranate is looking great, but I must confess that your goldwork one is fantastic. I love it! And I also have to confess to a sneaking pride in that it was featured in an Australian magazine.
Thanks for your great descriptions of how you do things, even down to your minor boo-boos. It’s a real help. Keep it up.
Hello, I just looked at the enbrouderie, May all that beautiful work. I can only look at this and say they must not have to do housework, cook, shop! I’d never have the time to even begin a work like this. : 0 (
FELICITACIONES, es maravilloso ver como puntada apuntada vas dando forma a tu creacion,y nos explicas con lujo de detalles como vas avanzando.
This is one of my favorite patterns you have on your site. I was following this project for inspiration. I am very much a beginner. Did you ever finish?
Hello,
I’ve just run into this lovely project but am sad to see that it finishes here!
Did you ever get to the end? I’d love to see the finished result!
Kerry