


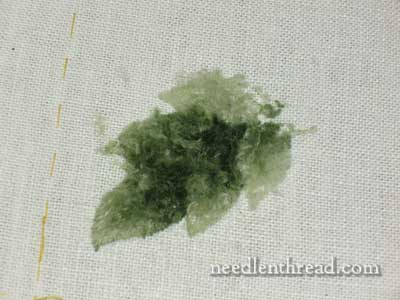
Here’s my next adventurous phase on the Pomegranate Corners wool embroidery project. Here, I’ll show you what I did next with the leaves, which I had picked out previously because I decided I wanted a vein down the middle, where the two sides of the embroidered leaf meets in the middle.
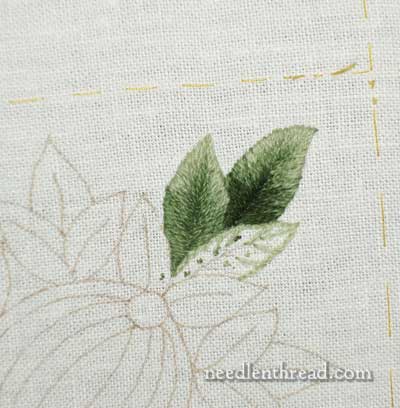
Right away, you can probably see a number of minor problems in these two leaves. Yes, they have the vein that meets in the middle. Whoopdeedoo! A vein is nothing, if the leaves look lousy, right? There’s are a couple things amiss here. I’ll talk about that below.
Still, I kept going, thinking that maybe it was just me. Maybe it was lighting, maybe it was the stitching angle, maybe it would look better once other leaves were added, maybe…. but May bees don’t fly in January.
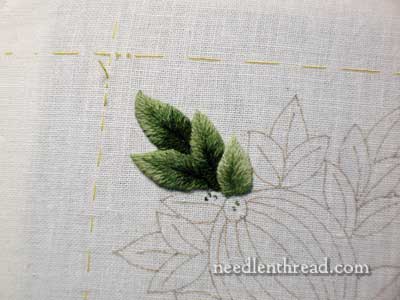
Actually, when I got to the front leaf and added it, over all, from this angle, it doesn’t look bad as in horrible, but … the problems are still there, and I knew they would bug me, especially because I knew I could (and should have) corrected them a bit earlier!
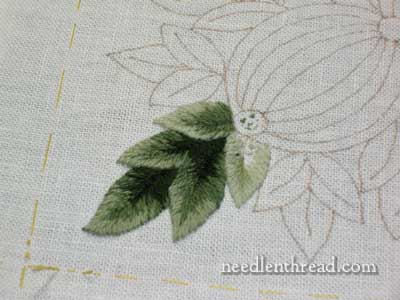
It wasn’t until I was almost finished with the last of the leaves in the foreground that I decided. And once I decided, it didn’t take long to go from the above, to this…
… on the front, and this….
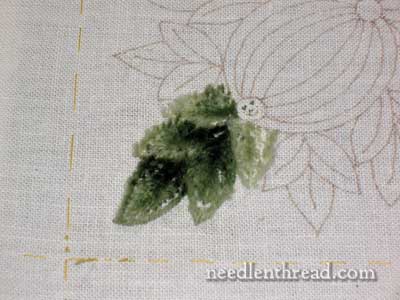
… on the back.
A reader wrote to me not too long ago about picking out threads, wondering if there was an easier solution to getting threads out of the fabric when a mistake was made – something easier than tweezers, snipping, and picking.
There are tools out there that are supposed to make this process easier. For example, there’s “Judy’s Boo-Boo Stick” (which I’ve mentioned before – a long time ago!). The concept behind this tool, which is tipped on each end by what looks like tiny bottle-brush bristles, is that you roll or lightly rub or scratch these bristles on the surface after you’ve snipped your stitches, and it helps pull the fibers of the snipped threads out of the fabric – kind of like the bristle brush on the base of your vacuum cleaner, only without the suction. The bristle brush on your vacuum cleaner turns and catches threads and the like on your carpet and picks them up, right? So in concept, this is a good idea, and it works pretty well with your standard cotton floss.
But this particular tool doesn’t work so well with wool. Or maybe it works too well. Much like that bristle brush on your vacuum, which can get all knotted and clogged up with threads if you don’t clean it off regularly, the Boo-Boo Stick gets so matted with wool when removing these types of threads, that’s it’s a pain to clean it off, let alone your fabric!
Really, the best tools for picking out this type of stitching is a pair of tiny sharp scissors (or a very good, small seam ripper), your fingers, and a pair of tweezers. There’s no magic wand you can wave over your fabric to revert it to its original blank thread-free state!
But one thing that helps when doing this type of clean-up job is Attitude. You have to set your mind right! How often do we come to a point in stitching where we’ve made a mistake that must be removed, and suddenly, that mistake sprouts into Jack’s beanstalk. It becomes Abnormally Huge in our eyes, and bammo! We come to a stand-still on the project. We can’t get back to it. It’s turned into a Monster, and it’s “easier” just to stash it aside and think, “I’ll get back to it later.” Have you ever noticed, in cases like that, that Later is awfully slow in coming around?
When I get to this point – like the point where I was, with the leaves in the wool project – I adjust my attitude. Especially if it’s a project that I like (or at least, that I liked up to this point!), how silly it would be to forestall, simply because I have some picking to do. The sooner I do the picking, the sooner I can move forward. “Reverse stitching” is often just as much a part of the embroidery process as stitching is. It sometimes has to be done. Putting in, taking out – sure, there’s a big difference. But if you don’t take out what you need to take out, you’ll never be satisfied with what you put in afterwards!
When it comes to picking out, don’t leave it for later. Do it right away, so that, in the next stitching session, you can start afresh. That’s how I generally handle these types of situations.
Now, to get particular on what was wrong with the leaves above, here’s what I didn’t like:
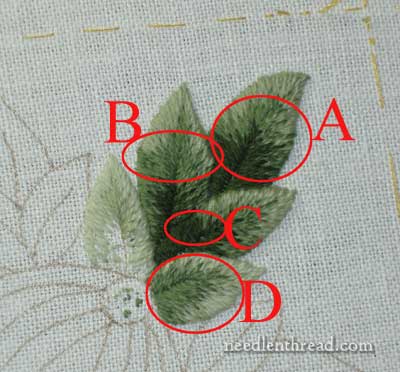
A. The darkest shading on the back leaf is wrong, especially on the left side of the leaf. The angle of the stitches on the left are too horizontal.
B. On the middle layer of leaves, on the left leaf, there is a point on each side of the leaf that is “squared” off – there’s too much of an angle there on the outline of the leaf, and it draws the eye to the color change and makes it look wrong. That needs to be smoothed out. The rest of the leaves are rounded, and that one on the left looks too stiff.
C. Where C overlaps B, the dark green runs together, and I’d like to soften this, so that leaf C is noticeably above leaf B.
D. There’s too much of the medium green in the center, and not enough of the medium-light. I want the front leaves here to be a bit lighter.
Now that I’ve done all the revision work (at least in my head), it’s time to do the final draft! Next time we visit this, I hope to show you a much improved bunch of leaves! That will be my stitching goal on Saturday.
Other posts on this project:
Pomegranate Corners – Free Embroidery Pattern
Setting up Pomegranate Corners – fabric selection, transferring the design, and preliminaries
Wool Embroidery Thread Selection for Pomegranate Corners
Framing Up the Project for Stitching – mounting the ground fabric on stretcher bar frames
Pomegranate Corners Wool Embroidery: The Stitching Begins
Dear Mary, another tip after you have done the picking and there is still some fluff that is difficult to get rid of, this is what I do. Take some sticky tape, you know the kind you use for parcels, and press it gently on the fabric and lift. Do it to the back and front of the fabric and in now time there will be no fluff left. I am enjoying your new project. Love Elza, Cape Town xxx
I agree with you on the attitude side. If your not happy with it, rip it out! All too often I’ve pushed on when I’ve not been entirely happy. That only leads to more reverse stitching in the long run, or worse still, I project you lose heart in and it gets put aside. How many of those do I have!
One thing I’d like to ask. I see you don’t mark on the fabric were you plan the colour changes to be, do you judge this by eye? I will be starting the long and short stitch phase in my Japanese embroidery this March and I am very daunted by it! I’m not sure that I will ever get to grips with this technique.
“Wax on… Wax off…Wax On…Wax Off…”
– Mr. Miyagi, Karate Kid
Mary,
Your May bees not flying in January cracked me up! I’ll have to remember that one!
Thank you for sharing your decision to reverse stitch and for showing us why, what’s wrong with it. I was unable to pinpoint the areas of your concern until you pointed them out.
Sharing your corrections with us will help us avoid making them ourselves, putting us on the track towards more realistic leafwork and perspective.
I think you are right about doing to reverse work immediately and starting the next session with a clean slate. I’ve noticed that when I am sewing (as ye sew, so shall ye rip–as my mother always said) and I end a session with an error, it is much harder to get back to it, knowing I’ll be starting out ‘in the hole’ as far as progress goes. Much, much better to pick up a project that is all ready to move forward!
I know I’m not any good at choosing colors which is why I always use a pattern. But I thought your first batch of leaves was pretty.They look velvety soft. I can tell you have the eye and heart of an artist. Now I’m anxious to see your improvements.
Oh Mary you touched a nerve with this post. I admire your strength in picking this our immediately. The temptation to push on, or try to fix it in place is sooooo strong. This happens with sewing and weaving as well. Taking it out is the only real remedy, and don’t you feel so proud and virtuous once you have done it? Thank you so much for your daily posts, I read them every day and they inspired me to keep needlework in my life, every single day. It’s more than an art or craft, it’s a quiet, almost spiritual time for me.
Joan
Mary, Thanks for sharing this process with us. I learn a lot from your mistakes!
Honestly, I wouldn’t have noticed most of it if you hadn’t pointed it out.
I love it that your May bees don’t fly in January, lol.
Lin Taylor
My rule when needing to rip is “
My rule of thumb when needing to rip is, “do it now and don’t think too much about it.” I just start removing threads and never look back.
I usually put my earbuds in and listen to an audiobook – keeps me from any regrets.
The same technique works for knitting errors. If it can’t be fixed just start pulling back. You are going to have all the pleasure of knitting/stitching it up again.
Elaine
I am a beginning embroiderer and appreciate your insights. I have just started a small stumpwork project—Jane Nicholas Christmas Brooch kit–and have found getting the stitch direction on the holly leaves correct difficult as well. So thank you for giving me the courage to start over!
Mary,
Glad to know about the “covering your six”. I was thinking I did not have a six! Okay, on with the question. You have mentioned about using different size needles and different types, but I want to know is about brands. I have tried needles that I fight with the entire stitching session and other needles that seem to glide through the fabric. Is there a difference? They all look the same as far as what they are made of. Are all needles created equal?
Elza’s tape solution is what my compatriots and I used to do in culinary college to remove stray hairs and lint from our chef’s jackets, which had to pass military-style inspection every morning and afternoon. It didn’t matter how cleaned, bleached, pressed and starched the jackets were if there were stray bits of hair, lint or thread on them, so we kept packing tape in our knife kits to use on ourselves and each other right before inspection. We wound pieces of tape around our palms or fingers, sticky-side out and then patted each other down on the back and did our own fronts. Worked like a charm–and it works beautifully on linen, too. It doesn’t leave tacky-sticky-ickies behind, either. It just picks up the fuzz and that’s it.
That said, picking out your mistakes right away is the same principle as getting back on your horse right after a fall and not shying away from it. The sooner you correct a mistake, such as an oddly worked leaf, or a fall from a steed, the sooner you can continue on and improve your skills. It also keeps you from making your mistake a bigger deal in your mind than it truly is–just as getting back on a horse right after a fall helps forestall any fear or dread that can handicap you as a rider if you don’t get back up on the horse right away.
Besides, who wants to let a bit of thread or a horse get the better of you? 😉 Great post–thanks for showing us the “bad” along with the good.
Hi Mary,
It really helps that you make boo boo’s too, because I worry ahead of each new project I start….will I make the right stitches in the right places and with the right colors? And no, I have really made huge mistakes that I had to pick out as well, so it is very inspiring to have an embroidery soul such as yours go through this too, so we see that mistakes happen, but it will all work out no matter what with the right frame of mind.
Looking forward to the next post. Take care.
I just love the fact that if you don’t like it you rip it out and start again. Somewhere along the line I inherited the notion that your first attempt at a piece should be perfect but have come to realise that is so far from the truth for most crafty sorts and artists! So I was delighted to see the leaf ripping going on!!
An idea…in flower and fruit painting on porcelain, the light is generally considered coming from the upper left side so the leaves have much more contrast when there are many togheter, like happens here and where one leave touches the other a contrast light/dark is always achived .Maybe this concept is applicable also in emboidery.
To give more depht maybe could be usefeull to work with more shades, about five so is possible to go from the darkest back leaf to lighter for the last upper leaf.
Hi, Francesca – Thanks for the idea! Yes, the idea is applicable to embroidery, definitely. This is what I’m trying to do, but the operative word is “trying”!! 🙂 I’m working with five shades of green. I’ll show you some (hopefully) better results early next week! ~MC