


This past weekend proved to be good and bad. Good, because I was able to devote quite a bit of time to the Pomegranate Corners wool embroidery project. Bad, because everything seemed to go wrong with the project from the outset!
I’m going to show you all the ways I went wrong, starting today with the framing up of the project. Now, despite the “negativity” that you might think accompanies this post, in fact, overall, it was a positive experience. When everything goes wrong, it’s hard to see how the experience can be positive, eh? But really – it was a positive and productive weekend, because once I got going and making all kinds of mistakes, the fire was lit! I was into the project, and determined to make headway.

My first big mistake on this project, and one that I refuse to correct for various reasons including not wanting to waste a perfectly good piece of fabric that I know I can “make good,” was that I cut the original piece of fabric too small. It’s always better, in cutting fabric, to be safer than sorrier – better to be an inch over in size than an inch under. I was an inch under. I gave myself two inches on each side of the design – but I should’ve given myself three. Oh. That makes me two inches under! Instead of a 14″ square, the fabric should have been a 16″ square.
The reason for why the fabric should have been cut larger is actually a question of equipment. If I had had a 13″ frame, I would’ve been fine.
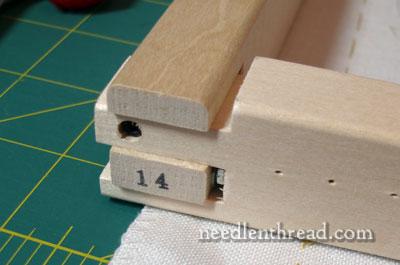
Unfortunately, I only had a 14″ frame.
I’m using Evertite stretcher bars for this project. They are my go-to frames for working an embroidery project that will be on the frame for an extended amount of time. If you don’t know what Evertite stretcher bars are, take a look at them! They’re great.
When I realized my fabric-and-frame conflict, I decided to switch to a slate frame, even though it takes a bit more time to set an embroidery project up on a slate frame. I got out all the necessary supplies to dress the slate frame, then lined up the project with the tapes on the roller bars of the frame, and found the opposite problem! The slate frame was too small!
So what to do?
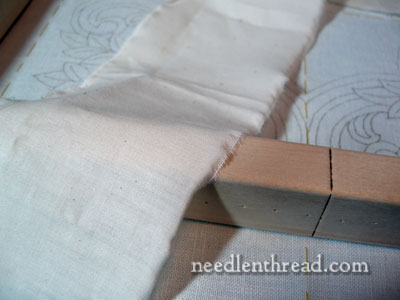
The only option was to extend the size of my fabric, by mounting it on another piece of fabric, so that it would fit the 14″ stretcher bars.
I opened my fabric cabinet and started looking for muslin. I usually have an abundance of muslin in reserve, because I use it for a lot of things – for lining projects, for testing patterns and tracing tools and things like that. Oh, yes. Muslin was what I needed.
And… I was out!
(Do you ever have days like this?)
Digging a little further, I found a scrap about 16″ long and 10″ wide. Not. Quite. Big. Enough. I wanted to sew the ground linen of the project onto a larger square of muslin, mount the whole piece onto the stretcher bars, and then cut the back of the muslin away, inside the stitching area. This is what I would normally do, if I don’t want to stitch through the muslin. And it’s quick, you know. Just square up the linen and the muslin so they are both on the grain, pin them together, and run them through the sewing machine. I normally use a zig-zag stitch or an overcast stitch, depending on which foot is on the machine. Well, if you don’t have a machine, you can hand stitch the linen to the muslin, using a herringbone stitch.
But all I had was this muslin scrap. And it wasn’t big enough.
So, what to do?
By this time, I was in a bit of a hurry and feeling a bit pressured by the clock, which was moving forward at an incredible speed, snatching my day from me! And for some reason, when I start feeling pressured by the fast-fading day, I start losing my love of the project, and start viewing it as my Mortal Enemy. I tried to regroup. I tried to tell myself that wool embroidery was not my Mortal Enemy. I tried to tell myself I was having fun.
It didn’t work.
Finally, I pulled myself together and tore the muslin into 2″ strips. Ahhh. That was rewarding. It is always rewarding to tear fabric – it alleviates a lot of frustration!
I sewed the 2″ strips to the four sides of the linen, and was rewarded with an 18″ square of fabric now, which could be easily framed up on the 14″ frame, with plenty left over to trim.
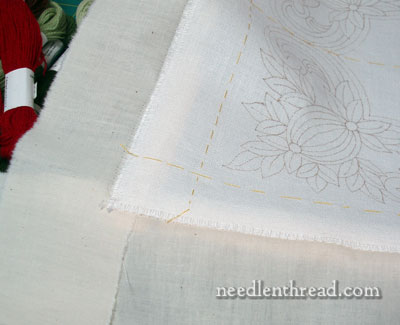
There it is. Ready to frame up. Perfect solution!!
I tacked in one side, then tacked the opposite side. Then I tacked the third side. All was going well….
And then…. I went to tack the fourth side, and that’s when I saw that I had somehow missed the edge of the linen when sewing it to the muslin, and I had a good three inches of linen-not-connected-to-muslin staring me in the face.
So what to do? Do I take out three sides of tacks and start over again? Oh, Mortal Enemy, you know me not! No way!

The fourth side, I tacked on top of the frame, right through the edge of the linen.
And you know what? I could’ve done that in the First Place, on all four sides, without the muslin, without looking for the slate frame, without hemming and hawing over how to solve the Frame-Too-Small issue! Uhhhhh…. what was I thinking?!
That is how the first session with this project went. But that’s ok! Because all’s well that ends well.
Ends well? Well…. you’ll have to wait to see what happened when I started stitching! But more on that, later….
I hope your weekend was a stitching success!
Other posts on this project:
Pomegranate Corners – Free Embroidery Pattern
Setting up Pomegranate Corners – fabric selection, transferring the design, and preliminaries
Wool Embroidery Thread Selection for Pomegranate Corners
Hi Mary.
What a shame, time is so rare, perserverance keep going don’t forget the adage “Proper Preperation Prevents Poor Perfomance” it will be worth it in the end. Adding to that I am with you all the way on this project, I fancy doing it myself, come on you can do it!
Ahhhhhh yes – the 7 (or 6 or 5) P’s – Proper Prior Planning Prevents Poor Performance ….!!! My brother-in-law likes to throw in another word, but it isn’t very nice, so I’ll refrain! 🙂
Thanks for your comments, everyone!
I thought I had the right sized frame for the project – unfortunately, I have three other projects framed up right now, a 13″, a 12″ and a 10″ – so all my smaller stretcher bars are taken up, and I wasn’t willing to un-tack any of them!
Coral-Seas – YES. You’re right, and that’s why I generally avoid tacking on top. Threads do snag on the tops of the tacks, and it drives me nuts. I’ve covered the edges before with another piece of fabric, to prevent that, but on this piece, since it’s just the one side tacked on top of the frame, I’m just going to keep that side on the left or on the top, and that should suffice to keep the tacks out of the way.
All in all, I should probably note that it wasn’t an entire disaster. Once I got the thing set up, I was able to do a couple bouts of “experimental” stitching (that’s what I call it when I change my mind! much more consoling than “accidental” stitching!!!) and now I know exactly where I’m going, and I can’t wait to start the real journey! Like I said, the fire’s lit. Before, I thought this would be an “ok” project. I wasn’t that excited about it, but still interested enough to do it. Now, I’m excited about it. Ideas have been developing, so I’m ready to jump in!
Can’t wait!
Oh Mary, you do have my sympathies! I had a similar sort of weekend. I cut out some curtain fabric and lining, fortunately the right size (so far as I know) and then went to sew it … only to discover I no thread to sew them with! A fairly elementary mistake, but the reason I’d not given it any thought was that I only needed white thread. I have REELS of that in the sewing bag … or rather I thought I did … my mum’s on a mission today hunting for a large reel of white cotton in Norwich for me! 🙂
Oh Mary, I have had days like that and the more I feel pressured by time, the worse things seems to get! I am glad that you persevered and look forward to hearing about the stitching. Hope that ends well 🙂
I’ve pinned (tacked) to the top of the frame before but the thread tends to catch on the pins. The wool might not so much but it can be a bit of a nuisance with fines threads. Also having a bit of extra fabric to pull on while pinning to the frame makes life a bit easier.
I’m anxious to see the first stitchs in this project!! Good luck now on!
Hi, Mary
Sorry to hear about your many misadventures at the start of this project. But then it is such a pretty piece and I am sure that you will feel enthused about work when you pick it up again.
Hi Mary,
it must have been in the air this weekend! I had a frustrating few days doing too much “experimental stitching” and pulling it out more than once. But, like you, I did learn something so it wasn’t a total waste of time. But I sure didn’t get as far as I wanted to get and was not a happy bunny for a while on Sunday afternoon! Funny how we can go along, everything working smoothly and then suddenly something we’ve done before just doesn’t work. I’m looking forward to seeing how this wool works up!
Kathy
Hi Mary-
A For Your Information for everyone – when I worked at a needlework shop, we always suggested cutting fabric 3 inches per side (plus 6 inches width and height) to allow for stretching when framing – so if the piece will be professionally framed, it’s a thought to keep in mind. I’m interested in your comment about lining pieces with muslin – do you have any posts on that? I can’t wait to see the project in progress!
Mary, I know the feeling of everything going south! I usually try to take a coffee or tea break and put in a load of laundry, or something to get my mind off the frustration. Then when I get back to the project in a few minutes, I have a fresh attitude. I have only just found your site a week ago or so, but I’m enjoying it so much! Thank you for taking so much of your time and energy to teach, inspire, and show so many different techniques. I’ve only done cross stitch (all through the 90’s) and simple embroidery for small frames or quilt block pieces (baskets with flowers type stuff). I’d really like to try some of the things I’ve seen here. Again, thank you. Sharon
It’s always the prep time involved in actually getting a project properly underway that used to drive me to distraction. With age, I’ve learned to enjoy the process as it gives me time to visualize each step as I want to make it.
I’ve come to enjoy the planning and prep time just as much as the actual construction work!
Hope you get a good block of time to enjoy the actual stitching–can’t wait to see it.
I do so enjoy watching along with your projects!
It’s not negaitivity, it is problem solving. Without problems to solve, we would not get ahead of the instructions given by our parents, from their problem solving.
Next time, you won’t have to go to the trouble of looking for muslin and sewing, you can just tack the fabric like you did on the one side, if you want. Another option is always good.
Oh my. I would have given up on it so you’re a stronger woman than I.
I’m so glad you got it all worked out. I assumed you would just sew strips of muslin (or some kind of fabric) along the edges to extend it. I never thought of sewing a large square and cutting out the middle. In any case, it’s ready to go.
I always read about allowing 3″ around the edge. This last project I counted, measured out what I needed and added 3″. Great, right? Nope, I added 3″, period. That meant only 1 1/2″ on each side. It’s a tight squeeze but I will make it work. 🙂
Dear Marymentor:
Thanks so much for this installment. IloveitIloveitIloveit ! All of my life I have prided myself on being the “mother of improvisation” ! 🙂 (More having to live with “necessity is the mother of invention” I guess 🙂 . But I’ve always had to live with “I’ll find a way to make this work !!) So your tenacity in this project really inspires me. Sometimes we who are “give-up-challenged” take heart in finding another kindred spirit….thanks for letting me wax poetic !..Judy in Pittsburgh
Yes, I’ve had projects like that. It’s almost as if the project is saying “No I don’t want to be made up now! Go work on something else.” Sometimes I take the hint, and sometimes I think “This project is not the boss of me.”
If needed, could you just run a strip of tape on top of the thumbtacks? It might be just enough to keep threads from catching if you must turn the project in that certain direction.
Hi Mary,
Thank you so much for your sharing your experience with all of us. You know, you are so competent at what you do, and eloquent on top of that. It is a help to me to see that each new project can pose challenges for the most experienced person. So another thing you accomplished was reassurance for novices like myself! And I know probably everyone has heard or seen this quote (the website I visited had many varying versions) from Thomas Edison, which I find very heartening: “I have not failed. I’ve just found 10,000 ways that won’t work.” I think he said this as he tried many many different metals for the light bulb filament before he found tungsten had the right properties. So, Mary it could be worse. After all, no one compared me to Edison when I suffered the usual round of failures this weekend!
Thank you again, Mary, and keep sharing the ups and the downs with us all. We can all learn from them!