


A buttonhole stitch face-off – it’s a great way to embroider a wide line that is similar to ladder stitch but works up a lot faster. Let me show you what I mean:

Working between two parallel lines (and actually, they don’t have to be straight – they can be wavy, and they don’t even have to be parallel…) work buttonhole stitch between the two lines, so that the “spoke” of the stitch spans the distance between the two lines. On the fabric above, I’m working the stitch vertically towards me (I’m right handed).
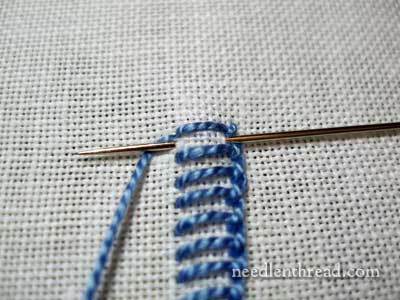
Turn your work 180 degrees, and working towards you again, work another row of buttonhole stitch between the spokes of the first row, with the twisted edge covering the tips of the spokes on the first row.
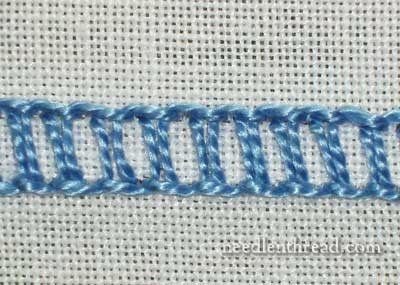
If you play with the spacing of your buttonhole stitches, you can get different effects, from a solid filled line (working the buttonhole stitches close together, with just enough room to fit the second row of stitches between the spokes of the first row), to a uniform line of equally spaced spokes, to a line made of double spokes fitting close together.
If you take a look at the ladder stitch, you’ll see the similarities. But the facing buttonhole stitch here is faster to work (fewer steps), and the edge looks like a nice twisted rope instead of a braid.
So there’s a little tip for when you’re looking to stitch a wider line on your needlework. It’s a great way to stitch a border, and you can even fill a whole design this way, as is done in different folk embroidery techniques.
Here’s hoping you find some good use for a buttonhole face-off! Any suggestions? Leave a comment and inspire the rest of us!
That is very nice indeed. I like “Up and down” buttonhole too, and if you do a double “Up and down” in the same way that you have done the buttonhole here, it makes a very good ribbon if you want to make wavy lines rather than having to have straight ones – can make your ribbon wide and narrow as if turning in the air.
your instructions are very easy to follow.
carol
I got some brazilian kits after your blog on them a while back. And I thought I could embroider pretty well, but that “cast on stitch” that is like a series of buttonhole looking loops on the needle and then you have to pull the needle through it — I can get the loops cast on, but I can’t for the life of me pull that length of thread through smoothly when I’m done. Any advice?
Also, I was wondering on those Edmar threads, anyone tried a little fray-check on the loose end to keep that tail of thread together that I lose on every needle? I haven’t but was thinking about it.
Hi Mary,
This may be off topic. But it is about a line stitch so I take that as encourgement.
I am having a really hard time with Stem Stitch. (maybe my favorite stitch)( OH , those
Peruvians)
I study your tutorials and try try again.
I am now trying to do a thin stem stitch with
1 or two strands of DMC cotton floss. If I reduce the length of the stitch I do better, but when going around circles, the stitching
seems to lean to the left or right.
Thanks for everything.
At present I am planning a project with a tree of life (maybe) or a garden
with personal history or just “loves” animals
birds, patterns, borrowing heavily from my
work as a textile designer. I am at the planning stage, which is largely thinking, sketching, color musing, and a few tiny stitch
sketches.
in NYC, watching the sunsets warm up
even while the weather is cooooooold.
Marcia (81 yrs)
Thank you for this great tip Mary, buttonhole stitch can be used in so many ways and is so versatile.
I am puzzled about one of the versions I use very often. Since most of the embroidery stitches I have learned when I was around 9 I have never learned the names of them, just used them.
Now if this version turns out to be well known by everyone please hold the chuckles 🙂
I wish I could show it in a pic, but I will try to explain.
My favorite to use this version is for edging or creating buttonhole flowers or leaves.
I’m always forming the stitches from “top to bottom” even with flowers.
Here it goes for edging: (I’m right handed)
The edge of the fabric facing up, I’m stitching from left to wright.
When I work the stitches I bring the needle to the front a 1/4″ down from the edge .. wrap the thread around the needle from left to wright and pull the needle through.
The part of the thread I’m wrapping is from the base of the needle where the thread end is.
This way you get a little pearl like bump as you finish the stitch .. it also keeps the stitch tighter and keeps a nice tension.
I love the way this looks.
Oyyy! … my explanation is clear as mud …
I’m hoping Mary you have a name for this or maybe this is just may own “wrong” way of doing it.
It may not work well used in your sample above, no need for an extra “bump” there.
I did not try it yet.
Good morning, all! Thanks for your comments! I’ll try to answer some questions:
Hi, Suzanna – It sounds like the tailor’s buttonhole, maybe, which is the “real” buttonhole. The commonly used buttonhole (shown here) is actually a “blanket” stitch. The blanket stitch (also called buttonhole in many books and stitch directions) is used in most techniques calling for buttonhole, but it doesn’t have the little pearl knot on the end, that you describe.
Ah, Noel – I was just working up a tutorial for that last week. I came up with a couple ways to end the edging on a blanket, one of which is practically invisible and the other ends up with a double stitch spoke on the back of the work (but the thread is anchored). I need to do these over again and photograph them, then I’ll post a tutorial. In the meantime, though, I find that using a series of anchor stitches to end, and working them under the last spoke area, helps to eliminate some of the problem of a knot. As soon as I have time, I’ll show you what I mean in a photo tutorial…
MC
I was just looking for a wide line stitch to add some texture to a striped fabric and this looks ideal. Thanks!
Okay, really basic question (the answer may even be something I was taught at one time but can no longer remember): How does one end the buttonhole stitch when using said stitch on a raw edge (as on a fleece blanket)and the thread has run out? I’ve tried to come up with a way to end gracefully but always seem to have a glaringly ugly big honking knot thing. Starting up with new thread is no problem but oh, those endings! I’m sure it’s an easy fix, but . . . Thanks, Noel
Nice and different thinking
I can see using this stitch and then adding –
– weave ribbon through the spokes
– add knots between the spokes
– add knots on top of the spokes
– add another color of running stitch on top of the spokes
– add beads or buttong between the spokes
in other words – not just a great stitch on it’s own, but a great stitch to use as a base for other stitches.
Thanks for solving the mystery here and putting a name on this buttonhole stitch.
When I was looking for different versions on the web this never came up.
Now as soon as I typed in “tailors buttonhole stitch” lots of diagrams showed up.
I will give them a try, I’m sure that is what I wrote about.
Thank you, Mary. Echoing what others say, I appreciate your willingness to help us with our stitching! Noel
Thank you Mary for sharing all that you have learnt and all that you learn through mistakes made. I have question- here in this project could you please let me know the fabric you have used?
Hi, Susan – for the buttonhole stitches above, I’m using Sotema linen (from Italy) – It’s called 20L and it’s 38 count. You can buy it online at Italian Needlecrafts. Hope that helps! ~MC
I forgot to add that it makes a lovely way to add a ribbon accent by weaving ribbon in and out of the strings.
carol