


Yesterday, we looked at one method of working daisy stitch in two colors, with petals in one color and anchor stitches at the tip of the petals in a different color. Today, let’s look at a different method of achieving the same result – and a much easier method, to boot!
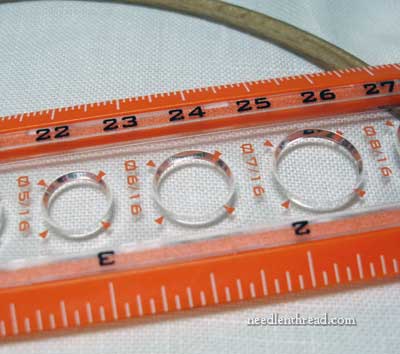
To ensure that this attempt came out at least a bit even on the first go, I used a circle template and marked on the fabric 8 equal points around the circle. You don’t have to do this…. and in fact, a flower stitched with detached chain stitch (daisy stitch) can have any number of petals, equally spaced or not. It’s up to you, and the look you want.

But I wanted to work out something that was relatively neat and even for this little tutorial, so I put the marks on the fabric, using a pencil.
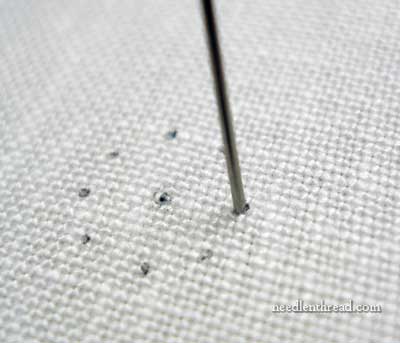
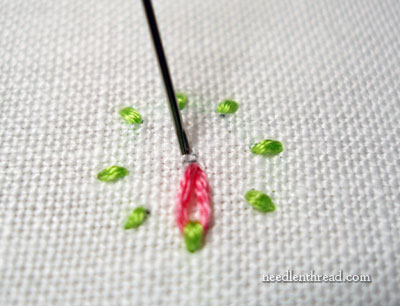
I used the same materials that I used in yesterday’s demonstration – 4 strands of stranded cotton floss, in pink and in green for contrast, threaded into a size 7 crewel (embroidery) needle. I threaded the green floss first, and brought my needle up at one of the small dots.

I took my needle down a short distance from where I emerged, to make a small straight stitch. At this point, you do want a stitch – this isn’t just a tiny stab stitch. You want the stitch large enough to be able to pass your needle underneath it easily, plus you want the stitch to be visible, in order for this technique to be effective.
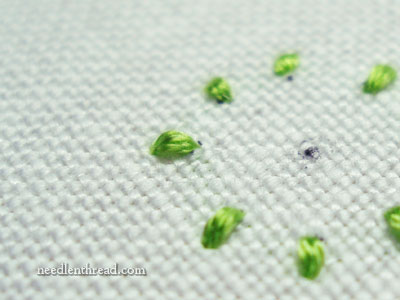
I worked the small stitches all the way around the circle, coming up into the dots I’d drawn and taking the needle down to the outside of the circle, a stitch length away.
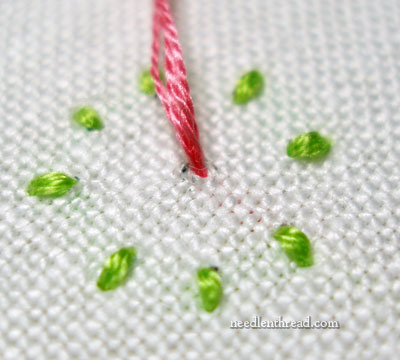
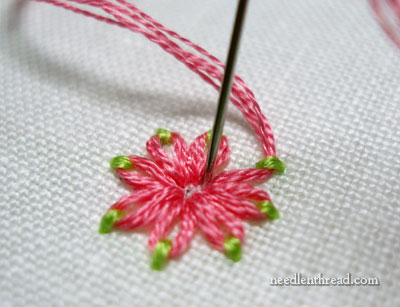
Time to thread up the second color (pink). Bring the thread up in the center, just off to the side of the center (not right smack-dab in the center).

Take the needle underneath the small stitch opposite where you came up.
Then take the needle back down into the fabric in the same hole that it came up in. Move to the opposite side of this stitch to work the next stitch, again coming up just to other the side of the center point.
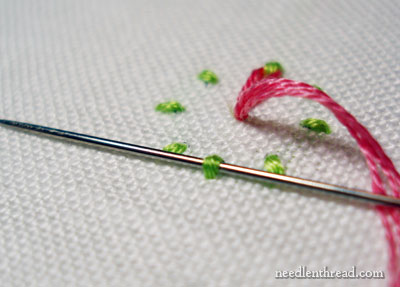
Again, slide the needle underneath the small stitch, making sure you don’t pick up any fabric or split the stitch.
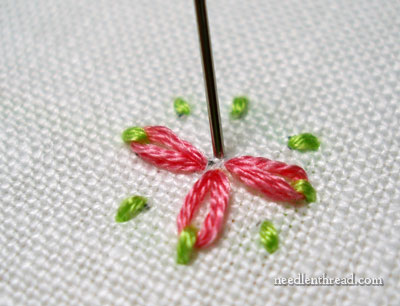
Continue doing this around the whole circle, always coming up just to the side of the center point (not directly in the center).
The reason I’m not going down and coming up in the direct center of the flower is an obvious one: if you end up coming up and down in the same hole, the previous stitch is going to be unstitched! So that space in the center of the flower is necessary.
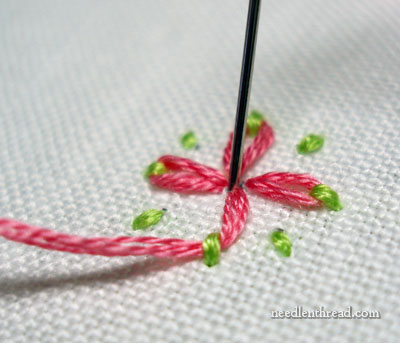
The final stitch goes in.

This technique is Much Easier than the techique shown yesterday! The main reason for its ease is the fact that you aren’t required to work both threads at the same time, so you don’t have to keep checking the back of your work to avoid tangling the two working threads.
So there you have it! Two methods of working daisy stitch in two colors! If you decide to use the technique for your stitching, you can do it whichever way is easiest for you.
What think you? Cute, isn’t it? Any particular suggestions for use? Or other suggestions or questions regarding method of stitching? Feel free to leave a comment!
If you’d like to see similar tutorials, check out my Stitch Fun index, where I explore different variations on stitches, just for the fun of it!
Gorgeous!! Isn’t it funny though – my embroidery brain is telling me that method one would be the easier option! I would worry about accidentally splitting stitches in the second option, and the situation with the centre hole would also worry me… I guess at the end of the day you have to do what you’re comfortable with when choosing a method.
Definitely easier. Cool. Thanks, Mary. I’m not one of those who figured it out myself!
The second method of sewing the daisy stitch seems so much easier to me as a beginning embroider. I sure enjoy your website and videos. Thanks so much!
Oops! Embroiderer???????
Dear Mary
Thanks for the two versions on the stitch. Yes definitely the second version is easier what a lovely flower, I’m thinking maybe I could use this on a birthday card for my niece. What a good idea to use a circle template makes it nice and even when stitching.
Regards Anita
Yes mary.
This method is easy. I will give a try.
viji
I’m smiling because that is exactly the method I thought you would show today. Much easier than trying to juggle two sets of needle and thread.
Of course, you are not restricted to using only straight stitches as the anchor. Any stitch you can slide your needle under would do. I’m thinking a small bullion know would be particularly pretty.
I LOVE this. I always have a terrible time with daisy stitch and will be doing about 15 daisy stitch flowers on a pillowcase today and can’t wait to try this method. Thank you so much.
G’day Mary,
Simply very lovely,
cunning,
neat,
teasey easy peasy as in tantalizingly simple,
“kiel” – 2yr old granddaughter’s ‘cool’. Going out there tomorrow and am going to have her help me make a polar fleece poncho for herself and a doll or teddy. Was wondering what embroidery to do on it that she could follow what was happening. Simple but effective. This is it.
Great stuff, Cheers, Kath.
I feel silly because I thought of another method yesterday but this is SO much better! 🙂
Thanks for this!
Anne
I have to agree Mary, this second way is not only mush easier when it comes to handling both colours of thread, but it makes it easier to get the petals an even size too! WHOOO HOOOO .. Can’t wait to try this!!
Cheers,
Wendy 🙂
This is why I love your site. I learn something new every day. I never would have thought to make the stitch this way. I have never seen a ruler like that either. Keep of the great work.
Mary, what perfect timing to learn this easier stitch as I am embroidering a SUGAR SKULL and these adorable flowers will set it off perectly. Thanks for all you do….
Very pretty,
Now could you please show us where you would come up with the stem stitch?
Thanks,
Katherine
Would you believe me if I said that when I entered the kitchen this morning to make breakfast, all I thought about was what your second method might be? Its true. And goodness, what an idea!
Can’t wait to put thread to canvas.
Thanks so much for sharing the 2 color flower. I love it.
Thanks for the two tutorials and the second one is really much easier.
At a Schwalm class I had learnt to do chain sts. starting with a single straight st. and looping the chain through it and the next chain looped through the first one and so on and since then have only used this method as it is much simpler and the chains come out very even.
Ahhh, yes! Very Nice. This is actually the method I prefer for the chain stitch, too (it is sort of backwards – placing the “tack” and then running the loop through it. We must keep our brains flexible!!! Thanks, Mary.
Hi Mary,
You surprised me with your second, easier method for the two-color lazy daisy stitch. I expected you to do the stitch in the usual manner with one color and then go over the securing stitch with the second color.It’s good to have lots of options! Thanks for always supplying us with choices.
Lovely to see each daisy appear step by step, no I had’nt worked out how to do the second option.
I think the two colours gives it real life and class and I will be adding it to my next piece of work. More please!
I love Dorset Feather Stitchery and Wessex embroidery but find the instructions for the latter hard to follow.
This is great. I am collecting stitches for my crazy quilt and this is the next one I will use. Thank you so much and thank you for your daily newsletter.
Mary,
I love how clear and easy this approach seems. However, I am always confused as to how one handles the “knot” on the backside. How do you start and end the stitch on the back? If moving to another area, is the thread woven through the lazy daisy on the back and then cut? or is there another way? Starting and ending stitches always leave me with questions. thanks for any ideas.
Peg
Ah. I learned the reverse chain stitch this past year, so I knew where you were going with the lazy daisy. But it’s funny that when I learned reverse chain, I never thought about doing with a daisy.
I love this method. Thanks.
This is genius! It reminds me of the woven wheels in crewel. I guess you could put little stitches anywhere and then weave thread through them as desired, or mix with long stitches for a basket look!
Hi Mary,
I’ve couldn’t wait to see your second technique! How much easier it is! Plus it looks great and as you say, no worries about continually checking the back of the work for split, knotted, garbled threads!
Thank you!
Oh, Mary, these two Lasy Daisy posts are so charming! Even though I generally don’t like pink, that pink and green is so bright, cheerful and summery!!! And so simple really, but my brain did a “blank” when I first looked at it too, and said “HOW … ” Thanks for turning on the “light bulb” and clear instructions.
Now I’m thinking of a third option … overdyed silk thread from Vikki Clayton, in a pretty flower color, that has small sections of greens in it, and wondering if I can stitch those green tips with the green thread, then get to the roses and burgundy colors for the petals, and get a patch of these daisies with color shading in … and then there’s the lovely piece of darker toasty colored linen I found in my mother’s box of fabrics that’s been crying out for SOMETHING … a nice big hank of Vikki’s silk in a gently shaded white/ivory/palest cream coloration to make summer white daisies with green tips, yellow centers and green foliage …
THANK YOU for the extra inspiration this morning; after a cortisone shot in my thumb yesterday, and the prospect of more tests in August and possible hand surgery looming, it was very welcome. And somehow my hand doesn’t hurt so much this morning, thanks to you !
Cathy
Beautiful – can’t wait to try it!
This is a great way to do the lazy daisy stitch. I think it will make mine look a little more neat. I tend to be a little off with this stitch. You’re just filled with new ideas. Thanks.
Hi Mary
Thanks for showing how to make this new stitch what a great idea. Where do you get your round holed ruler.
Brilliant! I wondered, and wondered, and didn’t even go anywhere close to this. Sometimes the simplest solutions are the hardest one to arrive at. Plus, I love how neat and perfect this makes a daisy stitch. You’re a great teacher, Mary.
You are such a clever girl, Mary.
I would use these on a dresser scarf or bathroom towels, maybe. They are so cute.
Great method…now tell me where did you get the cirlce ruler template from?
Hi, All! Thanks for your comments!
I picked up that ruler at an art store years ago. I think you can find them through Blick’s Art Materials – but really, any circle template will do. Office supply & hobby / craft stores carry circle templates in the art & drafting supplies area…
~MC
I imagine one could use a coin for a template. Nickle, dime, quarter – depending on the size of the required daisy.
Elaine
Merci, Merci, Mary… I always find it hard to make a perfect daisy now I know how.
Thank You.
France
Brilliant, so easy and neat
Very pretty and neat. I really like this method — for two coloured as well as one coloured flowers.
Seriously, this is the best technique I’ve seen in a long time. I will be using this soon. I’m a wool crazy round robin and this is a perfect daisy to use. Thanks!
Génial! I am impressed with this ingenious method. Bravo!
Keep doing this journal. I enjoy it a lot, even after many years of doing embroidery.
Looks much better than the traditional lazy daisy stitch I learned. I just discovered your blog and am grateful to finally find one that deals with embroidery!
HI MARY
IT IS A WONDERFUL AND INNOVATIVE IDEA FOR USE OF TWIN COLOUR … AS ALWAYS U R ROCKING. THANK U DEAR
Thank you so much again for having answered my email and even better for having done the 2 tutorials. This one is way easier than the first one. Will surely give it a go. It is so pretty.
hi this method is really easy. I am definitely going to use this one. Thanks mary for sharing this with us.
Well! Leave it to you Mary to figure out a unique and easy way to do this! Loving the idea!
Kathy
http://www.shawkl.com
LOVE the simplicity & ease with which you have solved this Plus the flower is beautiful. Definitely added to my repertoire. Where’s the needle & thread……..here I come. Thank you, Mary
Hi mary
Going through your site makes my day. The second method is really easy and looks good too. I am going to give it try.
many thanks.
That is very interesting and using two colors is so easy.I love this and will surely use this in my project.
Any chance of showing the back after you did the green ‘dots’?
You didn’t make each dot individual without carrying the thread, did you?
Hi, Marny – better to think of them as straight stitches, I think, instead of dots. No, they aren’t individual – I carried the threads all the way around. So on the back it looks like a widely spaced stem stitch in a green circle, with the a small blob of pink stitches in the middle where the daisy petals meet. I’m afraid I didn’t take a photo of the back, but next time, I’ll try to remember to do that! ~MC
Awesome!! Thank you for sharing your tips. My embroidery skill will continue to improve, thanks to you!!
Kathy
C’est vraiment superbe comme idée .thank you very much
Beautifully explained!! One of the infact THE best site for beginners!!
Great work!! Thankyou!
Excellent work & simply superb demo & also inspiring for the beginners.
god bless u.
thank you!
I’m just loving this site. There is so much information and wonderful videos. I’ve learned such a lot already. I’m just going to try these 2 colour daisies. Thank you. Lizzie x
Thank you for your wonderful instructions on how to do a two color daisy. I just love your sight. I have taken up hand embroidery again,even though I do have a sewing machine that can embroider. Working with my hands always gives me something I can be proud of.
I am so glad I found your website. I am doing lazy daisy for the first time today. These tutorials are so well done. I learn so much better by watching someone and this website ranks right up there with being with a friend to learn from. Even though I’ve never met you, I can tell you are a great teacher. Thank you for the time and effort in creating this website and sharing your knowledge.
Love it! Thank you SO much!
Super smart, and clearly way easier!
It is lot easier and cute . Thank you
Wow! I JUST found this site…now I can’t wait to try this stitch. I will have to take a look at the other articles you have…no more plain, boring split stitches for me! Thanks!
Every morning while drinking my coffee I can’t wait to see what new stitches you are showing. Wow!! is such simple word, but that’s how I feel ever time I read your techniques of the day. Today’s was beautiful and I like the second one and feel more comfortable working with one thread at a time. I am so happy I found your site because when I am not sure about a stitch I have you to show me.
I told the ladies in our sewing group about your site they were excited to know about it.
Thanks for sharing,
Dee
Thank you, Dee! I really appreciate your spreading the word about Needle ‘n Thread!
Thank you for your amazingly easy to follow instructions. Your site is also easy to follow. I am just a beginner but I have been getting compliments for my pillows that I have been making for family and friends and I always tell them that I have been learning from you. Again, thank you.
Adorei o jeito de faze-la, bem diferente do tradicional
Great tutorial!
These little daisy stitches in two colors are so cute! I just purchased some flower pot buttons for my granddaughter’s coat and these daisy stitches will look adorable with the buttons!
Mary, this is just wonderful! I have been reviewing some old posts and I just think you are amazing and your work is fan-tab-ulous! With your Stitch Index I am inspired to try a sampler or two. Thank you!
Hi Mary.
I love to look through your site over and over. Every time I see something new.
Could you please tell me, what is that ruler you used to mark the circle?
It looks quite handy.
Thank you,
Wonkey circle Christy.
Amei.,xonei xonei…Lindo e muito fácil, o passo a passo está muito bem explicado, até criança faz…Obrigada por compartilhar conosco.Um abraço com carinho.Beijos no <3
Maio 01,2014 Gostei muito dessa flor
I love this one! In fact I love you whole website!
I learnt to embroider a little in my childhood , but beyond loving the beauty of hand embroideries, didn’t have occasion to pursue it myself. Now after a long long gap I’m doing a bit of it again, mainly to adorn dresses; and discovering your posts is like finding a treasure chest!
Thank you!!
Thank you thank you very much. I really appreciate your embroidery.
Lovely technique! Thanks for sharing. I wonder how it would look with two shades of pink? A lighter shade for the petal and the darker for the hold down stitch.
Lovely
Muito lindo, delicado!! Amei! Parabéns! !!
To me, the simplicity is what makes it extraordinary. Less is more
Hi, can you please tell me where to get a ruler (with holes) like the one pictured above. I so need one of these.
Hi, Suzanne – I picked that up in the art section at Hobby Lobby. You can probably find them at most art stores.
Does it have to be a stitch needle? Can it be a regular sewing needle?
This is the prettiest lazy day I have ever seen! I used to think they were boring. Can you tell me what kind and where you got the template for making the evenly spaced dots please?
How did you end of these threads, particularly the green one? There isn’t a lot of threads to use as an anchor.
beautiful
Thank you for sharing. Very beautiful.
Where did you get the circle template ruler?
Hi, Sherrie – I got it in the art section at Hobby Lobby, I think. I prefer the circle template that is a sheet (plastic, usually green) with all kinds of circle sizes on it. They also have those in the art sections of hobby stores, or, if you’re lucky enough to have an AC Moore or Blick’s art supplies locally, you’ll find them there, too.
Wow, love it . First time I have seen it done this way, very cool.
Thanks, Barbara! And it’s super easy, too – great way to add dual color!
Just a quick note to say I’ve been working through these daisy stitches designing variations like adding the petals from an inner circle to the outer one and filling the inner with French knots using 6 strand DMC thread. I’ve been playing with colours, etc. It was fun. And then I made a change that brought a smile to my face and I couldn’t stop. I used some DMC cotton a broder for the French knots. OMG. Up until now, I’ve been “Saving” all my good threads and linen “for when I’m more skilled” and one of my New Years resolutions was get over that. I’m still working on cotton right now because I am working on my “doodle” piece. But I now have another resolution: stock up on other threads!
How is the knot stitch in the center (yellow) done?
It’s a French knot.
I really love your tutorials. I appreciate you go slow in your videos and your instructions are always very clear. Thank you for your efforts to teach the craft. I started out with cross stitch in 2016 and have progressed to hand embroidery thanks in no small part to your site. -Tiff