


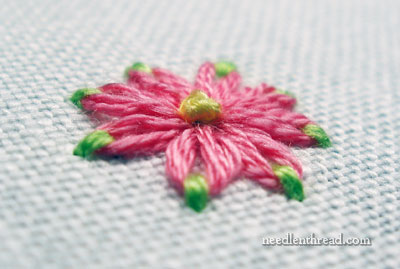
It was one of those e-mails: “Can you look at this and tell me how it was done?” It was a picture of a daisy embroidered in detached chain stitch (lazy daisy stitch), only there was a difference – the anchor stitches on all the petals were worked in a different color from the petals. It was really cute!
My first thought was that this is an easy technique. Use two threads of different colors, stitch the loops for the petals with one color, and anchor them with another.
But as soon as that thought flitted through my head, it was followed by another one, suggesting a different method. I’ll show you both methods in this two-part tutorial, one of which is decidedly easier than the other!
The first method corresponds with my first reaction to seeing the picture. We’ll stitch each petal and anchor stitch using two different colors of floss simultaneously.
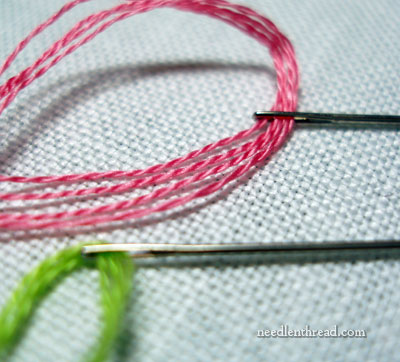
So, thread up two needles with two colors of thread. I’m using a bright pink and a bright green, since the contrast works well for photos. But you can use whatever colors float your boat! I’m using regular stranded cotton, four strands in each needle. The needle is a #7 crewel needle.
Anchor your threads in whatever way you like to anchor them. I started with two little stab stitches with each thread color (hence the tiny green stitch on the front of the fabric), but in retrospect, I think this would be easier if you use a waste knot from about three inches away.
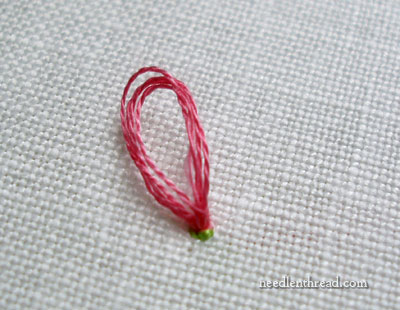
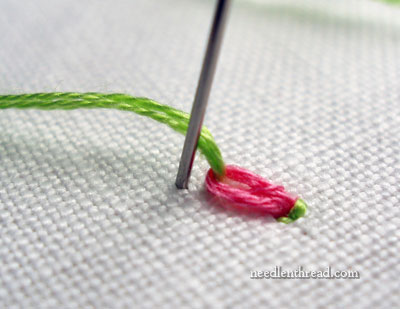
Once your threads are anchored, take the petal color and begin a daisy stitch as you normally would, coming up in the fabric and going down in the same hole, but leave a good sized loop on the front of your fabric.
Bring your second color up inside the loop, coming up at the point where you want the petal to be anchored. Where you come up will determine the length of the petal.
Once the anchor thread is pulled through, you can pull on the petal thread from below and tighten your petal loop up. Don’t pull too hard – just enough to bring the loop snug around the anchor thread.
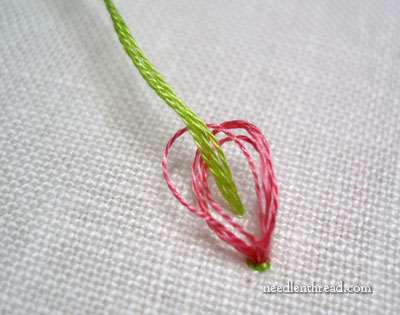
You can see that the petal is snug agains the anchor thread here. When you make your anchor stitch over the loop, feel free to take it down a little ways away from the end of the petal. After all, you want the anchor stitch to be quite noticeable. (Otherwise, you wouldn’t be going through all this to make a daisy stitch!)
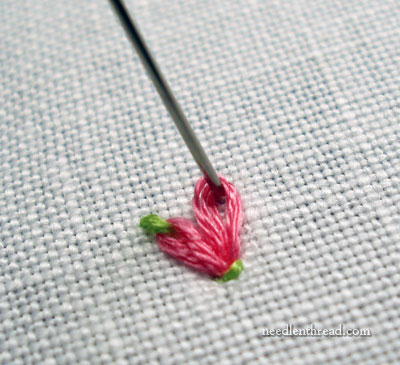
Make each subsequent loop around your daisy in the same fashion, first bringing up the petal thread and making a loop by taking the thread down into the same hole, and then bringing up your anchor thread and stitching over the loop.
Work around the daisy until you get to your last stitch. Hopefully, your daisy will not turn out as wonky as this one!
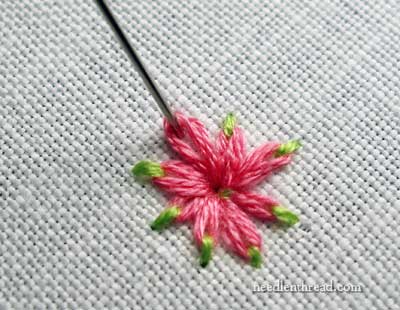
When you’re finished working all the petals, come up in the center and top the thing off with a French knot. You can do this in the same color as your anchor stitches, or you can finish off your anchor stitch thread, and use a different color. I just stuck with the green.
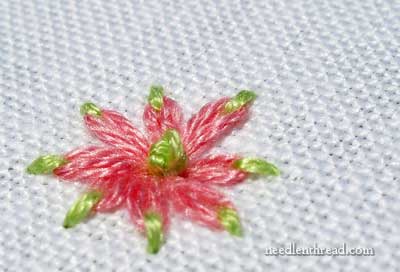
So that’s one method of making a daisy-stitched daisy with two colors.
Tomorrow, I’ll show you the other method, and you’ll probably be able to figure out on your own which way is easier! (Um… hint: tomorrow’s way is a lot easier!)
See you then!
Questions? Comments? Suggestions? Feel free to leave a comment below!
Very pretty but my, oh my that must have been fiddly. I’d bet the way I’m thinking off is the way you will show tomorrow 😉
Much easier and opens up possiblities for some interesting variations.
These are super cute!
How fun!!
Thank you!
🙂
Thank you Mary. I am designing & stitching something (a crazy quilt ‘thing’) for a competition here in NZ and I was wondering how to do blue cornflowers in lazy daisy stitch. This method (or maybe tomorrow’s) will be perfect to do without adding too much bulk to the overall item.
It is a very cute interesting flower and I can’t think of another way to stitch it, so I will be looking forward to tomorrow!
Deb
G’day there Mary,
This is really sweet. I like it, colours and all. It’s happy. Interested in tomorrows. Thank you.
Cheers, Kath.
Those colors are pretty together, and thw whole flower is very innocent looking. The only other way i could imagine it would be to do little straight stitch an outer ring then change colors and and do the second half of the fly stitch…it will be interesting to see the second method!
ktj
Very pretty! I can think of one other way to do it that would be much easier but might not look as good … can’t wait to see if that’s your method or not. If it is then I’m sure it looks great or you wouldn’t be showing it to us! 🙂
It looks like a poinsettia. I’m thinking tomorrow is the easy method I saw in a book, and what I now do. I won’t spoil it though.
Thanks-Mary- I love the idea, very simple to do yet very creative. I am going to use it on my current project which is a set of linen potpourri bags with embroidery! Perfect timing!
Take your green stitches all the way around the circle, then do your pink loops, sliding needle under each green stitch. Not sure how to say this 🙁
I was just working on a birth sampler that has the lazy daisy stitch for leaves. I think the rest of them will look better now that I’ve seen your method. I always learn something from you. Thanks!
This is adorable, Mary. It doesn’t seem too difficult, so I can’t wait to see what’s easier!
I like the effect. Good idea. I have an idea how to do it easier, but I’ll wait. But, I have a question. When I do a little flower with lazy daisy, I stitch at 12 o’clock, then 6 o’clock, then 9 then 3, etc for the number of stitches I want. Is it better to do them next to each other and how do you keep from having an oval if you do them next to each other? Thanks
Hi, Everyone!
Yes, tomorrow’s approach is much easier, and I know many of you already have it figured out!
Anne – yes, I demonstrate that (to a degree) in tomorrow’s post. Normally, if I’m just working little stitches like this into random flowers (like I did on the felt needlebook I wrote about ages ago, for example), I don’t necessarily work opposite sides, or put in equally spaced petals and then go back and fill, because, when working random flowers, the number of petals generally changes quite a bit, depending on how much space I’m filling. But sometimes, if I want precisely spaced petals and uniform flowers, I’ll do it the way you described, more or less.
Thanks for all your comments, everyone!
~MC
Do you know if there is much of a difference in quality between slate frames from Evan Burroughs and the ones made and sold by Hedgehog Handiwork?
They’re both good. I have a couple of each, but I think I prefer the ones from hedgehog because I like the wooden pegs, and I like the thinner rollers. They’re also easier to order and reasonably priced. ~MC
What a lovely variation on the lazy daisy. It brought back memories of my first embroidery lesson. I am planning a piece with lazy daisies right now and this will add a bit of pizzazz. I love you blog and learn so much from it.
Why not stich all the daisy stitches first in pink as usual and then go around the tips of the petals and add the green with a single stich or maybe two of green? That should be faster.
Hi, All – Thanks for your comments!
Yep, it is easier, isn’t it?
To answer a few questions:
You could stitch all the daisy stitches in one color and then go back and stitch another color on top of the anchoring stitches. But I think what makes this little flower interesting is that it is not done that way – so the alternate colored tip makes you look at it and say, “oh cute. now how’d they do that?” It looks “cleaner,” too. I did work it that way as well, but I didn’t like the bulk added by the extra stitch.
Peg – The knot on the backside – with this type of stitch, I’d use a “waste know” from several inches away and then cut the knot and weave the ends under the stitches. It’s easier than using little anchor stab stitches, because the anchor stitches get in the way and make the stitching more difficult.
Katherine – Hmmm. I’m not sure what you’re asking? Do you mean, if I were to stitch a stem with stem stitch, where would I start it? Probably just between two of the petals. If the stem is already drawn on the fabric, I’d actually start at the bottom of the stem and work up to the flower, but it doesn’t really matter either way.
Well, glad you like the little tutorial on this daisy. I do think it’s cute – I could see it on the edge of a little girl’s blouse or worked on a smocked dress somehow… or on a bonnet? Or a little hat? (I have lots of nieces!)
Off to the workroom for the day – hope to have a small stitched sample in silk and gold to show you tomorrow!
MC
Do you have tutorials for left handed people?
Thanks this is a great site
…..maravilla de bordado ¡¡¡¡¡mil gracias por tenerme en cuenta bendiciones por ser tan generosa enseñar como lo hace saludos desde ….CHILE
Beautiful instructions, thank you!