


A reader over on Ask & Share posted a photo the other day, asking for help identifying a stitch. I’ve already answered her question with what stitch technique I reckon is used here, but I thought I’d toss it up to you all to see what you make of it, hoping I’m not too off the mark!
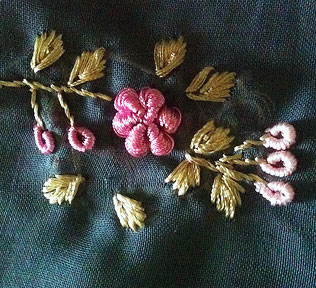
The stitch in question is the one used to create the pink flower in the middle of the design.
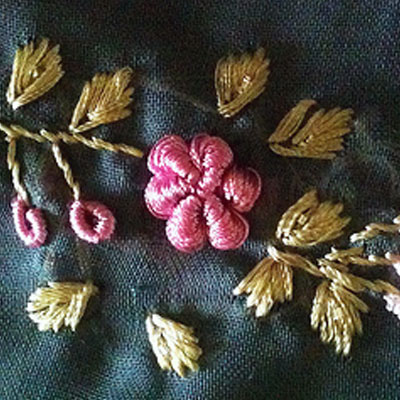
I’ve tried enlarging the photo a little bit here, without using too much resolution. It’s a neat looking flower, and I can see it having all kinds of applications in needlework – Brazilian Embroidery, crazy quilting, general surface work, embellishment of children’s clothing, and so forth.
The first thing that came to mind – bullion knots that are tapered. They’re wide at the outside end, then stitched into the middle with more tension on the working thread, to pull the bullion to a point.
I’m not exactly sure if this is the case, but in looking at the stitch, it’s the only thing that makes sense to me.
Anyone have a different take?
I’m going to play with bullions a little later this weekend to see if I can imitate this look and recreate a similar flower. Anyone up to the challenge of doing the same? If you do it and take pictures, post them on your blog, flickr, online photo album or facebook and let me know! If you don’t have any of the above, how about taking photos and sending them to me? It’d be fun to see what everyone comes up with! I’ll compile a post with any results you send in (including links and so forth to your work), and anything I come up with.
Any input on the stitch above would be most welcome! Feel free to leave a comment below!
Until tomorrow – have a terrific Thursday!
Bullions was what I first thought, and then I realized that the buds next to it are bullions… if that’s the case, then I’d think it would be difficult to get that even and wide a top to a tapered bullion…
Given the way the outside stitches seem to gap as they go around the petal, I am thinking you might be able to get the look with a padded satin stitch surrounded by several detached chain stitches that aren’t tied down…
Not knowing how big the petals are in real life is an issue, because things that would work on a small motif won’t on a large one: especially in the silk or rayon this looks like it was stitched in.
Definitely looks like bullion
My first thought was tapering bullion knots too. I can’t think of anything else that would give this effect. I think I might play as well, to see if I can recreate this effect. I agree that it looks to be a useful technique. I would use it on crazy quilting.
Hallo Mary, What a clever embroiderer to make such a flower! Since the buds, so simple compared with the full loop flower, are a looped bullion. I would say it is a bullion flower with possible inches long bullion so you cannot see the beginning or end. Six inches is about my maximum but this wasn’t looped & turned the way this one looks. Can hardly wait to see your flower. Cheers, Susan ps have a bullion needle about eight inches long wish I could lend it to you.
Mary, went to Ask and Share for the first time, today. What a wonderful addition to your site. Thank you for all the information you give us.
The stitch above is very interesting. Like Lesley-Ann, I think it would be a nice addition to a Crazy Quilt.
Louise
Could be a padded satin stitch like they use in mountmellick?
Yes, it looks like bullion stitch worked separately around some string and then stitched into the centre.
Looks like a loose bullion to me. To do it that way would mean lots of practice to me. Someone who has mastered the technique of bullion stitches might be able to do it.
Hi – I can think of 4 ways of creating this effectively. I give the 4 ways ratings of “Maybe,” “Less likely,” and “I’d do this one.” There are 2 of them I would likely try.
1. Maybe: padding placed in a upside down V from the center. Then satin stitch over. This would give you the cleanest line. But the line at the tip doesn’t look too clean.
2. I’d do this one: Wrapped threads. Place 2 threads in an upside down V from the center for each petal. Then wrap the V going over the top and under the threads (without going through the fabric).
3. Less likely: Using a single bullion: sloppy and thick at one end. Worked from the center out or tip – doesn’t matter. This is hard to do evenly. The snug wraps and the sloppy wraps have to be thought of all the time. Too hard to be consistent.
4. I’d do this one: Bullion with multiple needles. Worked from the outside (A (up) in center, in at B in tip, scoop up to A, add another needle(s), wrap for awhile, remove extra needle,continue wrapping, pull through and lay down). This could be done with 3 needles, 2 needles, and 1 needle for a nice tapered look.
Hope I’ve giving you some ideas of things to try!
Judy
If I were trying to make that stitch I would make two or three foundation stitches from point A at center to point B wider end of flower like a triangle or ray widening at the top. Then I would come back up at point B and wrap those foundation threads bullion stitch style like you would normally wrap your needle. With the foundation threads it will automatically be wider at that end. Surely that’s a legitimate stitch with a name for it. LOL.
Double Cast-on, turned in, OR Crochet Bullion OR Drizzle Stitch enhanced with Roll Stitch, OR a Bullion that was continuously pushed back to create padding. That’s my educated guess! There is a stitch that looks like a humpback bullion, detached, and ending with a long tail, but for the life of me – I can’t remember its name! Just something I saw in passing years ago.
This looks like a “spinning wheel” stitch. It is a variation of a spider web stitch, commonly used in battenberg lace and ribbon embroidery. It is a woven stitch where the spokes of the wheel are laid first. Next, the spokes are wrapped from the center first. You can vary the width going outward by doubling up the spokes ie. a 7 petalled flower could have 14 spokes laid out. Rather than going around each spoke individually, stitch around two.
Hi Mary!
My first thought was bullion stitch ,my second one
was a straight stitch(may be with 6 strands) and whipping it with 2 strands tightly in the center and gradually loosening it.
Anita.
spider stitch
I too think it is bullion knots, but, with a twist. A bullion knot is made first about 3/4 the length of the petal and then over stitched in place gradually increasing the width of the petal with the last 3 or 4 stitches laying over the fabric or over some stitching below it.
This is what I think, as the stitching is slipping on two of the petals.
Looking forward to seeing what you devise this weekend.
Might it be stumpwork?
I don’t own a copy, but in the book A-Z of Bullions (Country Bumpkin) there is a tapered bullion.
I’m pretty sure this is a raised spiderweb. If stitched with Brazilian thread it may be Lola, which is a larger thread. Lola would give a spiderweb a looser look than a finer thread like Iris or Glory. I’ll be interested to see what others think about this stitch.
Teresa
What else could it be besides a bullion? Especially with the bullion buds close by. If is it, it’s excellent tension control to get it looking the same on each petal. I’m at work, so I can’t play with it, but I’ll be watching to see what you all come up with. I love a good mystery.
The first thing I thought was a padded satin stitch, and then I realized it might be a bullion.
If you look at the white looped flowers, it appears they are a loose, uneven, maybe even careless bullion. However, the pink flowers certainly are not at all careless, and are really quite lovely.
I love the leaves, too, are they done with a “fly stitch?”
How would you get a bullion to taper like that? Wrap around something like a skewer? And then how do the wraps stay tapered – just depend on not getting snagged?
Interesting, I look forward to seeing what you figure out, Mary.
Hi Mary ~
Not a bullion…. Several years ago EdMar did a Rafia thread. In her first book, she had a Wild Rose ( if I remember the name correctly after so many years ) This flower is done with that stitch – not a bullion, only with different thread – looks like Lola weight thread. It is actually one of Maria Freitas’ (EdMar) variation of a French knot.
Starting with a French knot – making any # of wraps for the French knot, then start pulling wraps loose to create the cone shape. Very interesting creation Maria came up with.
Sharon
My guess would be a padded satin stitch with the padding thick at the narrow
top and thinner as it widens. The stitch looks lovely, doesn’t it?
It looks like some version of a wrapped spiderweb. The outer ends of each spoke are quite large, larger than usual, but that’s still what I think.
Could it be something like a loose cast-on stitch
http://www.brazilian-dimensional-embroidery.org/stitch_instructions.htm#Cast-On_Buttonhole_Stitch
made with several plies of thread?
In the horizontal right petal there seems to be the loops of buttonhole stitch… or do I need another pair of glasses?
That’s the little “Elephant Anklets” bullion I wrote about on Page 16 of my book, “Take A Stitch”.
It makes MUCH prettier flower petals, for sure. It’s a bullion that isn’t pulled down tight along the entire length, just tightened at one end.
We’re not supposed to make “sloppy bullions”, but in Brazilian Dimensional Embroidery we can do ANYTHING we want! –and see how pretty this is?
(It also makes very “interesting” little elephant feet…)
Rosalie Wakefield
http://www.healmyhands.com/how_to/bullion_stitch.html
Post number 11 above suggested a crocheted bullion and looking at the above web site— does look a lot like it. It’s fun trying to guess these things!
Veronica Garnier
Hi Mary,
I ran across this site while exploring the mystery “bullion” stich. The stitches in the video look quite similar.http://www.healmyhands.com/how_to/bullion_stitch.html What do you think?
Dear Mary
Buillion was my first thought but on studying the photo it could be padded satin stitch. Look forward to your analysis Mary.
Regards Anita
Hello Mary,
In fact, my first thought was : it is made with ric-rac ribbon.
Have a nice day,
Regards
Thank you Veronica and Marlene for the site. I have just had a look. I want to do it now but in Australia ready to sleep 10.30 pm by the time I hunt down the hook… What fun, thank you Mary for featuring a very, very good bullion. Just love it.
Can hardly wait for the next one. Cheers Susan
Whipped Spiders Web wheel, I think, over-wrapped to make it stand up.
I don’t have photos, but I’ve used bowing bullions myself for that purpose and it looks just like that. You just use more wraps than normally would be used for the distance, so that your bullion stitch stands up and bows out a bit, and surround it with your petals.
Crocheted Clones Knot.
Looks similar to one of the stitches used in Chikan Embroidery, a whitework embroidery of Northeastern India.
I happened to be looking for something in my Brazilian Embroidery book and came acorss a stitch called the double cast-on stitch which looks very similar to the one you asked to help identify. It is in a book by Maria A. Freitas, “The Art of Dimensional Embroidery
For my 2 cents worth I dont think it is a bullion at all. I think its raised leaf stitch – you can see a reference to it on page 27 of Pat Trott’s Three Dimensional Embroidery Stitches. Also known as leaf stitch on p264 of Anne Butlers Embroidery stitches.
just found a tutorial for it
http://kerrykatiecakes2.blogspot.com/2009/05/tutorial-raised-leaf-stitch.html
Hi, All!
Thanks for your comments on this post – and for all the input for solutions for the stitch. I’ve received a couple photos from readers who’ve recreated the look of the flower using a tapered bullion knot, very loose on one end, quite tight on the other (with the tightly pulled ends in the center). Janet (see her comment & link) recreated the look of the flower by wrapping base stitches. Rosalie Wakefield pointed to her book titled “Take a Stitch,” where she demonstrates tapered bullions to create elephants’ feet. They are exactly the same look as this flower petal.
Some other interesting suggestions include a French knot variation from Sharon Shetley, which sounds intriguing – I’ll have to try that out. Also, raised leaf stitch – but these flower petals above really are a bit different, as the thread direction in raised leaf stitch goes down the length of the petal, instead of across the width (or around the width) of the petal as it does here. There’s also the option of the crocheted version (Veronica posted a link in her comment above), which looks quite similar, but as it’s crocheted, it adds the question of applying the element to the fabric. In this case, I think the element was stitched onto the fabric.
I’ve been playing a bit with two options: the tapered bullion, and Sharon Shetley’s suggestion of a variation on a French knot (which turns out being practically the same as the tapered bullion, except for the way the needle is / is not anchored in the fabric….) I’ll see if I can drum up a photo tutorial with either “wrapped needle” approach.
Any other suggestions or ideas on ways of duplicating the stitch are certainly welcome!
~MC
Hi Mary,
I’ve just published my solution to your challenge on my blog. Can’t wait to see what you and others come up with.
Thanks, Janet – It looks great!!! A clever solution! ~MC
Hello Mary,
I do not think that this is Bullion Stitch but it is a form of “raised” Leaf Stitch. Names for stitches are very confusing as very often we use the names from our region or country, or what our grandmothers made up! It is used on a small part of HRH The Queen Mother`s bedspread at Glamis Castle in Scotland, which I had the privilege to re-create for her 100th birthday 4th August 2000. Sorry to name drop but I thought you might be interested!
If anyone else has described the name for this stitch, then please tell! I have forgotton and it may have a different name in the UK where I live. I am busy organising a Lady Anne`s Needlework Retreat for 2012 with Jane Nicholas and Meredith Willett so am up to my ears at the moment, but love your site. Thankyou. I will next send you a picture of a stitch I recently found in a private collection which I think you may find interesting! Phillipa
Thanks, Phillipa! You’re the second who’s suggested raised leaf stitch – I’ll have to look up some sources on that stitch, as I always thought that the threads ran down the petal (towards the growth point) rather than across the petal. But I’ll do some foraging and see what I come up with. Some of the Brazilian Embroidery ladies here have come up with some suggestions, too, so it’ll be fun to play around with all of those. In any case, playing with stitches makes for good learning!
You’ve piqued my curiosity on your Lady Anne’s Needlework Retreat – between you, Jane Nicholas, and Meredith Willett (of Louisville, I’m assuming?), it sounds incredible! I’d love to hear more details on that!
~MC
~MC
I find that what Janet made is very similar to what is on the picture. Bravo Janet!!!
http://crochetology.net/wp-content/uploads/2010/07/priscila-clones-knot.jpg
Wow! So pretty! I clicked on Janet’s name to be linked to her blog. Her solution is dead-on. What a great job Janet. I think you hit the nail on the head with your recreation attempt. Also, thank you for showing us how to do it to. A really pretty stitch!
Mindi Hammerstone
I only know this stitch by name of crossed needle flower. basically you insert 2, or in this case 3 needles, thru your work so they form a cross + where you want the center of the flower to be. in other words 2-3 threads are over the center of each needle with both ends sticking out free of the material. you then come up at the center and wind around under the needles until you have the diameter you want.then,being carefull not to deform the last petal, you go to the back of the work and come up at the center again. You now slide your needle under one of the wraps midway between two needles and back down to back of work. With your thumb over the wrapped threads, pull the thread to slowly cinch down your last stitch until it gives the effect you desire. Do the same with each space between needles and you should achieve the effect seen. I hope I was able to made this clear. If you look at the picture i think it makes sense. Good Stitching! Phyllis C
In reading back over my last comment I noticed something that may be confusing. When you are wrapping the concentric circles of thread, you always keep the thread under the needles. Don’t weave over and under. Next, when you come up at the center, you slide your needle under all the threads and back down in the center. This forms a loop that then cinches down the wrapped thread to form one side of a petal. Leaving the crossed needles in place until all petals are formed helps keep them smooth and even.
Thanks, Phyllis – I’ll give this a try! Your written instructions are really clear, so I’ll see if I can reproduce them in stitches! ~MC