


Today I want to show you how to satin stitch to a sharp point. Sometimes, on your embroidery designs that you’re working, you might find an small element (like a leaf or a petal or a bird beak) that requires a sharp point. You satin stitch the element, following the “stitch-just-over-the-outline rule” that seems to govern satin stitching, and …. you end up with a slightly rounded tip to your leaf, or at least it isn’t as pointed as you thought it should be.
The two things that will ensure a pointy point on a satin stitched element are the length of the first center stitch and the angle of all subsequent stitches.
Let me show you what I mean:
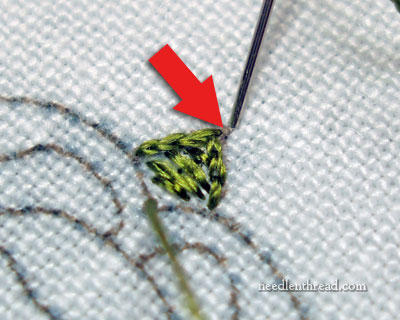
In the photo above, I’m preparing to satin stitch this tiny leaf that comes to a sharp point. Notice that I’ve outlined the leaf shape with split stitch, and on this particular element, though tiny, I’ve added a few random horizontal stitches inside to lightly pad the shape (not always necessary, especially on little shapes like this one).
I brought my satin stitching thread up at the base of the leaf (the opposite point of where you see the arrow), and I’m taking my needle down over the tip of the leaf, in the center. See where the arrow is pointing? There’s a bit of a distance there between the tip of the split stitched outline and where my needle is going down. So for the first stitch, I didn’t take the stitch just over the outlined edge, but I extended it a bit longer, and left a little space between the outlined edge and the end of the stitch.
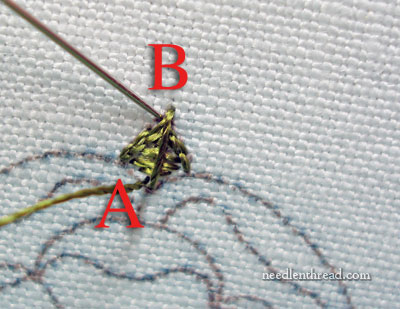
My next stitch is going to travel from A to B, on the left (or right, it doesn’t matter) side of that center stitch. However, A is slightly farther away from the first stitch than B is. As I go in at B, I’m going to place my needle right up close to the first stitch, and right up close to the outlined edge – almost, in fact, to the point that it seems that I’m pushing it underneath the first stitch a little bit.
Keep in mind that at point A, I’m not right next to that first stitch – I’m a little farther away. So my second stitch is not actually going to be perfectly parallel to the first stitch – it’s going to slant slightly towards it at the tip of the leaf.
Continue filling that side of the leaf, “fanning” at the base, but moving in closer at the tip. Not close enough to jam things up and make the threads overlap, mind you – but just a tad closer at the top than at the base.
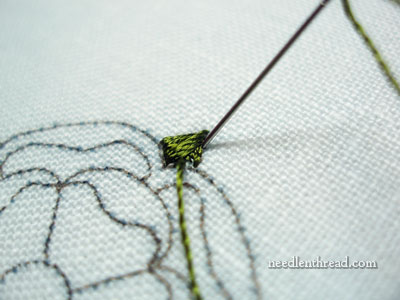
After stitching the first half of the leaf that way, move to the other side, and follow the same procedure, “fanning” at the base, and pushing towards the tip.
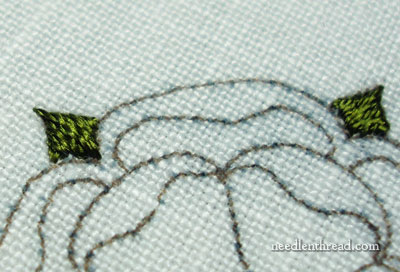
That’s how you’ll get nice pointy elements with satin stitch. Notice that the stitches don’t look like they’re slanting into the tip – they look pretty parallel, but there is a slight slant on them, especially on the first couple stitches close to the center satin stitch.
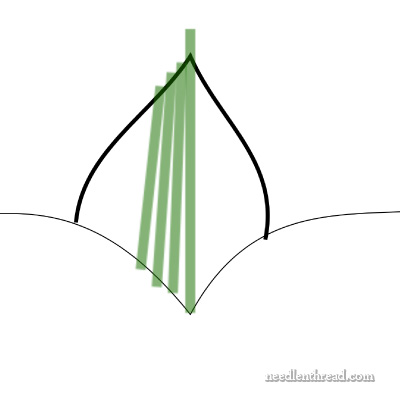
If I were to diagram the satin stitching of the leaf, it would look something like this.
So next time you’re satin stitching anything with a sharp tip, remember two points: 1. Make your center (first) stitch longer than you’d think – take it beyond the tip of your outline a little ways and leave a little bit of fabric between the outlined edge and the end of your stitch; 2. slant your subsequent stitches, “fanning” at the base and drawing up close to the first stitch at the tip.
Enjoy your weekend!
Of all the projects you have walked us through, Mary, I think I’m already starting to enjoy this one the best! I really liked the previous, gold work pomegranate, and this one seems to just build on that in terms of design, thread choices, and techniques. Very enjoyable!
Mary, this is a good little tutorial and the diagram really helped. Always have wondered just how to get that point! I still have to master (or at least come close) the satin stitch. Thanks for explaining this point.
Cheers,
Linda A
Ontario, Canada
You’re better than a box of Cadbury chocolates, Mary!
Mmmm…tastes like inspiration.
Lol. Every time i see the post about the box of chocolates it makes me giggle inside. Couldn’t help but respond.
Thanks for making me laugh.
Mindi Hammerstone
🙂
great tutorial
thank you so much , have learned a lot form here.
This is great, thanks Mary. But what if you need the satin stitch to come to a point if you are stitching in the opposite direction to your leaf? This is where I come unstuck … well, one of the many sticky places.
Hi, Christina – Do you mean if you are stitching perpendicular to the direction I’m stitching in these little leaves? Of course, it depends on the shape you’re stitching. This method works well for leaves and other similar shapes, stitched in this direction. But I’m not sure exactly what you mean – can you give me a hint? ~MC
hello mam,i have been regular reader of your blog n adored every tiny detail you teach us,thanks a million.i have learned a lots of stitches and enjoyed a lot.today i gathered a lot of courage to start a project and i decided to begin with tudor rose,i’ll post my work when finished,need your blessing.thanks again 🙂
Hi, Reshma – looking forward to hearing how you do with the Tudor rose! Glad you are enjoying the website! – MC