


Yesterday, I showed you the frame up on the church embroidery project I’m working on, and as the project unfolds, I’ll show you my progress on it, including tips and techniques that would be useful for all kinds of embroidery, whether church related or not.
So today, let’s look at the start. It isn’t too impressive right now, but there are a few tips here worth sharing.
The central monogram will be worked in blue silk outlined with gold. Originally, I had planned on doing the lettering in gold threads entirely. When I was practicing this basketweave technique in metal thread, I was planning on using that technique to fill one of the letters in the monogram.
You may be saying to yourself, “Oh, but gold would be so much prettier!” and you would be right, to a degree. The problem is that the background behind the monogram will be a kind of champagne-y off-white, a color called “brut,” in Soie Ovale, which is a flat silk. The flat silk will be couched over with the tiniest of gold threads, in a winding random pattern, using a goldwork technique called “vermicelli.” When I was originally testing that concept, I was testing on a dark background, against which gold lettering would stand out quite well.
However, since then, the fabric of the vestment on which this will be appliquéd has changed, so I’m going with a light background behind the letters, and a dark edge on the whole medallion. Against the light background, the colored monogram will stand out better. When it comes to church embroidery (or any other embroidery that’s seen from a distance), contrast is very important.
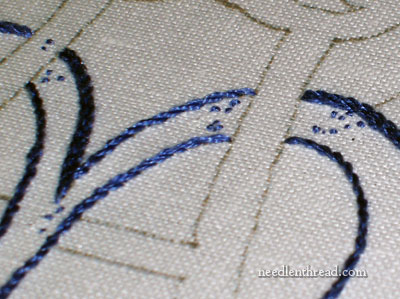
You can see the stem stitch just starting the fill up here – with two Whole Rows done! Because of the lighting and the fact that the thread is silk, you’ll see that in some places it looks darker than in others. But that’s just the light playing on the thread. The monograms will be solid, with no shading. They will, however, be outlined in gold.
You might be wondering about my choice of stem stitch as a filling, thinking it’s a bit on the ho-hum side. On the contrary, stem stitch when worked as a filling is quite beautiful, but more than that, I’m thinking two things: 1. It has a textured look to it, and against the flat silk background, this texture will add another level of contrast, which is what I want. 2. It’s relatively fast. I’m not taking shortcuts, but I’m glad it’s relatively fast!
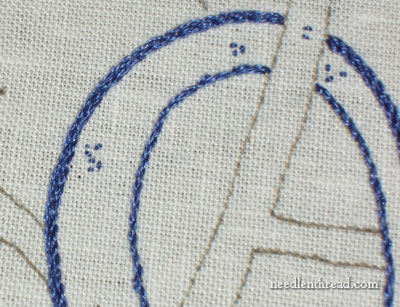
The stem stitch is worked in two strands of Soie d’Alger, which is a spun silk sold in skeins, with 7 strands that can be divided and then put back together, just as you would do when “stripping” DMC cotton floss. So why two strands of the Soie d’Alger and not one? One strand doesn’t give enough lift and texture to the letter. I need the letter to sit up off the background, without padding it. So … stem stitch is providing me with just what I want: texture, contrast in texture between the letter and background, and, worked with two strands, a little “lift” to the letter.
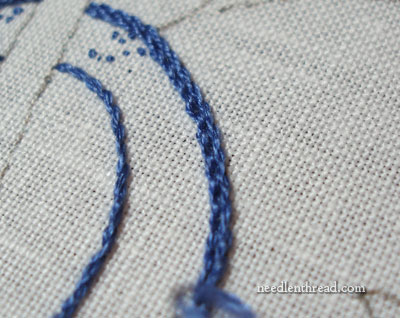
This is the thing, though: when working stem stitch with more than one strand of floss, you can get slowed down with uneven strands. If you’ve worked stem stitch with two or more strands of floss, you’ve probably experienced this. You’re stitching along, and suddenly you notice that you’ve got a little lump in your stem stitch (or any other stitch, really!), where one strand of your thread pulled through just fine, but the other didn’t pull through equally, and it left a tiny bump on your stitch.
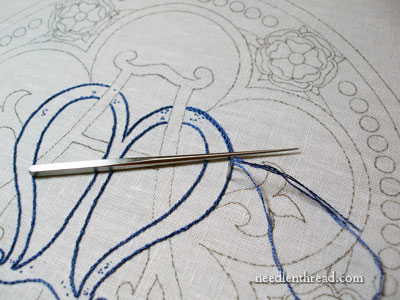
So how do you get a perfect stem stitch, every time, working with more than one strand of floss? Well, in most embroidery, I don’t really worry about it too much. In this embroidery, though, obviously it won’t do to have stitch flaws, so I use a laying tool to hold the two strands in perfect tension. Especially when working with silk, it’s easy to pull one strand of floss out of kilter (rough spots on the hands can snag the silk, or it can catch on the back of the fabric or on the frame somehow…), but with a laying tool, you always know that both strands are lined up and tensioned equally. It is a great tool for making a really nice stem stitch when working with more than one strand of silk.
So that’s my progress so far – not a whole lot of progress, admittedly, but I’m glad I got over the hurdle of starting. Sometimes, that’s the Main Event of any big project!
If you have any questions as I progress on this piece, feel free to leave a comment or to drop me an e-mail!
If you’d like access to all the tips and techniques discussed in the Medallion Project, including complete coverage of the Tudor-Style Rose, conveniently collected in one document, interlinked, referenced, and indexed, why not add the Marian Medallion Project e-book to your library? It’s packed full of all kinds of embroidery tips for undertaking a project like this, all in a convenient electronic format for easy searching.
Thank you for sharing your progress! I’m really looking forward to see this one as it “grows up”
Mary, I like the looks of the stem stitch filling. I’ve never used a laying tool when doing stem stitch, thanks for the suggestion!
Cathy
This project is magnifique… I really like watching your progress, your photos are clear and your comments are helping a lot eventhough I do not work with silk.
Good Luck Mary
France R.
Currently enjoying embroidering once again this is very informative. You are so talented. I appreciate your taking the time to share your knowledge of embroidery as you work on this beautiful piece. It is exciting to see it progress.
Hi Mary. This project is quite the undertaking! And it will be quite beautiful when it is done. I hope you will be able to see it occasionally when it finds its home. I’m wondering how comfortable it is to work on a stretcher frame? I don’t usually use any type of hoop/frame when I do any type of needlework; I find them ackward and intrusive. Even when I do counted cross stitch on linen, I roll the excess fabric up to hold w/ my left hand while I stitch w/ my right. Thanks for everything you’ve put on line. I enjoy browsing your site and learn so much from your videos. w/ stitching hugs, Dawn.
Hello, All! Thanks for your comments!
Dawn – Yes, I always use a stretcher bar of some sort – either a slate frame or stretch bars (or for certain small projects or for large linens, a hoop), and I guess I must be used to them, because I find them very comfortable to use, and can’t really imagine working without them, except on certain types of projects that are better off worked in hand. Certain embroidery – goldwork, this type of silk work, etc – must be worked in a frame, in order to keep perfect tension on the fabric while the project is underway. There are other types of embroidery – cross stitch, needlepoint, and some surface work – that can be worked just as well in hand, too, though. So it just depends on the type of work!
Kathryne – Yes, this is backed with white muslin. It wasn’t, actually, when those photos were shot, but since then, I’ve removed that section and added a cotton backing. As for fixing it to the vestment, I don’t do this part. It is likely that I will never see the vestment or the whole construction process. But if I have the opportunity and whoever is making the vestment is amenable to the idea, making I can take some pictures.
Cindy – Yes, I’ll work up a post on the laying tool! I’ve had a couple questions about it this morning already. There’s a video on Needle ‘n Thread (here: https://needlenthread.wpengine.com/2010/11/how-to-use-a-laying-tool-video.html) that demonstrates how one is used, in the meantime.
Thanks again for all your comments – I’m glad there’s some interest in seeing this project progress. I always wonder if people want to see all my projects develop or not, you know… I don’t want to bore anyone to death!! 🙂
~MC
I’m really enjoying watching this unfold. It’s so kind of you to share.
Thank you for sharing this project. It is a really beautiful design and I look forward to seeing the progression. Often I get tied up in my sewing machine contract work and have little or no time for the needle and thread, which is difficult since I am a hand-sewing enthusiast. So to watch you creating these gorgeous pieces is such a pleasure.
Beautiful work, as usual. I do have a couple questions —
First, did you back the linen with a support fabric or is the ecclestical linen sufficient.
Second, when it is finished, will you describe (or show) how it is affixed to the vestment?
I a new to embroidry as an adult. I do not know what a laying tool is. Could you address what it is and how to use it in one of your columns.
thanks
You are such a great teacher! I’m really enjoying getting back into embroidery after many years but have so much to learn.
Can you tell me more about this laying tool? I’m not familiar with it. Would it also be helpfull on regualr cotton thread or in other places?
Thanks again for all the time you give us.
Chère Mary,
J’ai vraiment hâte d’ouvrir mes “Emails” chaque matin pour lire ta chronique.
Ce projet de broderie religieuse me plait beaucoup. Merci de nous le partager.
Thank you Mary. I enjoy to read your chronique every day.
Merci, Louise! Je suis heureux parce que vous apprécierez mon e-mail! (My French is terrible!) Thank you! 🙂 MC
It’s really beautiful embroidery! I’m fascinating with church embroidery, especially, embroidered icon. I thought it will be a whitework, but blue omega is also wonderful. It going to be a magnifique work. I’m wondering, what it will be? A chasuble or other vestment?
Hi, Sylvia – Thank you! It’s for the back of a chasuble. ~MC
What is a laying tool please and how is it used?
I always want to see your projects develop. It’s an embroidery blog after all! Besides, that way I can pick up ideas. Just looking at the finished product is lovely, but you miss so much by not watching it grow.
Hi Mary,
I’m also interested in seeing how your projects develop as I can always pick up some new tips, techniques and ideas. Of course, I don’t have the time to use them all, but that’s a different issue. I generally think of red silk embroidery with goldwork, but the blue will be lovely. Is that an Alpha-Omega monogram? If so, I’ve never seen an Omega with a stem in the middle. The tip about the laying tool will be pretty handy, although I’ve never worked w/ two strands of silk at a time. Still, there is always a first time. And I can snag silk just by looking at it!
Hi Mary,
This is going to be gorgeous, would love to see the progress:) Something just popped into my head…when using stem stitch as a filling, is the direction of the stem stitch always the same in each row?