


The silver thread in yesterday’s article cries for transformation into a snowflake. After all, here in Kansas, winter’s coming, and so is Christmas. A hand-made Christmas ornament will make a perfect “small” project.
I started playing with the idea of a snowflake design by working out 6 lines on a circular grid. I made little changes and additions along the way, until a design emerged, eventually ending up at something that just might fill the snowflake bill. The embroidery pattern continued to develop until I had a look I wanted, but I kept making adjustments. I thought I’d show you the evolution and then the devolution of the design, sharing my thought process along the way.
This will probably end up looking like one of those picture games – can you spot the differences in the snowflakes?
Probably this isn’t the most efficient way to go about developing a design, but here it is, nonetheless!
What I want to do is embroider a snowflake, using this silver thread, silver spangles, white silk, and little seed beads. The ground fabric for the snowflake design is a deep, bright blue synthetic “suede,” backed with white cotton muslin for added stability. Now, if the pseudo-suede doesn’t work out, I may switch to a velveteen, but I’ll share more of that with you as I go. Today, let’s just talk about the design.
To accommodate the materials I’d be using for embellishment, I wanted a design with lines, swirls, and dots, as well as areas that would fill well with silk. I don’t know if real designers go about designing in this way, but I always think it’s useful to develop an embroidery design taking into consideration the materials that you have in mind. Now, if you don’t have any particular materials in mind, that’s another story. But when you want to use specific materials, it’s a good idea to consider how those materials will fit within the design you’re developing.
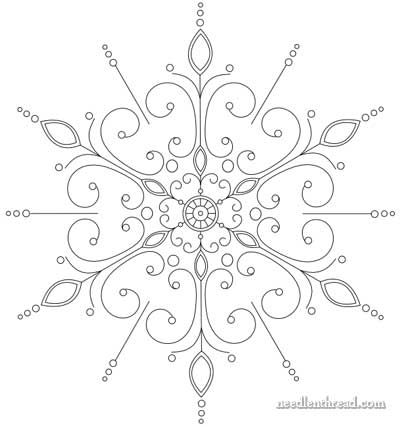
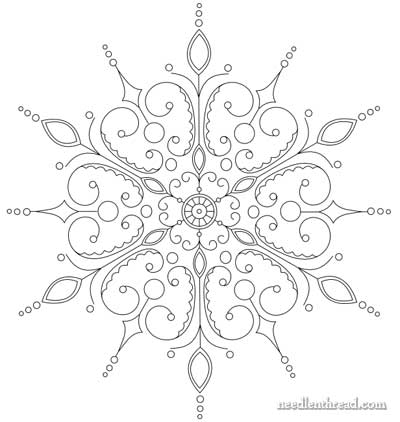
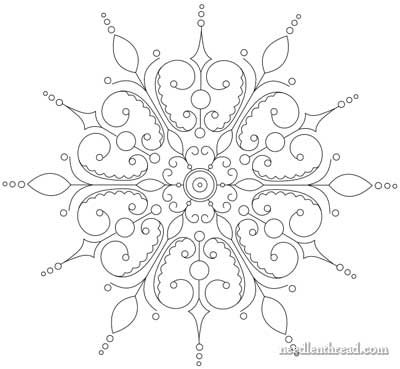
The image above was my “first arrival” at something that I thought was not too bad.
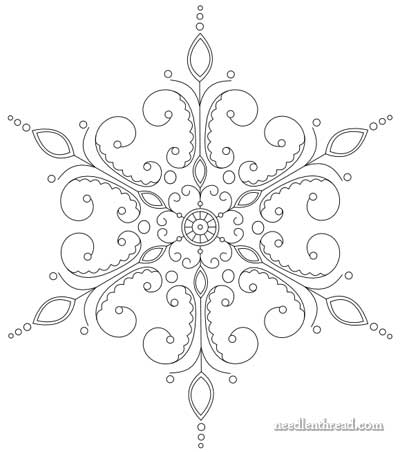
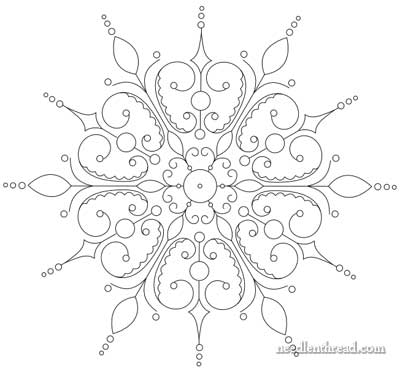
But I wanted a little more filigree. So I added the scallops inside the large curls that make up the main arms of the snowflake. I took off the little “sticks” in between the main arms of the design, thinking that it might be too much.
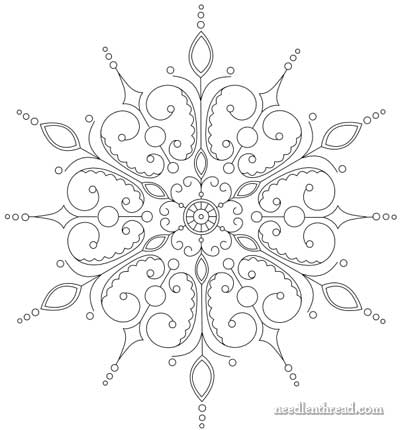
But then I put the sticks back. I like it better with them.
The “marquis” shapes on the main arms of the snow flake – those are the pointed pillow shapes – will be filled. To balance out that filling, I thought a filled area on the little extra sticks between the main arms might be a good addition, so I added an open space on those little in-between sticks.
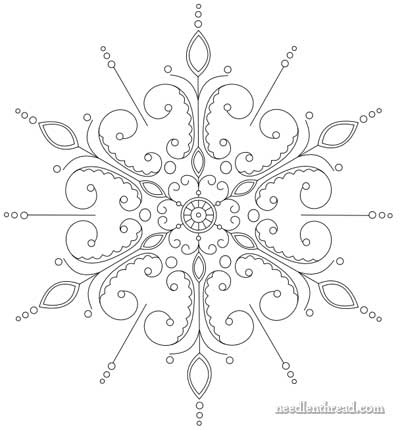
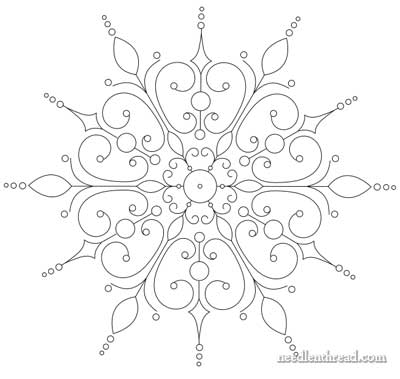
What the heck! Might as well add another large dot, to fill the area between the large curls on the main arms and to end the little in-between sticks.
In fact, to add another whole “arm” element between the curls on the main arms might be an ok idea, so I extended the stick on the in-between arms to join the circles.
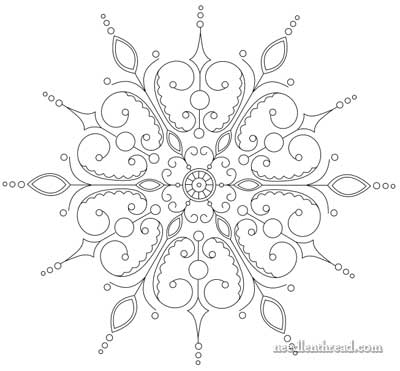
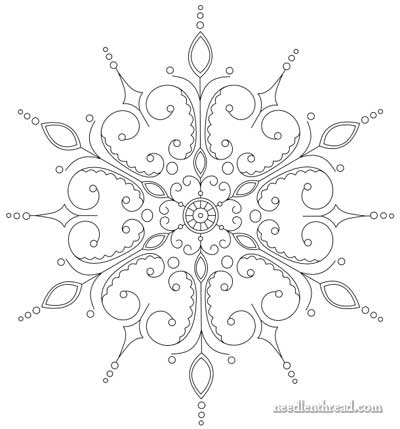
Can you see any difference in the design between these last two images? At this point, I decided to turn the design by 1/6th. It flattens the snowflake a little bit, but now the central vertical “axis” is gone, and I think that makes the design look a little more interesting.
The image immediately above will be my “reference” image, but in fact, it’s way too busy as it is to work as a pattern transfer – too many small elements that won’t transfer well.
So now, the design needs to devolve.
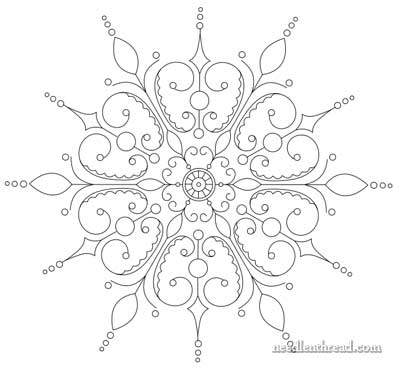
First thing to go: all the double lines in the areas that can be filled. The double lines, in my mind, are where I will outline around a solid filled are. But this doesn’t really need to be indicated on the pattern. I can figure that out as I go.
The very center of the snowflake had a “spoked” area, which I planned to achieve with a certain stitch. But I don’t need the spokes drawn there, and when it comes to transferring the design, they’ll just add confusion. So they’re gone.
Come to think of it, I don’t need the double line in the center, either, so it’s gone, too.
I like the scallops inside the larger swirls – but I won’t need them as part of the pattern itself. I can eyeball those, using a reference image.
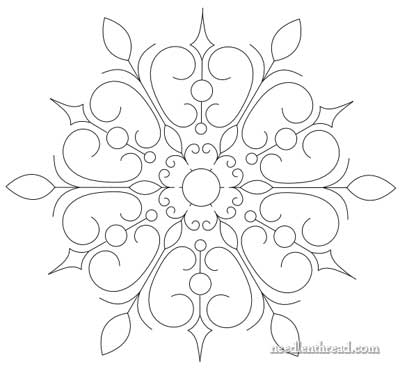
And finally, the last thing I don’t need are all the circles that indicate the placement of spangles and beads. Again, that’s something I can figure out by referencing the complete pattern, or I could just make a tiny dot on the pattern to mark where a bead or spangle will center.
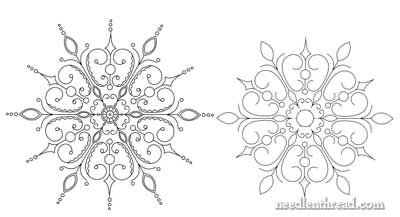
So now we’re down to the bare bones. On the left is the “reference” image that I’ll use as I stitch. On the right is the transfer design.
Removing all the little details in order to create a clear transfer design is especially necessary for this little guy, because, at its widest point, the snowflake will only span about 4 inches. Relatively small, but not itsy bitsy.
So, that’s how my snowflake evolved and then devolved. Next step: transfer! I’ll let you know how it goes!
What a wonderful pattern! I can’t imagine You’re drawing it without a ruler or compass (cyrkiel)!
When I want to draw a circle I need compass or a plate.
Design is amazing, it’s co lacy and elegant. I don’t like Christmas pattern, but it’s rather winter than Xmas.
This is interesting, seeing your process — but I wonder what tools you use for the drawing? What software?
Very interesting. It is very elaborate and pretty. The most ornate one could be recycled as a colorful mandala embroidery motif. This is a nice-looking project;can’t wait to see the progression. Thanks for the tutorial.
Thank you for showing your design process, not only in adding to the snowflake, but in showing what you took away for your transfer, and why.
Also thanks for making a 6 pointed snowflake, it’s one of life’s little irritations to see so many done with 8 points. I know – it’s easier for counted work, but still so wrong!
OMG Mary–
Don’t you EVER say you’re not a designer!! What you can do is awesome. The snowflake is simply beautiful (although it is not at all simple). I look forward to seeing pix of it in progress. Happy Thanksgiving to you.
Dawn
It’s an amazing process you’ve gone through – thanks for explaining the ‘why’ of each step. I’m looking forward to seeing the stitching evolve too.
Gorgeous design! I can’t wait to see how you stitch it.
Its beautiful. For more inspiration on snowflakes consider one of Ken Libbrecht’s books featuring snowflake photography. They are just full of beautiful photographs of snowflakes.
Gorgeous design, Mary! I love the stitching notes, and think it’s going to be quite pretty all worked up. Looking forward to seeing how it turns out. Seeing your final product, and then the simplified transfer version is quite helpful. Thank you.
“I don’t know how real designers do it…” What?! Really? I’m curious, and also slightly astonished, and so I must affirm this for you. Repeat after me, 3 times: “I *am* a designer…” Please get up every morning and say it to yourself first thing when you wake up from now until New Years.
You just designed. You have been dabbling in designing for quite a while now, but this is a solid portfolio piece. If you mean someone sitting around in an office being paid to think up a design, then you just followed the exact same process. Come up with an idea, continue pushing it, and massaging it, and tinkering with it, then look at it, analyze what bits work for your final product, start editing it so that it will function as it is meant to without getting married to the elements that you love but don’t work, and then start production.
Perhaps the only difference is that you are currently being paid to do something else. Just stick a big *and* on your self description. Teacher, Artist, Embroiderer, Writer, Photographer, *and* Designer! 🙂 You are doing all those things, aren’t you? The days of our one size fits all job descriptions are so 1980’s. *wink*.
Own your fabulous designing self, you great designer, you. * grin* I really like your snowflake. It’s very elegant.
Have a very Happy Thanksgiving!
Wow, Mary, so beautiful!
Now I have a dilemma, Mary! How does one wolf whistle with words?!
Oh, by the way, you ARE a “real designer”.
I second Sarah Bruce’s request.
Mary,
Thank you for sharing. I found the process very insightful. The snowflake is lovely!
Have a nice holiday,
Oh, great, thinks I, a snowflake pattern – maybe I will be able to ‘borrow’ it for my own blue-and-silver creation. But it soon became evident that Mary’s ‘small’ (albeit beautiful)is not synonymous with mine. For me a small pattern would be about an inch and a half in diameter, just right for my cq stocking. C’est la vie, I shall just have to design my own with a little reference to the magic of Mary I think.
I found this an INCREDIBLY interesting post and really appreciate the time you took to write out your thought process. I’ll echo some of the other comments written here – how did you create these designs? What software did you use?
Many thanks,
and Happy Thanksgiving,
arlene in NJ
Very interesting Mary ! Thanks a lot for sharing this process with us.
Have a nice day,
Hi, All!
Thanks very much for your comments on the snowflake. Sorry about the delay in response to questions, but here goes:
The first “hardware” I use to draw something like this is pencil, pen and paper, in a sketch book. I don’t take my doodling too seriously, but I do like to doodle things out in a sketch book. Next, I convert the concept into digital form using any variety of software types. I generally start in photoshop, working with the scanned image, and then I import the resulting gif either into Illustrator or Inkscape. Inkscape is a free vector drawing software. I like both, depending on what I want to do.
Sheila – thanks for your encouraging and enthusiastic comment! I suppose I was thinking in terms of people-who-do-this-professionally-for-a-job. I’d call myself a “doodler” more than anything else. I can never take myself very seriously when it comes to any kind of drawing! Although – I have to admit – my forte is the stick figure, and I do the stick figure pretty darned well! 🙂
Gail – oh yes, I’m with you on the 6 vs 8 point thing!
Margaret – thanks for the suggestion of Ken Libbrecht’s books. I love his books! Who would have ever thought that such a tiny thing as a snowflake could generate so much study?!
Well, I hope to make some progress on the snowflake this weekend – at least a few stitches, anyway!
~MC
I love these very much thank you! I am still following you! Thanks what beautiful snow flakes!
With my frequent tiny strokes, no longer able to get started on things easily, so need a jump start. So on my “good” weeks (like now) one of my tasks has been to find rather plain simple designs that I can print on full sheet of paper, to fill in with doodles, then color on my “bad” weeks (immediately after event, when unable to write, read, or watch film). This looks like a wonderful design for that purpose.
As a Dementia Mentor, and also looking at presenting on Compensation Strategies in July 2017, would like your permission to use this drawing in my demonstration of this strategy for arts/crafts projects at this stage of cognitive progression. Thank you,
Truthful L. Kindness (yes; that is my name)
Hi, Tru – thanks for your interest in this design, and I’m glad it can bring some enjoyment to you. You’re welcome to use it in your demonstration, as long as you credit the source. Thanks!
Happy fall
,Mary!
Thank thank you for all of your wisdom!
Please let me know what size compass you use what brand and a resource to purchase one? I’m not sure of the size etc. thank you so much, Linda
Hi, Linda – if you mean a compass for drawing circles when playing around with designs, I just use a regular compass that you’d find in the drawing or drafting section of an art or hobby store. Staedtler makes a good one, but they tend to be a little pricier.
Hi, Mary. Is this pattern available to download anywhere?
Hi, Leanne – no, I don’t have a PDF available for download for this particular pattern. I’ll see if I can get one up one of these days!
Beautiful! May I use for painting?
Of course you can! As long as long as it’s for personal use, you can use it for any type of arts and crafts medium.