Time for a Medallion Project update! I’m almost half-way finished with the M on the central monogram, and I’m absolutely itching to get to the finish line on this part of the project.
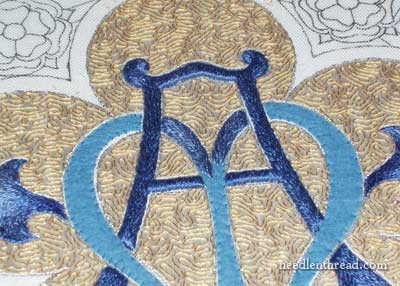
Beginning at the center top part of the M where the center column is split in two lines that meet the A, I embroidered both sides of the split and brought them down to the center column, and continued straight down the center column from there.
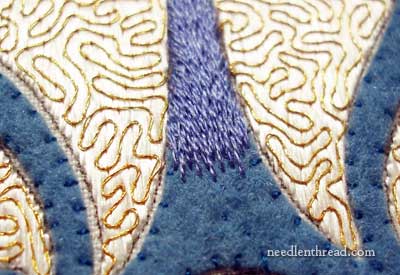
You can see that the long & short stitching really does follow that whole concept of long & short stitches, but not rigidly. If you look closely at this photo, especially right above the end of the stitching there, you can see that the side stitches are slanted into the middle, too. That’s the best way I found of really covering up the sides of the felt and rounding off the raises area.
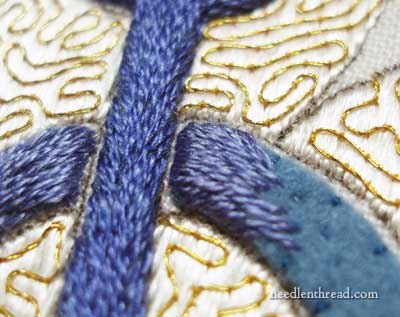
Perhaps that’s a little more visible in this shot – see the area on the lower part of the felt that’s in process” The stitches are obviously worked on a slant towards the middle of the felt. But the stitches in the center section are more or less kept straight, following the path of the felt. All the stitches work into each other quite well and provide good coverage.
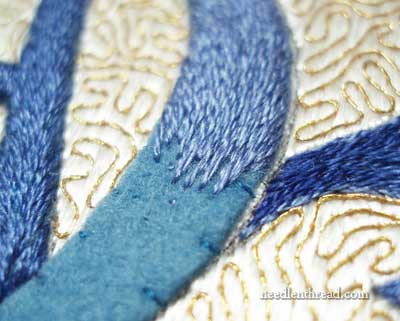
Working down the outer right side of the M took a little longer than any other parts of the letters, because the design is quite wide there and requires twice as many stitches.
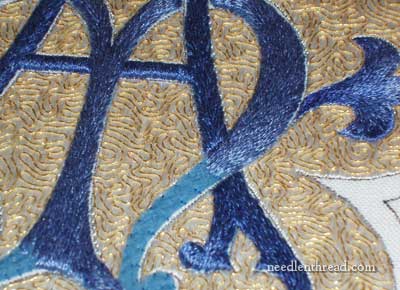
From farther away, this is a zoomed shot that shows better the gold and the silk together.
Just a bit more on the right leg of the M, and then the whole left leg, and this part will be finished! Next time we visit this project, that’s where I’ll be! (We could place bets on that, I suppose…)
If you’re interested in following this project from its shaky beginnings, feel free to check out the Medallion Project Index, where all the articles relating to the Medallion Project are listed in order.
And of course, if you have any questions, comments, suggestion – feel free to leave a comment below!
Tomorrow, I’m giving away a book, so keep an eye out for that!


Mary –
I don’t know how you do it! You manage to not only achieve prodigious amounts of stitching daily, but you also take the time to photograph your work (beautifully!) and to generously share your progress with all of us. You are truly an inspiration! Thank you.
Karen
It is looking beautiful! I am amazed that the background looks white and gold in the closeup, but when the camera backs up, it is definitely gold. Awesome!!!
Lovely work! How will you erase the design transfer lines when you are finished stitching?
Hi, Donna – the transfer lines will be completely covered, so no need to erase them. They’re permanent! (but no one will ever know…) ~MC
I can’t get over how the padding makes the long and short stitch just look that much more elegant. Lovely!!
I’m still stuck on the beauty of the white flat silk. Ahhh…
Hi Mary,
Thanks for the closeups of this lovely work. I had just a bit of trouble understanding your description of how you stitched the sides of the felt but this explained it beautifully. I’m looking forward to the next section.
I just love your photos and progress reports. Such beautiful work. I have a bunch of questions on the whole thing so I’ll have to go back and look at the archives. You do some fine stitching, lady!
Your work is amazing. I am following your progress on the medallion project. I never knew how much went into the vestments.
When I was interned in a Catholic School, one day I was called to accompany a nun to the church to retrieve something for her to be repaired
She was bringing back some long white lacy gowns. While she was looking over and pinning the areas of torn lace, I was touching the embroidery and beautiful work of the long cape.Being so young, I never gave it another thought, too young to know, but appreciate it.
I admire your work and patience, but we embroiderers have what works in our favor for our daily life, patience, that other who do not do have it,envy.
Hi Mary,
It’s been hard work, but the felt under the letters “makes” the design.
Just a question (or a few questions:) that maybe you might comment on at some point. How much input does the vestment maker have with your design? Do you give them updates, or do you just come up with the basic idea, and run the proposed colors, designs, etc by them, and then get an Ok to run with the project. Do you provide them with updates, or suggested changes like with adding the felt, etc? Do you do the actual attaching of the finished work to the ground fabric, and then the vestment makers does the finishing of the chausable? If you at some point (future post?) share with your readers, that might be appreciated.
It’s beautiful!
Hi Mary,
Your photos made the stitching come to life for me. I can really see and UNDERSTAND what I’m supposed to do for success! Thanks!
I hope you can hear the cheering from the sidelines as you race toward the finish line! It looks beautiful.
Do you work the short and long stitches with one or more than one needle at a time?
I do hope this won’t be taken as heresy, but I would really like this to stop with the blue, that is, no Tudor roses. I just adore this colour scheme, from which you may infer that blue is my favourite colour and you’d be right – and then to pair it with gold and white, well that is heaven on a stick.
It is beeeautiful, Mary, she said in hushed tones.
Mary, your work is beautiful. Thank-you for sharing all the hints. You inspire me.
We know that this is a commissioned piece. i’m not asking how much you are charging to do this piece but I would like an explanation as to how you price a commissioned piece. we all know that there is really no fee that reflects actual hours and an hourly rate….when i sold stained glass i made about a $1.00 per hour and sometimes not even that much…lol….we love the work but have to sell to support our hobby….lol for example any kind of leaded beveled window was priced at $100 per square foot (this was about 10 years ago, i’m sure it’s gone up by now) tiffany style foiled pieces were charged out at $1.00 per piece of glass cut, i.e if a lampshade had 150 pieces of glass the price was $150 for the shade.
what criteria do you use to figure out how much to charge for hand stitched piece?
Hi, Sharyn – it depends on the type of embroidery, the cost of materials, and the amount of time involved. I generally estimate the time involved, multiply that by an hourly rate based on the type of embroidery, and then figure in the cost of materials.~MC
Mary, In your close ups, there is a small gap where the 2 letters cross – Can you explain about that? Will it be left like that? Is there going to be a outline stich around each letter? Just how is ther gap address and if left open, then why?
Your work is wonderful and so inspirational to those of us just starting out. I had assumed you had stiched all your life and was amazed and enouraged when I read your bio. Maybe there is hope for me too someday.
Hi, Susan – I’m outlining the letters in a little ticker gold thread, so I left space for the gold…!
Mary, I am a history buff I just love old embroidery this book would be wonderful to have. Thanks for all the book reviews you do it because of your reviews I have started a list wish of the books I want.
Mary–It’s stunning! Church embroidery covers a wide range of colors, so I was wondering how the colors & contrast were chosen for this commission. Was “Chartres blue” on your mind when you & your client selected the colorway? It’s certainly an iconic source of inspiration!