


Yesterday, nary a stitch was stitched on the Medallion Project! So much for the Weekly Deadline! What does this mean? Simply that next week, I’m going to have to double-time it. I suppose we shall see what happens!
In the meantime, here’s the update, and some answers to some questions that have arisen:

We have two fleurs de lis now. Anybody else get the sense that this thing looks like it’s fixin’ to fly away? Or is it just me?
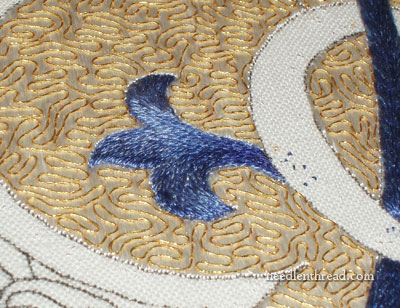
Soie d’Alger makes a beautiful long & short stitch for shading. It’s a stranded silk much like, say, DMC stranded cotton – only it’s silk, so it has a wonderful lustrous sheen and it is slightly softer, so it blends beautifully. It’s my favorite thread for shading.
The little speckles in the white part of the monogram are my anchor threads. By using a waste knot on the top of the fabric, and then stitching a few tiny stab stitches and cutting the waste knot away, I can start and end a thread from the top of the fabric without having to turn the frame over. These little speckles will be covered up. And the thread is perfectly secure. It’s the best way I know of for starting and ending a thread, as long you can do it in an area where the thread can be covered.
You can even use this method of starting and ending threads on a line, as the photo tutorial in that link will show you, as long your subsequent line of stitches can cover up the thread. So if you’re ever troubled about how to invisibly start a thread securely, even on projects like flour sack towels, this is the best way to do it. It holds up to laundering (not that the Medallion will be laundered), it keeps the threads secure, and it’s a nice, invisible way to start and end threads.
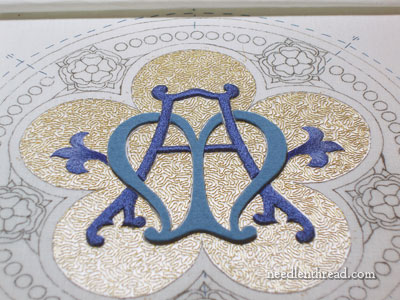
The felt for the M part of the monogram is laid on, ready to tack down. I actually did finish that part, but I forgot to take a photo! You get the sense of what the overall monogram will look like on the gold background, but the blue of the felt is somewhat off color. The M will be slightly lighter than the A.
In stitching over the felt on this project, I’ve learned a few things.
First, it’s not so easy to stitch this densely through the cotton backing, the linen ground, and the thick wool felt. It’s not impossible, but it is certainly more difficult than simply stitching through a single layer of fabric.
Second, I learned that, to cover the felt sufficiently, especially over the sides of the felt, it is helpful to stitch the sides first, at an angle pointing down and towards the middle of the felt-covered area, using somewhat long stitches, and then to go back and work the long & short stitching into those side stitches. This ensures that the sides of the felt are sufficiently covered, without any noticeable gaps. It also creates a nice rounded edge to the embroidered area.
Third, the felt provides extremely good, consistent “lift” to the stitched area, but it requires the tension on the stitching to be kept consistent. If I break for a bit and return to stitching and get out of the rhythm of stitching, I find I have to be careful to make sure my tension matches the previously stitched area. Whereas this might not be as noticeable on the plain ground fabric (but it’s still important, no matter what fabric you’re working on!), the felt provides a soft bed in which the stitches sink somewhat, so if a new set of stitches is slightly tighter than the previous set, I find that the felt dents in. I’ve been careful to avoid that, but I always have to double check to make sure it isn’t happening.
So, there we are! We shall see what next week brings – keep your fingers crossed for me, ok?
If you’d like to follow along with this project from start to finish, feel free to visit the main page for the Medallion Project, where all the articles in this series are listed.
Questions, comments, suggestions? Feel free to leave a comment below!
If you’d like access to all the tips and techniques discussed in the Medallion Project, including complete step-by-step coverage of the Tudor-Style Rose, conveniently collected in one document, interlinked, referenced, and indexed, why not add the Marian Medallion Project e-book to your library? It’s packed full of all kinds of embroidery tips for undertaking a project like this, all in a convenient electronic format for easy searching.
Perhaps you should see if a thimble will make it easier to stitch through the felt – balance the awkwardness of using a thimble when you’re not used to it versus the relief of not stabbing your fingers/thumbs! Janet.
We’ll keep cheering you on, Mary! Good job. can’t wait to see the M finished, and to see what you choose for the gold thread to outline the letters with.
Then it will be interesting to see how you do the rest of the design! Best of luck this week!
That’s just beautiful!
What are the little stitches in the empty M on the close-up? Cut threads or are you tying off a thread?
It’s beautiful, Mary. I think the flying away effect will lessen with the lighter M and the tudor roses. This is really a fine piece. I don’t mean like, “That’s just fine.” I mean fine like “fine china”.
Mary, you are so wonderful with sharing such detailed tips. It really makes learning new techniques so much easier! And the project is turning out beautifully.
I have to agree. It does look like it’s going to fly away. Perhaps, if the fleur de lis’ were done in the same blues as the M it might not be as noticeable but I’m not sure if that would really help.
I think the trouble stems from the fact that the fleur de lis’ just seem to sprout out from nowhere. The have stems but they aren’t grounded anywhere.
I would appreciate you creating a video showing the starting and ending thread on a line that was written about today.
Looking great! Yeah, maybe a little bit as though it’s about to fly away, but still great! 🙂 You’re doing better than me, even if you didn’t get any done yesterday. I just got round to buying the interfacing to put on the felt to cut out for a goldwork project I’ve been planning to start for the last couple of weeks!
Have got my Millennium frame now. Fantastic!! Thanks for the review, which decided me on getting it.
Hi Mary:
I had to laugh ar your reference to the “A” and “M”, which of course are the Greek symbols for Alpha and Omega and used extensively in ecclestical cloths.
Karen
What a wonderful work, thanks a lot for sharing it with us Mary,
Have e nice week-end
Oh Mary how I wish I could embroider the way you can, I envy you so much. I will keep watching and practicing however. I did’nt start to embroider until I was 48 years old as my high school teacher told me I was useless, but I have proved her wrong Thank you so much for your inspiration. Joy
Mary, rather than looking as though it is “fixin’ to fly away” I think that once the M is embroidered, the combination of the fleur de lis with the legs of the A will remind me most of the fantastic creatures so beautifully painted as initial letters in illuminated manuscripts. I think you have done better than you know.
Cheers — Phyllis
BTW my copy of The Right Handed Embroiderer has arrived and oh my gosh! The BEST stitch dictionary I have ever seen and the only one I’ll ever need. I’m going to sell my other two at our guild’s white elephant table next month.
HuMMMMMing along beautifully with soaring fleur de lis. Is this really ten minutes a day? Definitely more next week as the beautiful simpliciy (means hard work behind) evolves. The ‘M’or the Omega can hardly wait,hope you have working at long stretches for that rhythm.
Fly? This piece is going to soar! I can ‘see’ it already with the roses…Thank you so much for letting us peek over your cyber shoulder and perhaps learn how to take off and wing it ourselves. Or at the very least, see how it is done.
It is simply beautiful, discreet. leads to the essential.
Mary, I am watching your progress and your skill and perfection in stitching is beyond words!
Karen – I am not sure what the A M stands for here (is it Latin, Greek?) but you said A M in Greek is Alpha and Omega. That is incorrect, A in Greek is the Alpha, the beginning of their alphabet and the Omega is the last letter of their alphabet (not M). Just sayin’….
Hi, Robin – this is a Marian symbol, and there are a couple ways to ‘translate’ it – it can be AM for Ave Maria, and also an entwined two letters, that you can actually ‘trace’ out the word Maria in. With this particular monogram, the former makes more sense, as there is no clear “R” in the entwined letters. ~MC
OK,now it makes sense! Marian symbol meaning a symbol relating to “Mary” in the Catholic church. I was just curious as to its meaning. Your work is so stunning – thank you for sharing your gift with all of us through your website!