


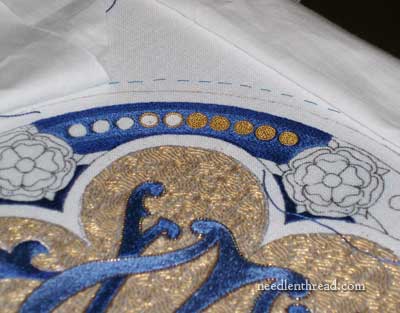
Approaching the gold dots on the outer edge of the Medallion design, I decided that they should tie in with the center goldwork area on the Tudor-style roses that surround the Medallion. The center of the dots, then, should be filled with a goldwork embroidery technique called chipping or chip work. This involves cutting up tiny bits of check purl and sewing the bits down by taking the needle and thread through them and sewing them down like beads, in a random fashion, until the area is filled up.
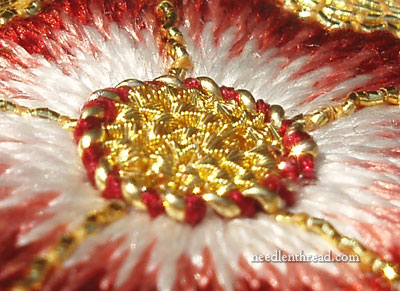
You can see this goldwork technique worked in the photo above, which is a close-up of the center of the Tudor-style rose.
Using the same gold thread, which is a #10 (very small!) bright check purl, I started working on the dots. Remember that the dots are quite small – about 5/16″ in diameter (just over a quarter inch) – so the real metal thread used to do the chip work would have to be pretty small, too. #10 bright check purl is quite small. I had to use a #12 crewel needle to fit through the center of the purl. Nothing else would work, though I did try a #15 beading needle, which duly snapped after a few stitches. I foraged about for my reserve of #12 crewel needles, and found them – four lonely needles wrapped in a tiny bit of tissue paper and tucked into a tiny envelope. I made a note to order more!
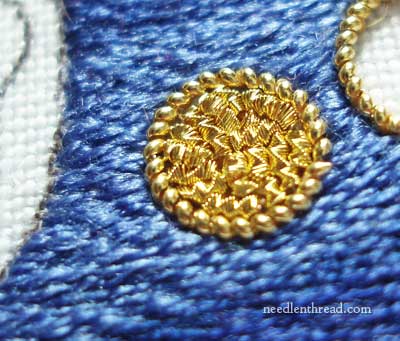
I tend to crowd the chips into their space, always afraid that the fabric will show through. Keep in mind, I’m not padding this area with felt (thank goodness – cutting out 50 tiny felt circles and sewing them all down is the last thing I want to do at this point!), so without the yellow felt behind the gold chips, there’s more of a chance of the noticeable white ground fabric peeping through. Or so I thought. Actually, looks can be deceiving. Because the area is so small, any bit of white that does show through is teeny. While they might be visible in close-up shots with the camera, they are practically undetectable otherwise.
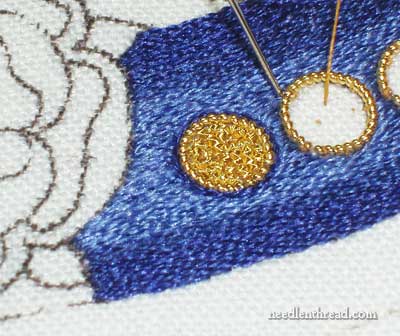
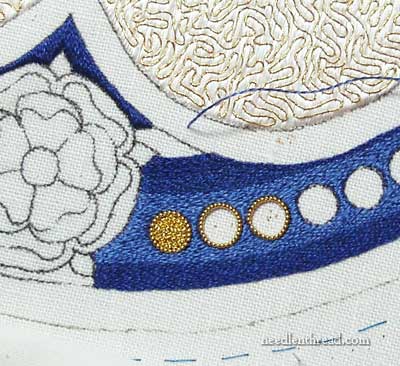
Adding a stem stitch outline in the darkest blue around the outside of the dot gives it a little further definition, and it keeps the dot from looking too flat.
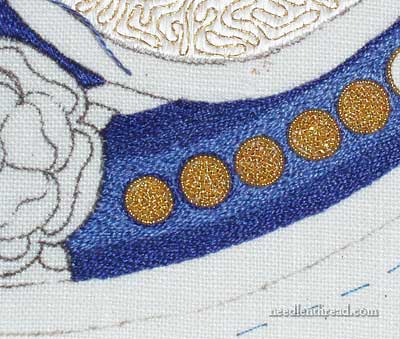
You can see the difference here between the dots with the blue outline and those without it.
And, finally, from a different angle, so you can see the golds and blues working together…
As I work through the rest of the dots around the outline, I’ll try to put together some step-by-step tutorials on using the pearl purl around the outer ring, and cutting and filling with the chips of bright check purl.
If you’d like to follow along with this project from its beginnings until now, I’ve got all the articles relating to it organized under the Medallion Project Index. Feel free to read the back story and follow the work involved in getting the project underway!
If you’d like access to all the tips and techniques discussed in the Medallion Project, including complete step-by-step coverage of the Tudor-Style Rose, conveniently collected in one document, interlinked, referenced, and indexed, why not add the Marian Medallion Project e-book to your library? It’s packed full of all kinds of embroidery tips for undertaking a project like this, all in a convenient electronic format for easy searching.
That blue stemstich outline really lifts them! It’s looking great. Will you be happy to see it done or sorry to see it go? 🙂
LOL! It’ll be a while still before it “goes,” Anne… at which time, I have a feeling I’ll be gloriously happy! I have several large projects / plans looming that I want to get to, but I can’t do anything else until this piece is finished. Hopefully, in less than a month, I’ll be there! MC
Stunning! Thanks for sharing.
I like chipping. It is fun to do (once all of the tiny bits have been cut) and it looks great. Your dots are going to be really sparkly. Love it!
That’s marvelous looking!
Mary it is stunning!!!
What a great idea to add the darker blue around the edge of the dots…it really does set them off nicely.
Stunning. The work you do is way beyond anything I ever hope to do, but I love watching this project evolve. It fascinates me to read about the process and your thinking as you complete each section. I hope you print out all your posts when the project is done and preserve them in some form other than just digital. It makes me long to read the minds of women from centuries ago and what they thought about as they worked.
G’day there Mary, I am in awe of your embroidery here, more than ever. Also the dark blue around the dots, I’m glad you pointed that out. The difference it makes is certainly significant.
Thank you Mary. Cheers, Kath.
This looks beautiful, Mary. The darker blue around the gold dot gives it such depth, especially in contrast with the brightness of the gold. I look forward to seeing the whole piece.
I love watching the progress of your work. It’s especially fun when I realize how blown up the pictures are. I can’t even imagine working that small. Maybe with the help of an electron microscope . I know this work is commissioned – although it’s hard to imagine it being for anyone less than the pope. I would find it very hard to let go after you put so much of yourself into it.
Thanks so much for letting us share the journey
Cynthia
Beautiful! The outer circle in dark blue is a great idea .
Please don’t go mad doing all of these dots! 🙂
wow, that is just so beautiful. I also love seeing the graduated blues finished around the dots.
It’s looking gorgeous!I love the gold dots and the blue outline is looking great.Thanks for sharing.
Aww that´s so sweet!
My, my this is so beautiful. Jana
I couldn’t tell from the photos but how does it match up to the plate area? I think it is beautiful using the gold chips in the circles. Everything has a mild shimmer to it and looks so rich.
It looks really beautiful!
I find the last picture very nice, but also interesting, since you can see that your eyes play tricks on you.
When you look from left to right at the blue circle with the dots, the first thing you see is dark blue with lighter blue and white dots. The more you go to the right the more the colors will seem to blend and at the last two dots you almost see a three dimentional ring with golden “circles” in/on it.
The project it stunning! The gradation of the blues is striking up close, but so subtle from a distance.
Just curious what stitch was used for the small “V” above each Tudor Rose. Is that a satin stitch in the darkest blue?
Anxiously waiting for the next aaaahhh moment on this project which is every post!
This is a gorgeous technique. I have been following your adventures in goldwork and have been really inspired. Soon I will need to purchase some of these gorgeous threads and start creating.
I’ve really been enjoying peeking over your shoulder as you have being doing this gold work project. The process is fascinating.
this piece is sooooo beautiful. can hardly wait for more pictures. ms.b
Dear Mary
It looks beautiful I think it was a good idea to change to all gold it looks outstanding.
Regards Anita Simmance
I’ve been watching the progress of this piece, and it just looks better and better as time goes by. You can already tell that it will be gorgeous in the end. I’m learning so much from watching what you’re doing, and reading the reasons for your choices. Thank you for blogging about this!
Mary, it’s so gorgeous. I think I could die happy if I’d left behind something so beautifully right.
Wow, this is so beautiful. I love all of your choices!
It is simply gorgeous!