


When I played with the detached chain stitch and the ribbed spider web stitch a couple weeks ago, to create the Chain Stitch Spider Daisy, a reader wrote and asked if there was a way to make the flower domed rather than flat.
So today, for Stitch Play, let’s look at the Raised Spider Daisy! Now, the concepts involved in creating this domed spider daisy are found in other raised stitches (for example, in raised satin stitch dots), so you can actually apply these concepts to creating all kinds of domed elements in your embroidery.
This is what we’re going to create in today’s Stitch Play:
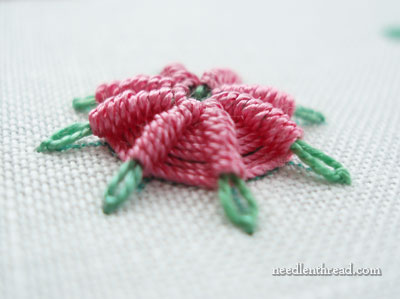
You might think it looks just like the Spider Daisy we created a couple weeks ago, right? Well, read on… and below you’ll see the comparison photos!
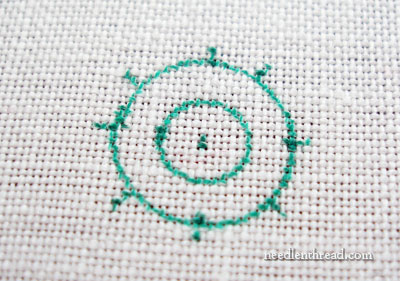
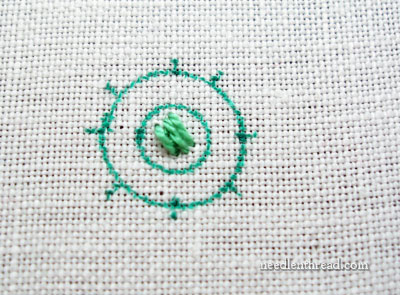
Whenever building the padding area for a circular stitch, you might want to start with concentric circles drawn on the fabric, because it helps to keep the “dome” that we’re going to build in the center right in the middle, so that the raised effect is evenly distributed. You don’t have to draw circles on your fabric for this – you could eyeball it. But for this demonstration, we’ll start with circles on the fabric.
I’m going to start the whole process with a waste knot and anchor stitches. I’ve covered this technique before in other little tutorials here on Needle ‘n Thread, but for those who are seeing it for the first time, it’s a good lesson on starting your thread in hand embroidery without leaving a knot on the back of the fabric, and without having to turn over your work.
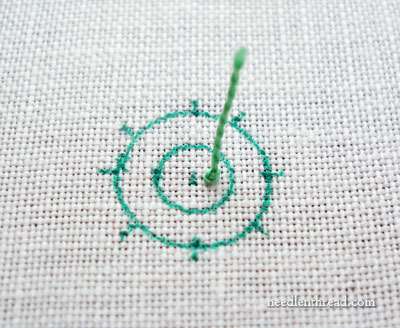
So, in the middle of the center dot, I’ve taken my thread down into the fabric and left the knot on the top of the fabric.
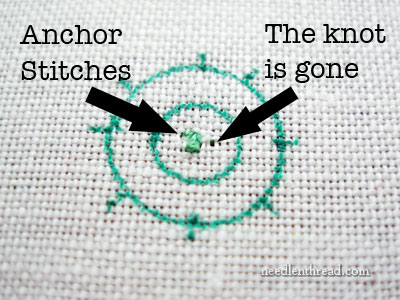
Then, in the same center area, I’ve taken three tiny stab stitches right close to each other. These anchor stitches will hold the thread securely, and they will be covered by subsequent stitching. Any time you can cover anchor stitches with your embroidery (you can even start your embroidery thread with anchor stitches on a line), this is a great way to begin a thread. Notice that the knot is gone – I pulled up on the tail and cut the thread right next to the fabric to remove the knot. And my thread is perfectly secure.
Now it’s time to build up our dome.
I started with three straight stitches in the middle of the center circle. Take a straight stitch and come up for the second straight stitch right next to where you went down with the first one. This way, you’re not building up a dome on the back of your fabric, too.
Then make another layer of straight stitches over the first layer, working this next layer perpendicular to the previous layer.
At first, you’ll only need three or four stitches on each layer, but as the dome grows, you’ll need a few more to cover each layer. Keep building the dome by working these each layer perpendicular to the one before.
Notice that, on this particular piece, I’m not working the stitches close together like satin stitches. If we were making a satin stitch dot, I’d probably work these padding stitches a little closer, but since we will need to pierce the center of this dome and stitch through it, I’m keeping these padding stitches a bit more loosely spaced.
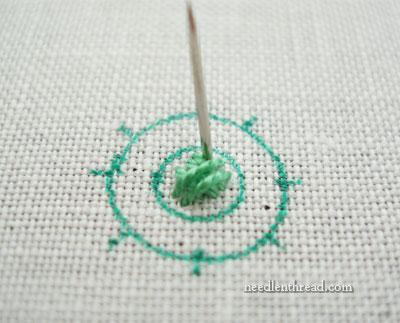
You can see how high our padded dome is. Now it’s time to work the spider daisy over the dome.
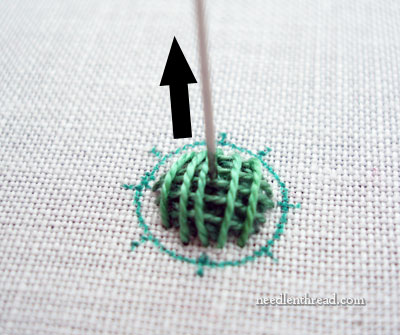
Bring your needle up into the middle of the dome, and work your “spokes” in detached chain, just as we did for the foundation of the original spider daisy, only now each chain stitch is starting in the middle of this raised dome.
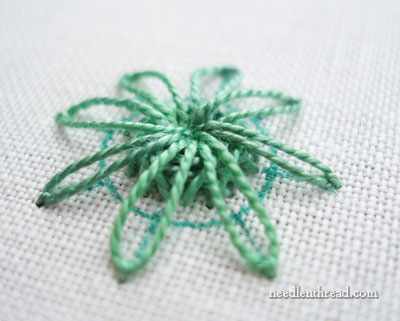
Here are my spokes in detached chain stitch. They are long – stretching out well over the dome – and they are a little loose. I didn’t pull them as tight as I would if I were just stitching a flat daisy with detached chain stitch. I want to give them room to move down over the dome.
The circle that’s still visible is the perimeter of my ribbed spider web stitch. This is as far as I will take the ribbed spider web, so that the tips of the detached chain are still visible beyond the ribbed spider web.
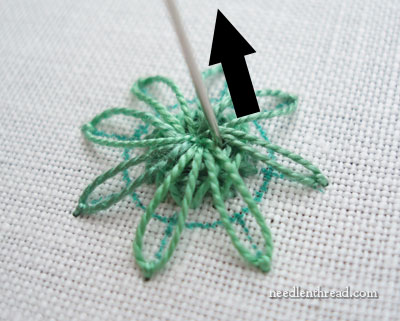
Thread your needle with the color you want to use for the ribbed spider web. For this demonstration, I used pink buttonhole silk again. Bring the needle up between two petals of detached chain stitch, close to the center.
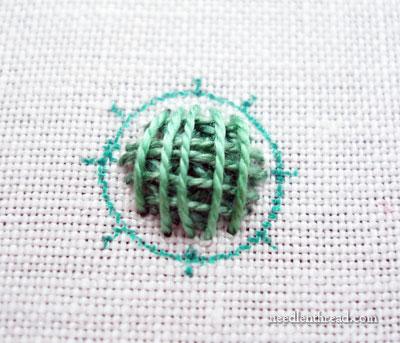
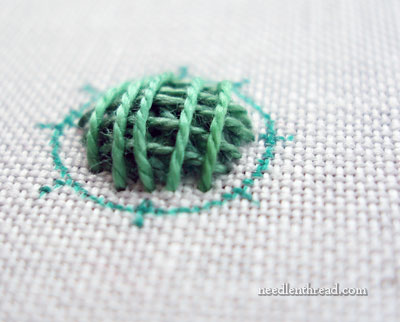
And then go ahead and work the ribbed spider web stitch over the petals and dome, just like we did in the original spider daisy. You’ll pass under the petals, but not into the dome stitches.
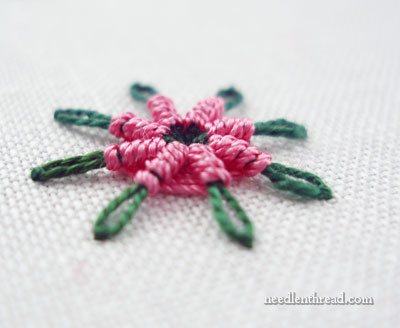
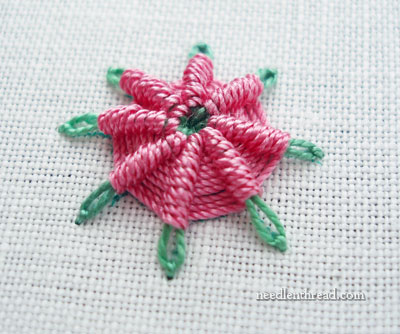
The original spider daisy…
… and the raised one.
Again, the concept of building up a dome of padding underneath a stitched element can be applied to all kinds of other stitch techniques. The domed padding doesn’t have to be circular – it can be built up in any shape. Imagine, for example, a beehive made from bullion knots. If you want the beehive to stand up from the fabric, just build up your padding stitches in the same way, working the padding in layers higher and higher, until the area you want to cover is raised up as much as you want it raised. Maybe I’ll show you a beehive worked in this technique one of these days!
Stitch Play is a relatively new series here on Needle ‘n Thread. If you have any requests for Stitch Play, just leave a comment below or drop me a line, and I’ll try to drum up something for you!
Beautiful – This would be a unique embellishment for a crazy quilt block.
I love this raised spider web, I just included it in my sampler with a bead in the centre…looks great. By the way…your photos are incredible. It’s easy to see exactly how to do the stitch.
I am loving stitch play!!
Hi Mary,
This Raised Spider Daisy is beautiful, I would
not thought this out by myself.
Mary can you perhaps show us to make a object filled with buttonhole stitch scallops?
I agree with Helen your photography is just as good as your stitching!
Hi Mary,
Nice tutorial! I was wondering how one decides whether to pad with wool felt or layers of straight stitches. Is it just a matter of how large an area needs to be padded, or is there a difference in finished product?
As always, thanks for focussing on the details.
Cheers,
Jen
Just a note to say I LOVE your daily tutorials and commentary. I’m going to miss seeing the progress on the blue and gold medallion, but I understand that you don’t want to keep repeating yourself! It’s just such beautiful work. I don’t have much time to do hand work, but I love reading your blog. It’s the only thing I read EVERY day!
Beautiful! Nice tutorial,thank you Mary.
Thank You..Thank You for this wonderful demo. I cannot wait to get home from work to try this little project.
I just want to thank you for this daily newsletter and the “how-tos”. I did embroidery many years ago & loved it. Now I am painting and have begun to try a “new” idea of adding the 3D with embroidery. This is SO helpful to read and learn. I have nothing yet of the new idea on my website- it is all paintings yet, but if I can get it right I will be adding it to my “repertoire” of artwork. Again, I just want to say a HUGE thank you for all your help and giving of information. BTW- your work is absolutely stunning.
I should have also mentioned- I do alot of miniature paintings and my first piece is mini. I am using padding, but now I will try this stitched padding idea on the next one- it may work much better on pieces that are so small. I had thought of doing stitched padding but was uncertain how to go about it- this will give me a “starting point” even if I’m not doing this exact stitch. You are giving me TOOLS. 🙂
Thank you Mary for the photos. This web site is helping me to do some wonderful things, and your instructions are great. Thanks!!
You can also use a bead to raise the center of a spider web daisy (Mill Hill Pebble Beads work well because of their overall size and the size of their center hole; pony beads, which are larger, work too). Center the bead, hole up, in the flower area. Work all the detached chain stitch loops by coming up and sinking back through the hole in the bead. Come up through the hole to begin the spider web wrapping as well.
I don’t know if this is a question that would qualify for Stitch Play, but I could certainly use help. I’ve been trying to master the buttonhole stitch in hopes that I could do all sorts of wonderful CQ fan shapes and other motifs, but I have difficulty getting the stitches to stay in play. I don’t know if its my tension, the thread I’m using or what, but the stitches seem to loosen and the outer edge falls into the center. I’m fine doing a very close stitch (say outlining a leaf edge), but once my stitches widen out, the thread loosening starts happening. I usually end up adding a bead or couching stitch to the outer edge just to tighten up the stitches. Have tried a number of different threads, loosening my tension, but still have problems. Help!
Thank you in advance for whatever help you can give.
What a gorgeous class!!! Thank you so much for updating us with such lovely play-stitches!
Mary,
Thanks for posting this. If you did the padding stitches in red, then the spokes and woven part in black, it would be the perfect black widow for a Halloween piece. 🙂 Oh the possibilities.
Oh, Mary, this Stitch Play is FUN! Love this domed spider daisy and your carefully detailed instructions and comparison. If and when you have time, I’d LOVE to see a beehive done this way … my sister collects bee things, as her son is a beekeeper … I could embroider something for her with little bees and a beehive …
Thanks!
Cathy in PA
Thanks a lot, Mary. This is a really great way to build up padding.
I love the Stitch Play series….My only reguest is PLEASE, PLEASE continue……I am a long time stitcher and I love to add dimensional stitches to my pieces and these are a great help…I have created a special folder in my “favorites” to keep these instruction and the ones to follow, so I always know where to find them guickly
Hi Mary,
I love “Stitch Play”. The raised spider wheel is beautiful. Please, please, please show us how to do a raised beehive. I saw one a long time ago on a needle case, with hollyhocks around it, and since then I’ve been itching to make one of my own – didn’t know how to get about it. I have followed your instructions for a spider wheel and love it.
I’m quite new to embroidery and am so glad to have recently come upon your website and tutorials (videos have been especially helpful for me–a left-hander who has to think “opposite”). Your basics such as thread and needle choice, pictures of process, techniques, and detailed instructions have been so helpful and inspiring for me. They encourage me to feel that, one day, I really CAN make something beautiful. Thank you so much for sharing your skills and tips!
First, I want to say that I love your addition to your blog with stitch play. The raised spider daisy is great looking. I can’t wait to try it.
Belle Gallay
THANK YOU BEUTIFULL. CAN YOU PLEASE SEND ME ANOTHER CATALAGO PLEASE. AND I WISH YOU HAD CANVAS TO ENBROIRE READY TO BY. LIKE TEH PICTURES PAINT BY NUMBER ONLY INSTEAD OF PAIN I WILL ENBROIRE THE PICTURE . THINK ABOUT CANT FIND ANY PLEACE THAT HAVE THEM OR A BOOK WITH PAINTING FOR CANVAS TO ENBROIRE TO IRON THEM ON THE MATERIAL TENAK YO COD BLESS ECH ONE. AND AGAIN THANK YOU MAY ADRESS IS 8684 SIERRA AVENUE APT 312 FONTANA CALIFORNIA 92335 ANE TELL ME HOW MUCH IF YOU DICEDE TO MAKE TE PICTURES TO ENBROIRE TO PUT THEM ON FAMES GOD BLESS.
Hi Mary stitch play is a joy and a treat. the raised spider daisey is beautiful. thank you.
Elodia Hernandez
Wow… great work.I love to see yr smocking project too.like to make dress for my baby…
Hi Mary, I am looking for examples of Geometric Satins Stitch, but I cannot find any information in any books. A google search led me to Largatera (sp?) embroidery of Spain, but I am still unable to find anything in the library here. Can you help in Stitch Play?
Thanks,
Marian (NZ)
Marian: Try the spelling “Lagartera.” And possibly something that was popular in medieval Germany: Brick Stitch or Klosterstickerei; here are links to 2 tutorials that Racaire has posted, so you can see if either of these is the kind of ‘geometric’ you’re looking for.
http://embroidery.racaire.at – look down the Right sidebar for ‘tutorials’ for the Klosterstich – it’s a large PDF
http://embroidery.racaire.at/?cat=194 (under Brick Stitch on 22 Oct 2010 if the link doesn’t work)
http://wymarc.com/asoot/asoot.php
Oh, dear. You know those little “googly eyes” the craft stores carry, with the pupil loose in a clear dome?
Well, now I have to go stitch me up some alien bugs.
Mary
Thank you for this series. I am really enjoying it. There are stitches here that are not anywhere else. It has led me to expeiment with other stitches to get different effects with them. As a new embroiderier I would follow the stitch directions to the letter and felt they had to be exactly as taught in the books. Again thank you.
Glad you’re enjoying the series, Karol!!
Me gusta
Thanks for the great instructions and pictures!