


The Medallion Project is dragging out a bit longer than I had hoped! I did not meet my First Personal Deadline (which was Easter), nor my Second Personal Deadline (which was April 15), and now I’m pushing my Last Personal Deadline and Final Deadline of All (mid-May). I must be finished around May 15, because it has to be turned over the vestment-maker, to meet the June deadline. So it’s down to the wire! (No pun intended!) This may turn into a nail-biter!
Today I’d like to show you how I changed the order of work on the roses, and give you my reasoning behind that. You can apply the same principals to any embroidery – sometimes, you just have to change the “normal” order of work, due to some logical reason. I’m also going to show you the back of the goldwork, because this figures into my reasoning for changing the order of work.
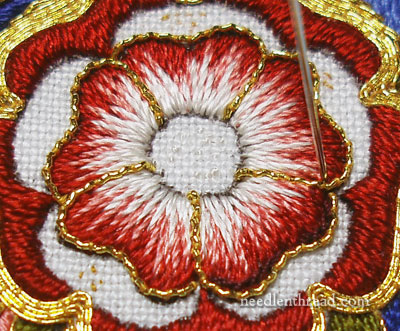
Last week, we talked about adding an outline to the Tudor-style roses on the Medallion. Most folks seemed to like the effect of the outline, though some didn’t, and that’s ok, too. I can see it both ways, but I did go with the outlining, for two reasons: 1. I do like it better with the outline – it gives more depth, and helps pick up the rose from farther away; and 2. it was in the plans, anyway (you can see that the original Tudor rose worked as a sample for this has the outline, too) – so it wasn’t just a spontaneous decision to outline, without having planned it or thought it through. The latter reason isn’t necessarily the best reason to do something, but it’s a fairly good secondary reason.
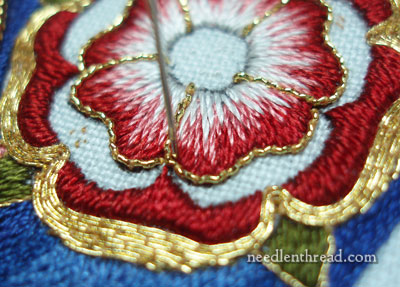
The outline was stitched on the different parts of the rose after the rest of the rose was finished. It was the last step. But as you can see in the photo above, I’m adding the dark outline on the inner petals before the goldwork on the tips of the inner petals is complete.
You can see the first petal outlined here (the lower right inner petal, with the dark line). At this point, I’ve couched the check thread that outlines the petal, but I haven’t worked the other gold that fills in the turn over on the petal (where the white linen is still visible). The outline inside the petal runs against the check thread (that wiggly gold thread outlining the petals), so it was necessary to have the check thread in place, but not essential to have the rest of the gold in place.
Now, the reasoning for doing the outline at this point was not merely whim. I wan’t bored with the goldwork and hankering to do some stitch with silk! You can probably guess why, but this photo below may help illustrate the point a bit better:
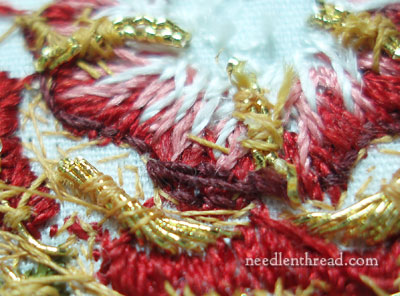
Here you can see just one side of the gold threads plunged from the turn-over on the inner petals. That bundle of gold thread will be mirrored by a similar bundle that will take up the rest of that white space in the photo, when the other side is plunged. It’s a lot easier to work the outline in the inner petals without this gold in the way!
I figured it was just smarter to outline once the check thread was in place, to save the frustration of running into the gold threads on the back and also to save the gold threads themselves. As much as possible, it’s good to avoid piercing the gold threads even on the back, because you can displace them, unravel them, and cause all kinds of mayhem by stitching through them.
So, when it comes to stitching, if there’s a good reason for changing the normal order of work, by all means, change it. There are times when you can’t change it – you can only stitch this element once that element is finished – but there are other times when it makes sense to switch things around a bit.
Someone asked me the other day if he could run side bets on whether or not I finish by May 15, or open some kind of “closest finishing date” pool. I’m pretty sure he was kidding, but if he wasn’t, I want it on record that I get part of the winner’s take!
I hope you don’t mind joining me over the next two weeks as this project comes to a close. I’ll keep you regularly updated on progress, but you can also expect plenty of other articles in the mix, as usual. I’ve got a really interesting beginner’s e-book for you (still have to read it myself, but it looks like a gem!), a challenging give-away / call for stitchers coming up (involving a specific kind of whitework – absolutely beautiful stuff!), and some other bits and pieces of stitchy interest. So stick with me!
And keep your fingers crossed for me!
See you tomorrow!
If you’d like access to all the tips and techniques discussed in the Medallion Project, including complete step-by-step coverage of the Tudor-Style Rose, conveniently collected in one document, interlinked, referenced, and indexed, why not add the Marian Medallion Project e-book to your library? It’s packed full of all kinds of embroidery tips for undertaking a project like this, all in a convenient electronic format for easy searching.
I’d bet it wouldn’t do the silk much good trying to stitch through all those goldwork tails either?
Good point, Gail – you’re right, of course! They can shred up the silk!
Yeah – makes great sense. Those pesky gold thread bundles are a bother on the back side.
On the bright side – at least this is rose two, or hopefully more that is almost done! You’re going to make it!
The original Tudor rose post said those they took 22+ hours a piece – but all the silk is done, except outlining! One of the 5 sections of dots is done (if you stick with what you’ve done and don’t change like was hinted at a few posts back.) You always finish strong, and we’re all here cheering you on. Best of luck!
Thanks, Carrie – you’re right, this is rose 2, but rose 3 is also done, and I’m doing rose 4 today. The dots won’t change. And you’re right, these roses are going faster. The first sample rose took as long as it did, because there was a lot of trial and error involved, but after repeatedly stitching the same rose, it goes a whole lot faster now! – MC
Mary,
I have confidence in you. All bendable body parts including fingers are crossed for you. It is a beautiful piece and I am enjoying your play by play commentary very much, better than the hockey games this year!
Cheers from Canada
Dale
Fingers AND Toes are crossed 🙂 My bet is you will meet the deadline. In the meantime, these comments are gems of wisdom. Good luck.
If you need to abandon us for the next two weeks in order to meet your deadline, we understand and will be patient. Drops us a crumb or two when you need to take a break from the stitching.
I’m so glad you figured out the problem you’d have had stitching the outline through the bundled ends BEFORE you finished the goldwork on all five roses!
Dear Mary
I agree with you I prefer the dark outline and I can see your point in stitching the outline before the bulk of the goldwork goes in, good idea. I really hope you get it done by or before the 15th May I’m rooting for you keep going.
Regards Anita Simmance
Mary, does doing the dark outline LAST disturb the spacing of the gold check and the gold threads at all? From your pics, it looks like doing the dark outline FIRST pushes the check out and down just a bit, which would mean you can now put down the gold threads more .. true(?) to the space they’ll permanently live in, instead of them being pressured to scooch over just a bit under their couching threads. I know it’s all a matter of hundredths of mm, but does that matter in a piece this valuable, supreme quality, and lasting?
… and my curiosity got the better of me — I am also sending you all good energy every way I can think of! You can do it!
I love watching you work on this project. Your closeup pictures are great. I would love to see the final vestment when the embroidered piece is added to it. You are an inspiration!
Thanks for showing the back with the bundles of gold thread.
I love reading your daily blog, but really Mary you are making me nervous about the end date. Get off the computer and get to work ha ha
Dear Mary,
My fingers and toes are crossed for you! I look forward to your posts but won’t mind skipping a day or three or five to know that you are stitching and can meet the final deadline with ease. What stunning work you do. You are an enormous inspiration. What a celebration it will be when the piece is completed!