


Last week, I showed you the finished goldwork edge around the inside cinquefoil on the Medallion Project. One recurring question from that article was how to achieve the sharp corners with the couched Japanese gold thread. You know, that was a problematic part for me, too!
The easiest path to take when couching the gold would have been to work in two continuous lengths of the Japanese gold, side-by-side, so that the threads only had to be plunged twice while filling that whole area – once at the beginning of the couching and once when the whole outline around the cinquefoil was filled. As efficient and dreamily pleasant as it would have been to not have to stop to plunge threads, the sharp angles at each corner would’ve been lost with that approach.
The only approach that would keep the integrity of the design and achieve the effect that I wanted to achieve was to plunge the ends of the gold thread at every angle – a process that made sense but took decidedly more time.
Today, we’ll look at how I took the sharp corners on the cinquefoil shape, using Japanese gold thread.
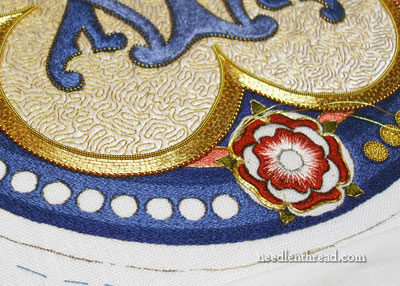
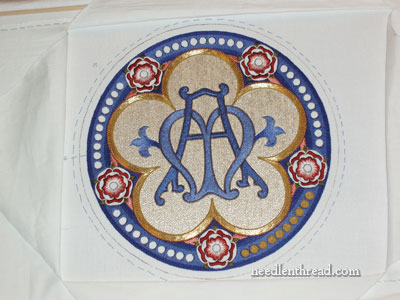
This is the gold that I’m talking about – that wider band of gold in a scalloped, five-petaled shape that surrounds the inside section of the medallion. In fact, one reader (Jenn) commented that this gold outline looks like a bevel, and that’s exactly what I was trying to achieve – a kind of bevelled edge around the cinquefoil shape, so that the center seemed to sit on top of the rest of the design. So I was thrilled to the moon to see Jenn’s comment. Whew! I wasn’t the only one who saw the bevel. (It’s always easier to see what you want to see – the question is, do others see the same thing?!)

So, to really get across that whole “bevel” idea, I knew the sharp angles where the scallops meet would have to be maintained and that a hint of a line along the angle would have to be somewhat visible. But with Japanese gold, it is pretty difficult to pinch a really sharp (acute) angle and keep that angle with each subsequent line of gold. With smooth passing thread, it’s a bit easier, because smooth passing is wire wrapped around a core. Japanese gold is paper wrapped around a core.
Plunging the gold threads at each corner guaranteed that the angle would be maintained and the area would be filled without any “softening” of the angle, and it would also create a somewhat visible line at each angle.
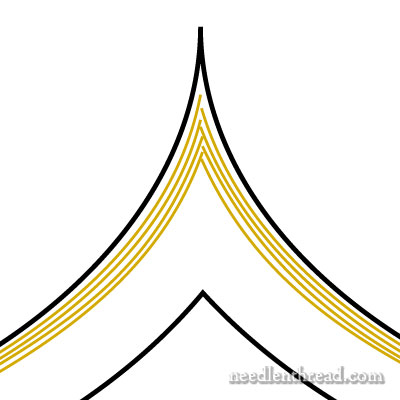
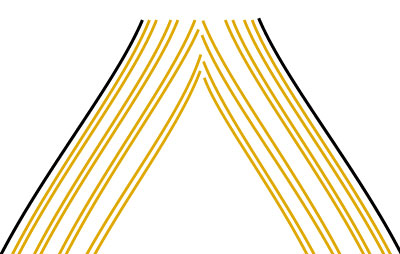
The gold threads are couched in pairs. At each tip of the angle, I plunged the pair of threads in such a way that they alternated placement with the pair of threads that would butt up next to them in the next scallop. The drawing above illustrates the placement of the threads when plunging them.
You can see the same idea in the drawing above, which was from the Goldwork Pomegranate project, where I explained how to do the same thing with smooth passing thread. In that article, I explain how to plunge the threads using a plunging needle. You can also plunge threads to the back using a plunging lasso. In this project, I find that the needle works better than the lasso, because the area is small and tight.
So, by slightly alternating the placement of the pair of gold threads along the angle, plunging them so they sort of “miter” together, I was able to maintain a very sharp angle and a somewhat visible “line” where the threads meet, to help enhance that whole sense of a “beveled” gold edge around the scalloped shape of the cinquefoil.
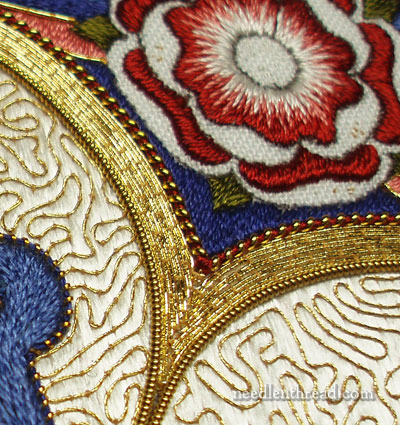
This photo, though somewhat sloppily taken, might give a better sense of the “bevel.” Do you see it?
That’s it then. That’s how I worked the sharp angles with the Japanese gold thread. You can apply these concepts to any of your goldwork projects, too – they certainly aren’t specific to this project alone!
If you’d like to see the progress of the Medallion Project step-by-step and pick up other goldwork or silk embroidery tips along the way, feel free to visit the Medallion Project Index, where you’ll find all the articles relating to this project arranged chronologically.
Tomorrow – let’s a play a bit with Stitch Play! It’s much more relaxing!
If you’d like access to all the tips and techniques discussed in the Medallion Project, including complete step-by-step coverage of the Tudor-Style Rose, conveniently collected in one document, interlinked, referenced, and indexed, why not add the Marian Medallion Project e-book to your library? It’s packed full of all kinds of embroidery tips for undertaking a project like this, all in a convenient electronic format for easy searching.
I really want to get into goldwork…. what is the best place to start? I’m thinking a kit of some sort, but I’m not sure where to get a good one.
Your work is just gorgeous 🙂
Hi, Shana – look up Berlin Embroidery online. Tanja has some really good kits for beginners – her goldwork sampler project is an excellent learning tool. She also has some other kits available on her website, and her instructions are really good, so it’s a great place to start. -MC
G’day Mary,
YES, I see it. Could see it in the first photo. That’s exciting and GRAND!
Cheers, Kath.
I, too noticed the bevel, but it looked like it went 2 ways…beveled in AND beveled out!! It depends on the angle of the curve. Just stunning…absolutely beautiful!!
Yes, I can definitely see the bevel. It’s so nice to see you take the time to sink the threads to achieve a sharp angle rather than taking the shortcut to a rounder edge. The project is coming out amazingly beautiful. I imagine that many years from now it will end up in a museum somewhere. I hope you can manage to put your initials and the year somewhere on a tag on the back of the medallion.
Cynthia, you are so on target about the signing issue! Mary! PLEASE sign your full name, and date this piece on the back where it will remain unseen, only to be found by conservators in generations to come. Putting on your web address will provide a link to this history of its creation (if the web is still around…even so, it gives it a chance). How often do we wish that we knew something more about the creators of past masterpieces? Wouldn’t YOU want to know about the makers of the Sion Cope for example? I sure would!
It’s just gorgeous, really. I hope you’ll post photos of it when it’s in situ, as it were, on the vestment.
Yes, I do see it! It does look beveled. That gold work really shines and sheens – so beautiful. What wonderful work you do.
This is good, Mary. Thanks for sharing. I *think* you could get sharp corners using Japanese Embroidery techniques, but sinking works just great too. Can I put in another plug for Japanese Embroidery? The metalwork techniques taught are very good, the best I’ve seen anywhere. They’re also very applicable to other forms of metalwork. OK, I’ll get off the pulpit now! Speaking of metalwork, I have the last part of my Phase X piece to finish, and it is……. goldwork! It’s a single strand of #4 real gold in a to and fro pattern, couched every 1 cm. Keeping it straight is a challenge! Have a great day, and thank you again for a great blog.
Oh yes…it’s definitely beveled, crisp, clean and shiny. It looks very, very good! Thank you so much for taking the time to tell us how you did it. Is the outer ring also going to be done in the Japanese thread? If so, would the starts and finishes be staggered to create a smooth ring?
Absolutely GORGEOUS! So inspiring. Thank your for sharing so many tips, tricks and techniques with us. I truly appreciate it.
Hi Mary, The drawings are really helpful to me. Sometimes it is hard for me to follow along without the concrete visual. I read the post below about the place to get started with goldwork. After a few more months of learning, maybe I will try those goldwork kits too.
Oh the bevel is definitely visible, yes! I showed the images to my mother and she was enthralled by your work. Thank you, as always, for sharing it with us.
I see the bevel, however to my eye, it’s the glow from the vermicelli work that really lifts the center from the background. I’d guess that if the background color of that, and the outside were reversed, I’d be saying that it looks as if the center were recessed.
Hi, Gail… Well, I don’t really want the center to look recessed. The lighter color should bring the center forward. – MC