


Back to the goldwork embroidery project I’m currently working on – now it’s time to add some gold! The first real metal threads added to the design are passing threads, and in particular, I’ll be using gilt smooth passing thread, in size #4, which is fairly small thread – about .35 mm wide.
For goldwork, I order my supplies from Tanja Berlin in Canada. Shipping is a bit more expensive, and the shipping time is a bit longer, so I always try to think ahead if I have a large goldwork project coming up. For some reason, I really like the passing threads that Tanja carries. I’m not sure who the manufacturer is, but they are different from other passing threads that I’ve ordered from other places. Another thread I order from Tanja is check thread, but I’ll talk more about that later, since I will be using it later on in this project.
In my stash, I have a good selection of frieze (or check purl) and smooth purl, as well as Jaceron (pearl purl), and I may be using those eventually.
So, I’m beginning the goldwork on this project with #4 gilt smooth passing.
For tools and other supplies (besides the smooth passing thread), this is what I’m using:
1. Beeswax – this is for coating the couching thread, to strengthen it against the metal thread
2. Gold-colored couching thread – for this project, I’m actually using YLI #100 gold (color #215). It is tiny, strong, and less visible than other threads that I often use (including Kreinik, 50 wt Tire Silk, and Soie 100/3). In fact, while working this project, it has become my Most Favorite gold-colored couching thread ever. (I have no idea where I got it…)
3. #11 Crewel (embroidery) needle – you can get away with a #10, which is easier to find
4. Chenille needle for plunging
5. Tweezers – essential for pinching threads and pulling things and all around usefulness
6. Small, sharp embroidery scissors used solely for cutting metal threads
7. Melore – for prodding metal threads around (The melore is not 100% essential – it’s a nice tool to have, and since I have one, I feel obliged to use it!)
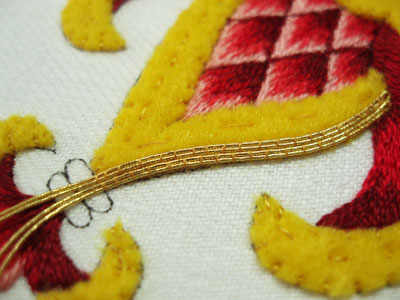
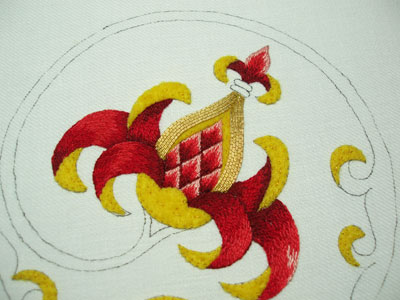
The outside of the body of the “fruit” will be covered with the smooth passing thread, which is couched in pairs.

I started with double the length of one side of the fruit, plus about 1.5″ for plunging. To create a pair of threads, I folded this length in half.
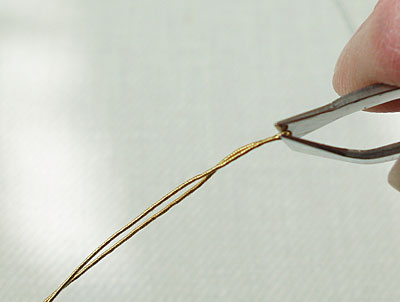
Using tweezers, I pinched the fold so that it was a sharp fold.
I started at the outside base of the side of the fruit, next to the petals, arms, peelings, bracts, or whatever you want to call them – those long curly things that I already embroidered. I ran my couching thread through the beeswax about three or four times to coat it well, and then ran it slowly between my finger and thumb to work the wax in and get rid of any extra wax clumps.
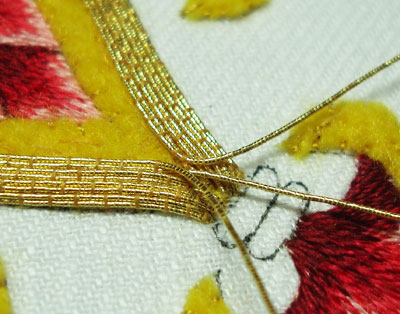
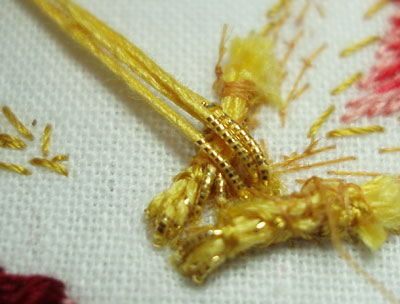
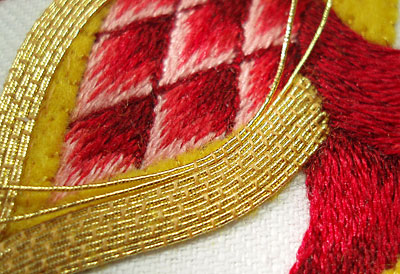
I anchored the stitch in the yellow felt, taking a few little tiny anchoring stitches. Then, I brought my needle up in the middle of the pinch of the gold thread, taking it back over the thread and into the fabric and creating the first stitch at the base of the gold thread, in the middle of the pinch. You can see the first stitch in the photo above – it is perpendicular to the other couching stitches.
The next couching stitch is just above the pinch, across the pair of threads, and pulled tight to hole the pinch together (but not too tight, as to distort the pair of threads). The pair of threads should lie parallel to each other, but not overlap, nor should one jump up and sit higher than the other.
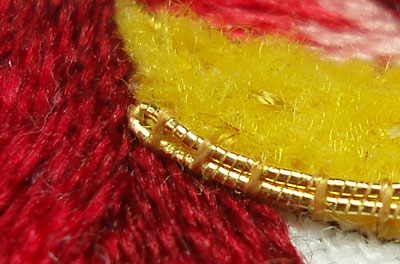
I worked two rows (two pairs each) on each side of the fruit, leaving a long bit of passing thread hanging over the tip, for plunging to the back.
As I couched each row, I tried to space my stitches between the stitches in the previous row, in a “brick” fashion.
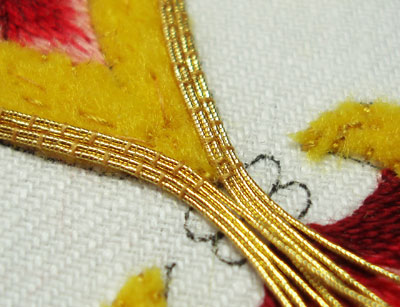
You can see here at the tip that there’s not enough room for another two pairs of passing threads, which would keep the side even, so I will stagger the placement of the threads, so that they miter into each other when I plunge them.
I should have gone ahead and plunged these threads at this point – but I didn’t. It’s always easier, in my mind, to plunge as you go, rather than leaving everything to plunge at the end. However, I don’t always practice what I preach!
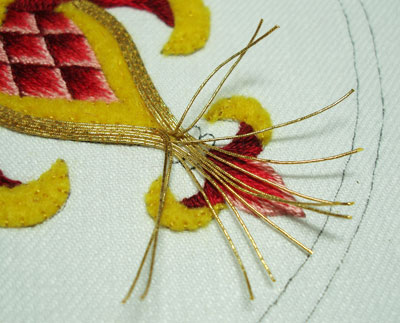
So I worked one more pair up each side of the fruit, and ended up with LOTS of ends to plunge.
Plunging is not my favorite part.
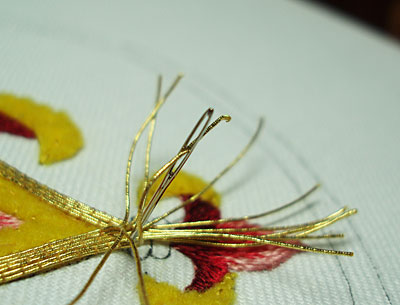
There are a couple ways to plunge goldwork threads. You can use a lasso formed of string and pull the passing thread through, or, if you’re using a fairly fine passing thread as I am here, you can use a chenille needle with a large enough eye to accommodate the passing thread. I used a chenille needle and worked from the outside threads towards the middle on each side.
Basically, to plunge the passing thread, you stick your plunging needle into your work where you want the thread to pass to the back, then I pinch the tip of the passing thread with tweezers to flatten it so it slides right into the eye of the plunging needle, and then you pull the plunging needle to the back. Now, the plunging needle doesn’t necessarily pass easily to the back of the work. Sometimes, you have to wiggle it back and forth a bit.
Eventually, it will pop through. (In fact, it sounds like a pretty good “pop” as it passes through the fabric to the back of the work.)

Concerning the middle area, if you look at the diagram below, even though the spacing is all wrong, this is how I staggered the placement of the threads for sinking them. On the third pairs up each side, one thread from each pair filled the gap left at the top edge of the flower, and then the other two were staggered and plunged to the back.
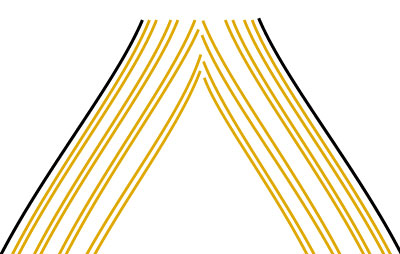
The rest of the threads filling the area were staggered the same way and plunged to the back.
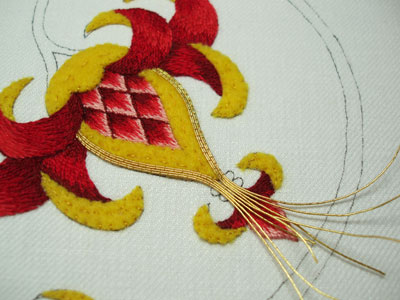
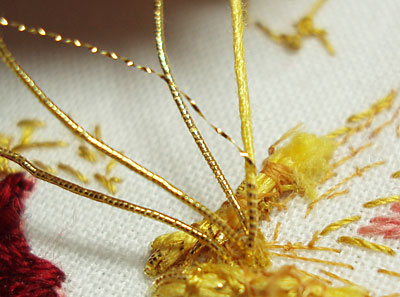
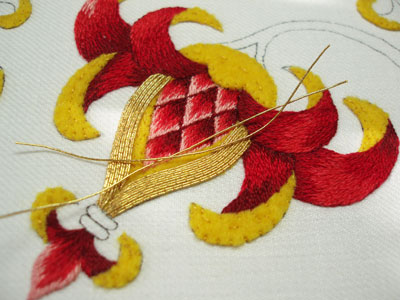
In the photo above, you can see the passing thread pulled aside to make room for plunging each thread down the center.
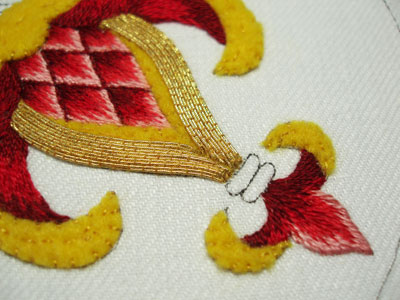
Where the threads were plunged, a line forms down to the tip of the embroidered center of the fruit.
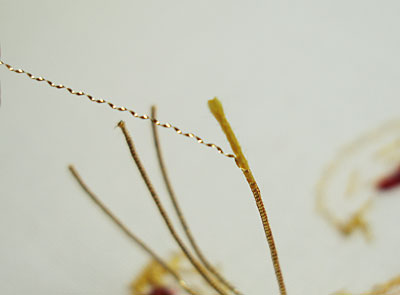
After the passing thread is pulled to the back, I strip the gold off, leaving the yellow core thread. To do this, you just grab the tip of the gold, and pull gently.
I strip the thread down to about a quarter inch from the fabric and snip the gold off. It’s easier (I think) to secure the “naked” yellow thread than to secure the gold-covered thread. It’s not a necessary step, but this is generally how I like to secure my threads on the back.
You can see that there’s still some gold left on the thread – you don’t want to strip it to the fabric, because you don’t want to risk pulling gold off the thread that’s on the front of the fabric.
And you can see that my secured threads on the back are rather clumpy and in a general mess. This really is my least-favorite aspect of goldwork – finishing off the threads on the back!
So there you have the first five pairs of smooth passing thread on each side of the fruit. At this point, I started staggering the base of the threads, too, in order to fill the rest of the felted area.
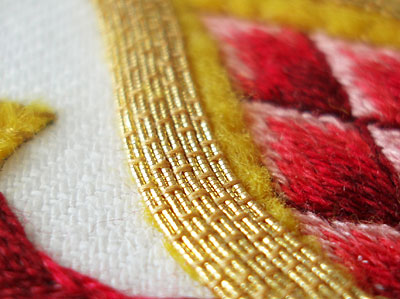
I love the look of smooth passing thread! It’s so rich and solid!
To fill the rest of the space, I cut two separate pieces of passing thread to form each pair. I left “plunging room” on both ends of the thread, so that I could stagger where they were plunged in order to fill up the uneven space remaining on the outside edge of the fruit.
The threads are couched exactly the same way as before, without the fold in the thread.

After filling up the whole area, I used gilt pearl purl, size #F1 to line the inside of the fruit.
I’ve already written a little bit about pearl purl and how it is used, so you may read that article if you are interested.
To get the pearl purl to fit in the tip of the inside of the goldwork area there, I pinched it with tweezers so that it bent sharply.
And that’s the first foray into the goldwork on this project! Next up, I’ll show you what check thread is and where I’m going to use it on this part of the design!
For all the posts in this series, please visit my Goldwork Pomegranate Project Index.
Hi Mary
Ah now I understand gold work! I honestly had no idea just what it was. How lovely is that – thanks to your clear pictures and description I am really tempted to have a go.
This is going to look so beautiful.
Kind regards
Janey from Bristol
G'day Mary,
I won't get to read all the post until tomorrow evening but have 'read' the photos.
I don't know what I was expecting really but certainly not to be amazed at the beauty of the 'thing'.
The stripped gold from the back of the threads would be nice couched onto stitched Christmas trees and decorations, crazy patchwork embroidery etc. Do you use them for anything or are they too fragil or sharp or ….?
Anyway, it made me feel quite excited to see those gold threads being laid down. It's beautiful, really beautiful.
Appreciate your enthusiasm. It hurtles across the world and loses none of it's sincerity and fun in the coming. Thank you again for sharing.
Another one of my stray thoughts comes to mind. My son had a turtle that was old and slow. It was replaced with a new one that is very lively so he's called it Hurtle the Turtle. Ha!
Thought should delete the turtle story but then, what the heck, gotta make your own fun in the bush!
Laughter surely must be the laid gold pathway that afforts us easier travel in life.
Cheers, Kath.
Stunning! Really beautiful!
Question & comment: Couching seems to be a necessary evil with Goldwork. The yellow threads break up the smooth sheen. However, the distant photos make it appear to have a gorgeous shimmery gold look so it's not a "bad" result; you mentioned the smoothness of the passing thread but it seems somewhat obscured. Would you ever use a gold sewing thread instead or is the strength of linen thread necessary to hold down the gold? Suggestion to gold threadmakers- build in a small exposed loop from within the yellow inner thread, a picot loop for bottom attachment using one of the applique stitches, which are really fun to do, especially the invisible ones. Anyway, as a "non-Goldwork-er" I want to thank you for the detailed photos and for sharing your lovely works of art.
Wow! I wonder if I will be able to do anything like this but I am off to shop for some of the supplies tomorrow, I cannot wait to try this. Thanks Mary for your clear intructions and beautiful pictures.
This is absolutely gorgeous! Every post I am more and more amazed at your talent! I am on the hunt for a project on which I can use all of these techniques!
I think these are the most clear directions for gold work I've seen. Thank you Mary! The piece is looking very regal. I can't wait to see it finished. Thank you again for a wonderful documentation of how you're doing something.
I am just enchanted by your beautiful work! It's wonderful that you take the time to show these techniques and not let them become lost skills.
Thank you once again Mary for all you do for us! The photography and the step by step directions are great. Someday I'm going to give this a try and I'll come back to these tutorials.
Aloha Mary,
Just an FYI for goldwork fans. The scissors for goldwork have one edge that is serrated to make cutting the gold easier and these should not be used for threads so as not to dull the blade. They are not cheap but the right equipment saves frustration.
How did you decide on what size passing thread to use ?
Aloha Mary,
A question about the couching of the felt. Your felt couching stitches look slightly slanted, not perpendicular, is this so as not to "cut" the felt?
Thanks, Jacquelin
Hi, all – thanks for your comments.
Kath – The remnants after stripping the thread are pretty sharp on the edges. I suppose they could be used for something, but I don't generally save them for anything.
Laura – The couching threads are not generally too visible, especially from far away. I don't see them as a necessary "evil" – they are often used to form patterns, etc., and I've never really thought them to be a distraction from the gold. If they're done neatly, I think they look nice. But then, I've always liked the look of couching.
Jacqueline – true, they do make serrated edged scissors for goldwork, but I've never found them essential. I have a pair, but I never use them. They're one of those things I bought thinking they were essential, and regret putting the money into them. I prefer a very fine, sharp blade that slides between the pearls on the pearl purl and between the coils on smooth purls and check purls. I've never experienced frustration with them. They work great! They have larger finger holes, too, so they are quite comfortable to use
How did I decide on what size passing thread to use? I use the threads I like best – the #4 (and #5) consistently creates a nice smooth coverage, they're easy to work with, and they are exceptionally pretty – they gleam gold, without showing the wrap, like the larger Japanese threads. Plus, the area to be covered is rather narrow – I could fit more of the smaller threads closely together to create a smooth finish, rather than having fewer larger threads that look bumpy or corduroy-like.
Thanks again for the comments!
MC
WOW- I had no idea what to expect with this Goldwork project and I am blown away. Thank you for introducing Goldwork to me. My horizons have been widened!
Very beautiful Mary. When you strip away the gold from the thread on the backside, do you have to anchor down the piece of gold that remains? Or does it stay? If you don't mind me asking, how much do goldwork threads cost?
Oh wow, thanks for the tip about unwinding the gold from the thread before securing to the back, you just solved a giant source of annoyance for me!
How beautiful Mary! I love the red with the gold…I haven`t tried any of this yet, but your instructions are so clear i`m very VERY tempted…
You are really making me want to do this project with you, I can't wait to get a little more experience under my belt! If I had started this with you I think I would still be preparing the ground fabric. I think I can, I think I can….!!!
Danielle K.
Mary, Gutermann polyester gold-colored sewing thread seems to be the most-used thread for goldwork projects that I've done/am about to do/have seen. I'm guessing that the reason you prefer the couching threads you've listed is because they're finer-gauge?
I'll second what you said about the serrated-edge goldwork scissors. I've found that they don't cut cleanly enough. Do you designate one of your pairs of embroidery scissors as metal thread scissors or do you use a sturdier pair for that purpose?
Finally, do you ever use invisible thread for some of your couching? I just heard that the Royal School of Needlework once considered this verboten but now allows its students to use it for couching certain types of gold thread. (It's a bear to work with, though.)
Hi, all – thanks again for further comments. I'll see if I can cover some questions here!
Tania – glad the horizons have been widened. Careful. It's addictive!
Bonnie – the gold on the back gets anchored in with the whole thread. I just sort of tie it all down, but stitching over the thread folded on the back. It doesn't ravel off unless it snags or you pull it. It's pretty tightly wound. Goldwork threads, if you think in terms of length, can seem rather expensive compared to regular embroidery floss, etc. But if you go with gilt rather than 2% gold, you'll save a bundle there. Also, with goldwork threads, in most cases, a little goes a long way, though it's always best of have more than you need than to run short! If you check out the links in the article above to the two places I buy gold threads, you'll get an idea of the prices. Certain real metal threads are much more expensive than others – for example, pearl purl, once you venture into the large sizes, starts climbing dramatically in price, and if you're looking at it in the 2%, it can be really rather expensive. But overall, yes, you'll find the threads more expensive than regular embroidery supplies, but you can economize by working with gilt threads and also with using the gold as a 'touch' in a piece, rather than using it as the bulk of the whole piece.
Hi, Lorena – glad I was able to help you with an annoyance!
C'mon, MJ and Danielle – dive in! You'll love it! Funny thing about goldwork – as far as the stitching itself goes, it's really quite simple. For this type of goldwork, there are no complicated stitches involved! It's the manipulation of the metal threads that is the more difficult element.
Hi, Janice – I've used the Gutermann thread before. You're right – I like this better because it's a much finer gauge, and it's a "real gold" color, rather than a yellowish color. For the scissors, that's just it. I get a cleaner cut with regular edged, small, sharp embroidery scissors. I have a designated pair of embroidery scissors for metal thread work. They are a fine-tipped, thin-bladed Dovo scissors with slightly larger finger holes than some embroidery scissors, which makes them more comfortable when cutting the tougher threads (like pearl purl).
As for the invisible thread, I was going to mention that you "can" use nylon or manufactured thread that's invisible, but I don't like it, so I didn't bring it up. First of all, it's h-e-l-l-ish to work with. It adds another layer of "intensity" or stress to goldwork, because it just isn't pleasant to stitch with that kind of thread, in my mind. Second, it slides in between the wraps even on the passing thread, with a kind of cutting effect, though it doesn't actually "cut" the thread – it just cuts into it, if you know what I mean. Third, it has a tendency to seem stretchy, though I suppose it isn't "stretchy" in an elastic way – but it does give. I don't like the way it feels when I stitch with it. So I'm not one to go for the invisible threads, personally. Again, I like the look of the couching threads on the passing threads – as long as it is subtle. I don't necessarily like to use a thicker, heavier bright yellow, but this YLI stuff is great, and so is Tire Silk. I like them both.
Hope that answers some questions.
And gosh, I just re-read my post and realized that there are a heap of writing errors in there. It was late at night!!
Thanks again for your interest and enthusiasm over this project! It keeps me fired up and eager to work on it!
MC
I second the recommendation to avoid invisible thread. I've used all sorts of eccentric threads in my time without turning a hair, but the invisible thread was a pest, a pain, and a trial from start to finish!
I'm really enjoying the development of this project, Mary – thank you for sharing it with us!
I jsut found your site. I am stunned. This is so beautiful!!! Amazing! Thank you so much! I am very interested in embroidery, defferent types, in old pieces too. I will study your site.
Larissa, Moscow, Russia
I do use dark invisible thread for tacking and basting, especially for counted work. It's great because you can't stitch through it – the needle bounces to one side or the other – and therefore it is really easy to remove when you are finished. The only reservation is that it needs to be a little thicker than some on the market. It also needs to be fastened on and off securely with several stitches.
Jacqui (in Auckland, New Zealand)
Mary,
I'm an addicted follower of your blog and beautiful embroidery. I've already learned alot from doing the long and short stitch tutorial you so kindly shared with us.
Learning Goldwork has been a dream of mine for about the last 10 years and I'm thrilled that you are taking us step-by-step through this gorgeous project.
I am signed up to have a thread painting class with Tanja Berlin in June through our EGA chapter….and she will be bringing some of her kits, supplies with her when she comes. She has asked our chapter what kind of supplies to bring….can you tell me what I can put on the list in regard to this project? and in regard to what you like to have in your goldwork stash from Tanja? This would save some mailing expense for me. I am very confused when it comes to ordering the metals for this. There seems to be a vast array of them.
Thanks again for being such a fun mentor to all of us!
Carol DuVall
Estoy realisando un trabajo con canutillo en oro, quisiera afinar mi tecnica, me podrian dar un consejo como bordar el canutillo por favor, gracias
Been wandering through and looking at goldwork pictures – lovely to see. About plunging threads to the back – I learned a spiff way from Jane Nicholas in a class I took from her last year. When plunging wires to the back, she recommends using a large-eyed chenille needle, and then stopping with the eye halfway through the fabric. Then she threads the wire or gold thread through the eye of the needle from the top so it comes out of the eye under the fabric. This way, when pulling the needle all the way through, there is only one width of thread going through that hole, instead of two widths (i.e., that thread folded). It doesn’t take the same strength to get the thread through the fabric that the traditional method takes.
Hi, I’m looking for a needle used for “Bordo” stitchery. It is used for carpets and tapestry. After passing the thread (which are loose) you cut them and that gives certain thickness to the carpet or tapestry. Thanks in advance, María – Argentina
Hello Mary,
Thank you for this helpful sites. I am a learner who started doing goldwork embroidery last summer. I just finished my second goldwork project a few days ago.
I note down the process of my handicrafts on a site because everything is new for me, no matter what I learn about goldwork. I feel it is handy, and I had set up some links to other websites on the side bar of my site so that I can see the pictures of their educational works easily.
I linked your sites, so I wanted to say thank you.
I am a Japanese Christian from Kyoto. I make altar linens and upholstery for church: corporal, chalice pall, offering bags, burse, chalice veil….
With kind regards,
Kiyoe
Thanks, Kiyoe! I’m glad you find it useful!
Mary, I would love to try this piece, but can you please tell me how much Passing Thread, cause if I am reading berlinembroidery site correct it’s sold by the yard?
Please help, I love your work and I have spent my hours just looking through you website hoping one day to start one.
Thanks Lynn
Hi, Lynn – I’m not exactly sure of the yardage. I’d imagine if you order 5 yards, you’ll be safe. It’s been quite a while since I worked this project! Hope that helps!
Thank you for sharing your magnificent project. It is just stunning, and your work is fabulous!!
I’ve had 3 x 2 hour sessions learning how to do simple goldwork, and I love it. Later this year I hope to have a project to do, and a few more hours of tuition. I’m not good at designing, and finding it hard to know which type of threads/purl/ beads to use in specific areas of a design. I’m finding your posts very interesting, thank you.
Hi, Julie! I’m glad you find the articles helpful!